Software
Substance Painter 2019
Photoshop CC
- Import from Blender
- Baking
- References
- PBRs
- Basic Material
- Masks
- Hide Seams
- Paint a Scene
- Export Maps to Blender
- Principled BSDF
- Particle System
- Smoke Simulation
- Basic Lighting
- Depth of Field
- Global Configuration
- Memory Management
- Post-production
It is necessary to know the basics of Blender and Substance Painter
Preparations
Blender 2.79 & 2.80
- Concept
- The Artist
- Folder Structure
- Camera Management
- Background Image

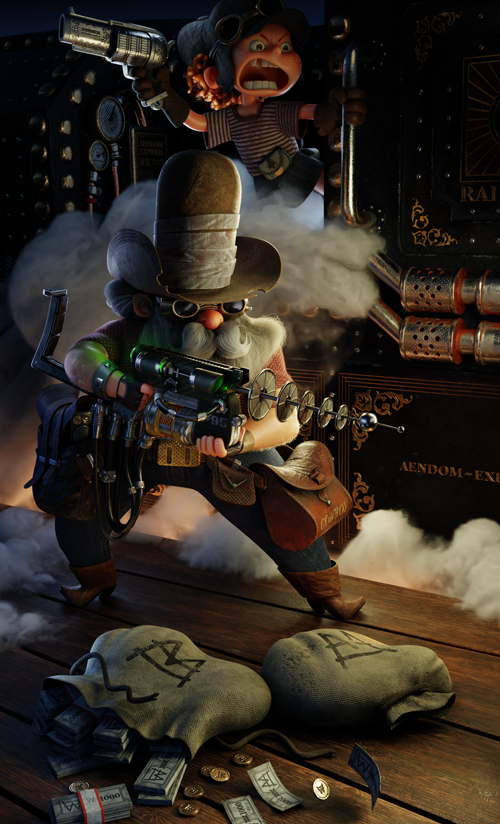
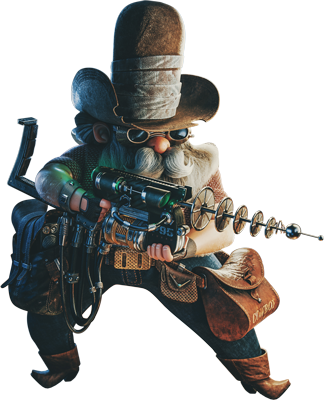
1.1 Concept
Finding an image that excited me, so I could be able to develop it in high detail.
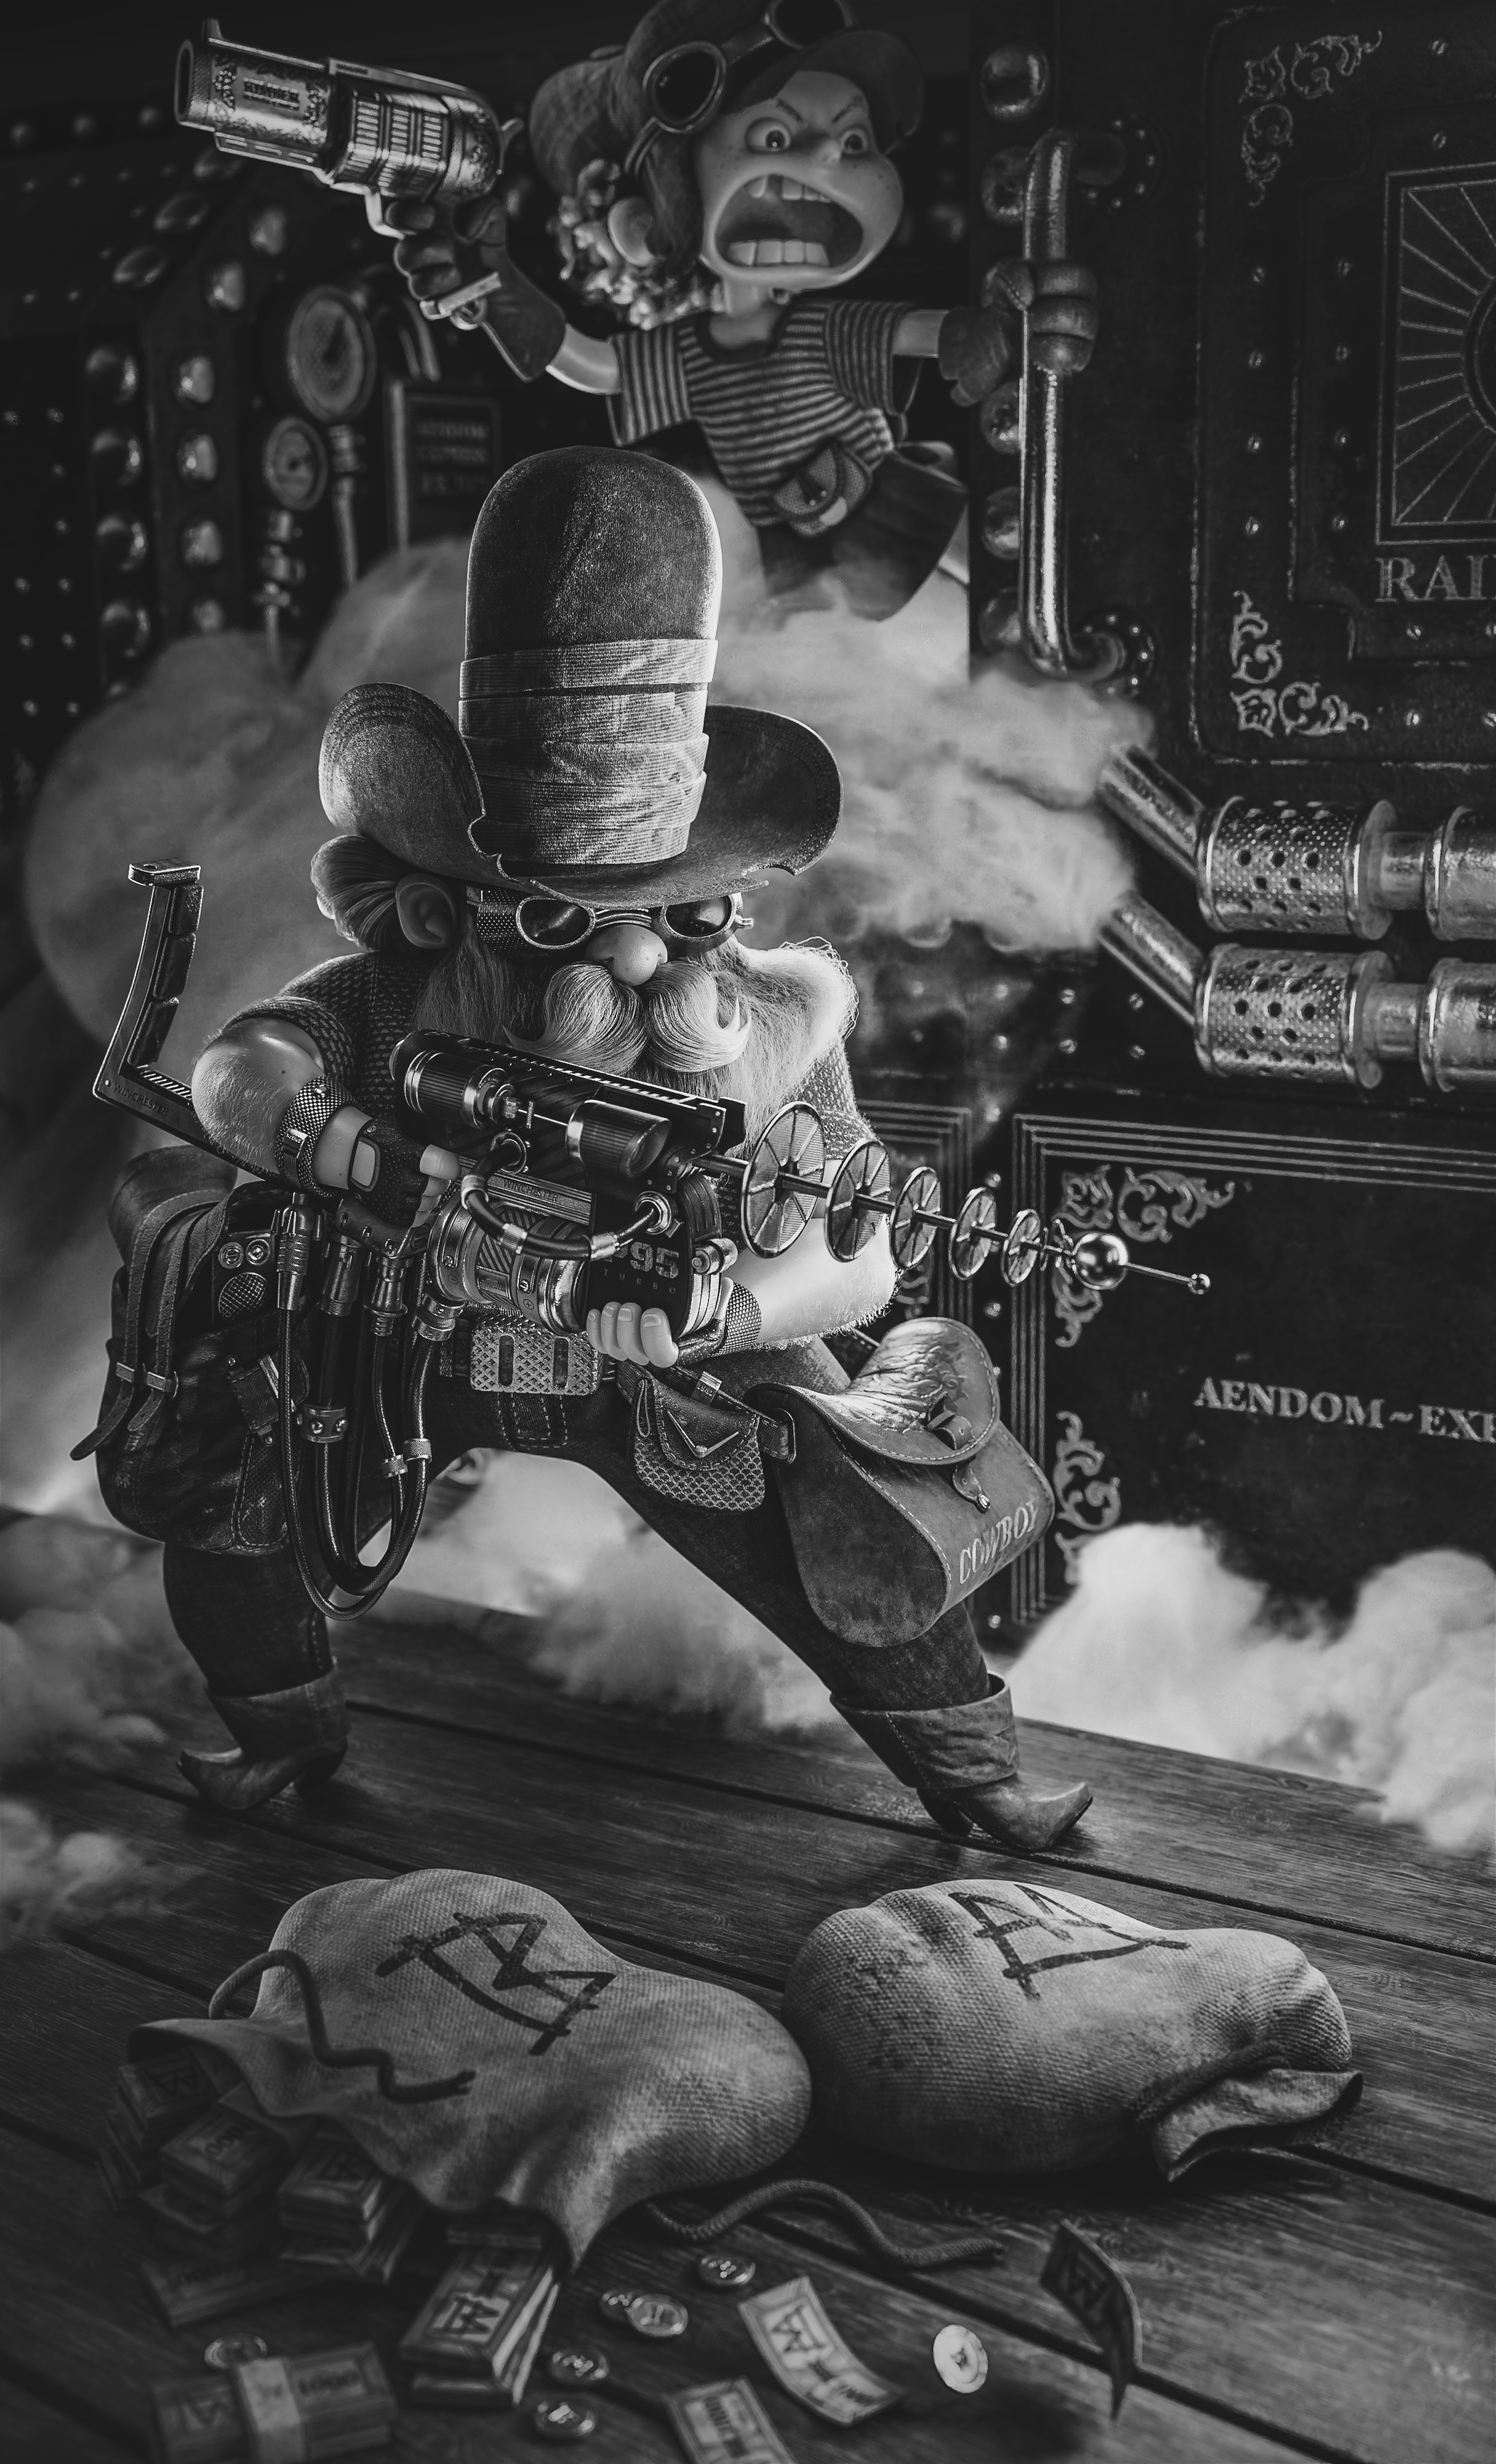
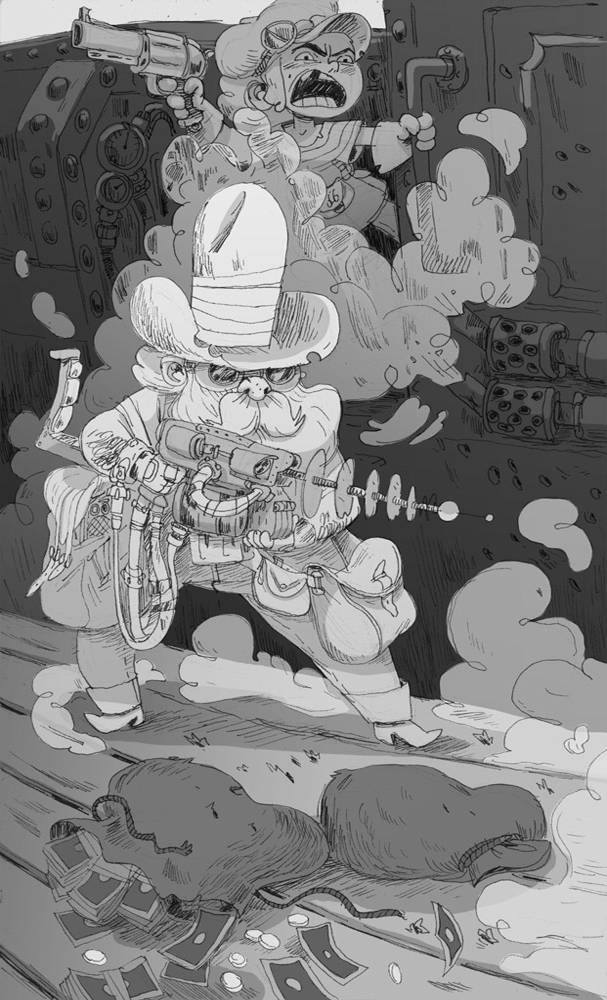
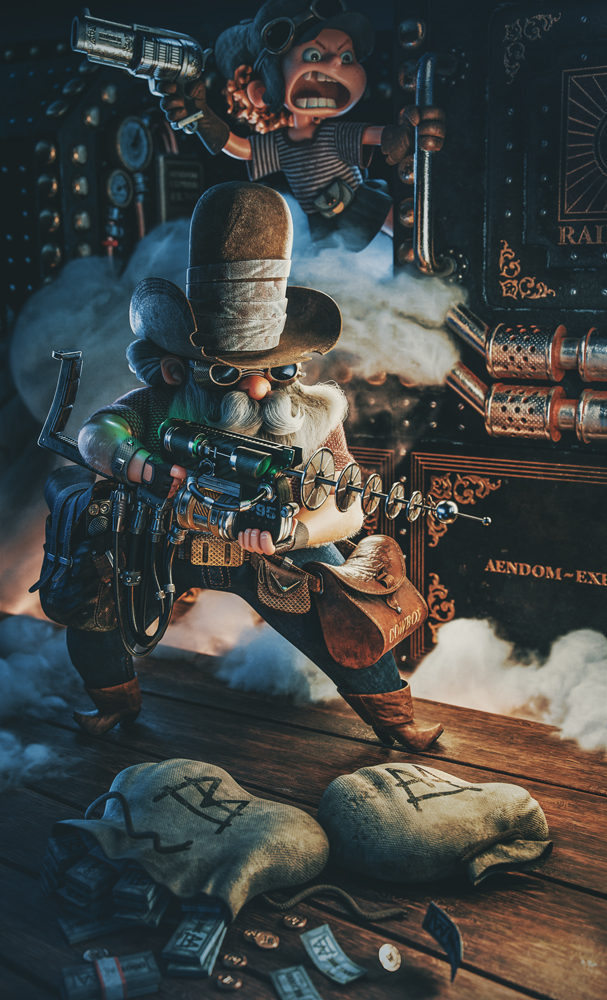
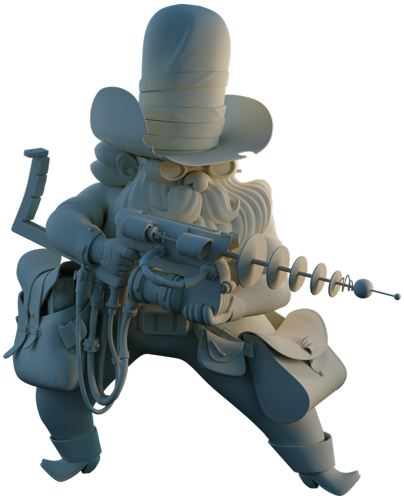
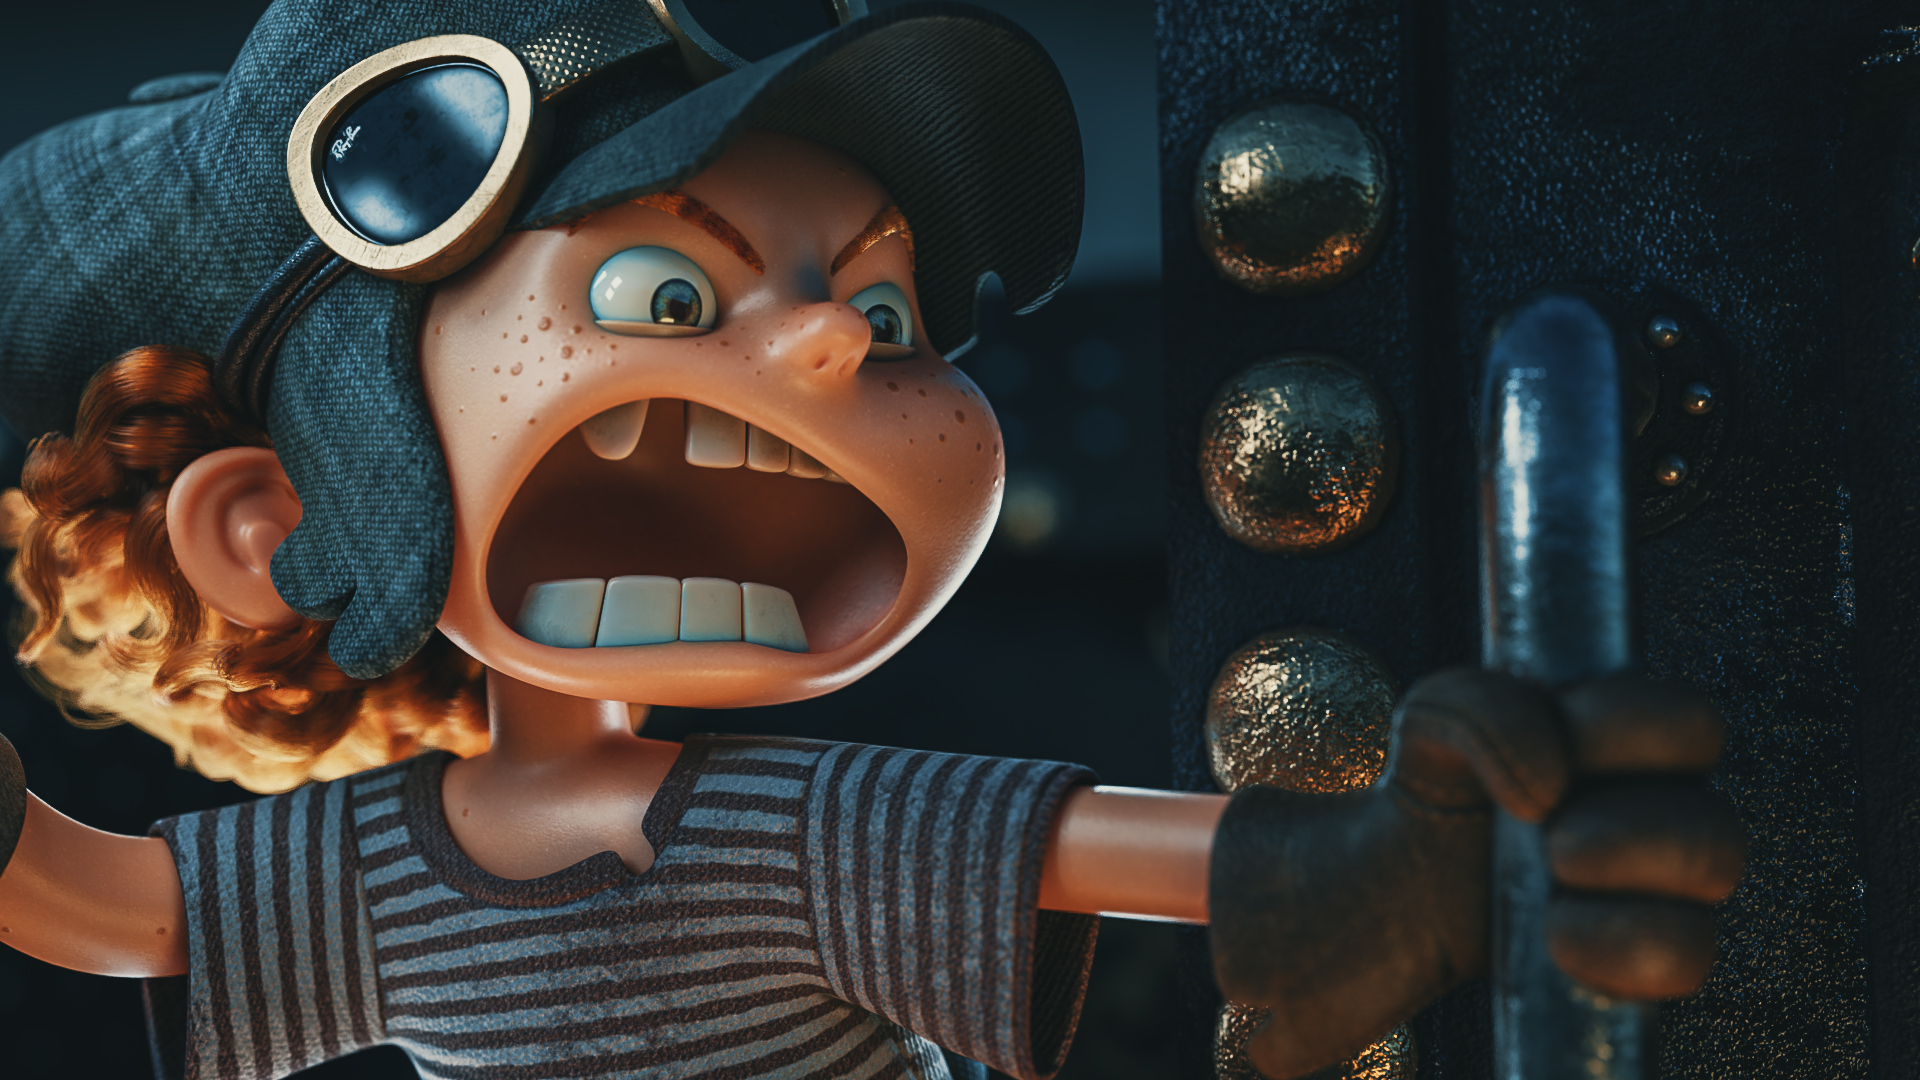
I fell in love with the illustration “Laser Cowboy” from the first moment I saw it, the mix of humour and seriousness made me choose this project. The goal was to make the scene feel like a Stop-motion, using references like Laika Studio, Wes Anderson and Tim Burton. I Used the version of Blender 2.79 in most of the stages, and with the experimental version used the new materials; For hair Principled Hair BSDF and Principled Volume BSDF for the smoke. It was rendered with CPU + GPU, and finally translate the workflow to Blender 2.80, getting ready for the release of the final version.
1.1.1
1.2 The Artist
Behind a great artwork, lays a great artist.
Gaspard Sumeire is a master storyteller, with a single image you can feel the emotions and intentions of his characters. Passionate about the comic strip, he studied at Emile Cohl (Lyon) where he discovered animation, then entered the School of Goebelins. Graduated in 2013 he now works for the animation industry and occasionally is an illustrator. Asked permission to use one of his works for my next 3D project. Gaspard agreed with the idea. With that, doubts about the project were avoided and my commitment grew exponentially.
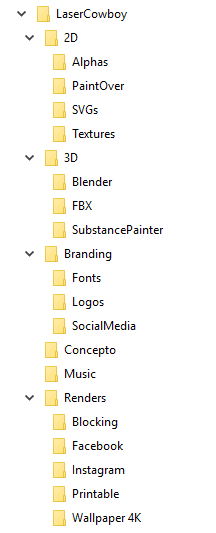
1.3 Folder Structure
Having order in your folder structure does not guaranty success in your project, but it does make it easier
I divide the assets into six main folders, The 2D folder has the alphas, sketches, final textures and vector images in SVG. The 3D folder has the Blender scene, FBX files and the Substance Painter project. Branding folder contains the Fonts, Logos and ideas for social networks. Concept folder contains the original concept image. Music folder has the music for the videos. The Renders folder with Blocking, images for social media and printing.
1.4 Camera Movement
It is necessary to have a camera in the scene to put a background image.
Blender 2.79 & 2.80
The workflow is the same in both versions of Blender
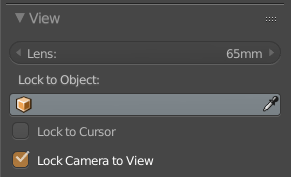
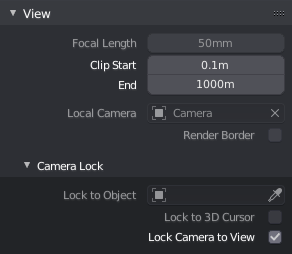
Started by placing a camera with the same proportions of the concept image that I’m going to model. I add a camera with Shift + A and select Camera, I arrange it into position and click on Numpad 0, to see from inside the camera. Use N to view the properties menu of the viewport. In View used Lock Camera to View, and move the camera with ease, when the correct position is reached, remove it so could no longer move. This makes it easy to know what will be inside and outside the shot when modeling.
Blender 2.79
1.4.1
Blender 2.80
1.4.2
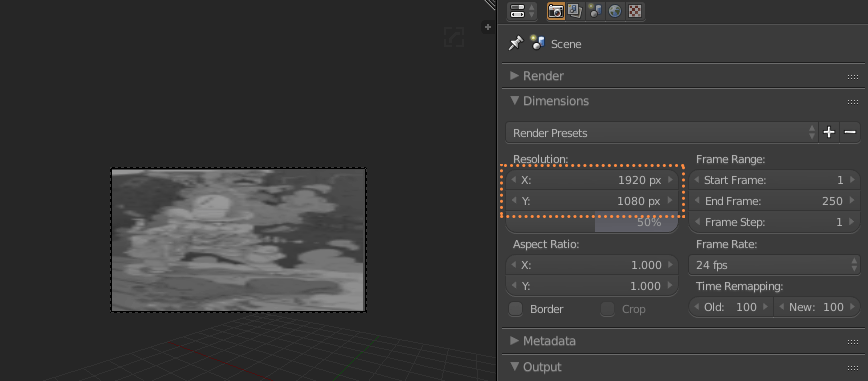
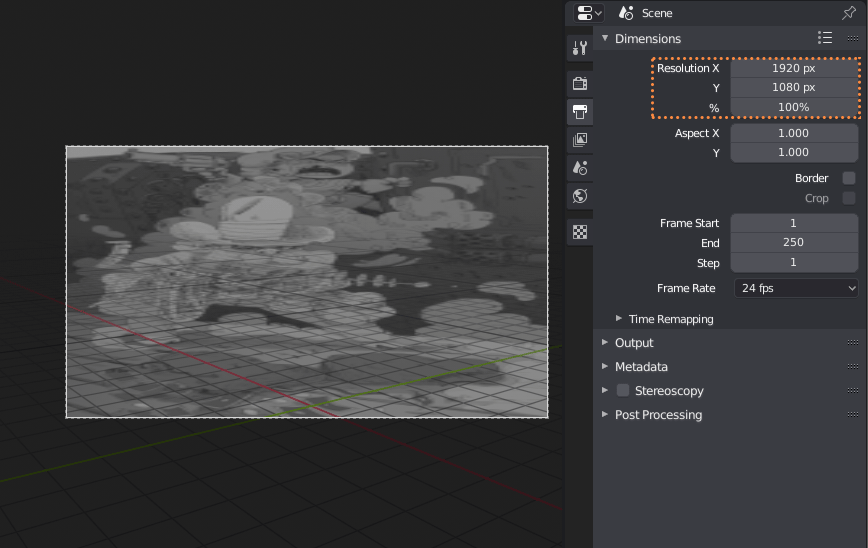
1.5 Background Image
Putting a background image helps having identical proportions to the concept ilustration.
Blender 2.79
Exclusive to this version
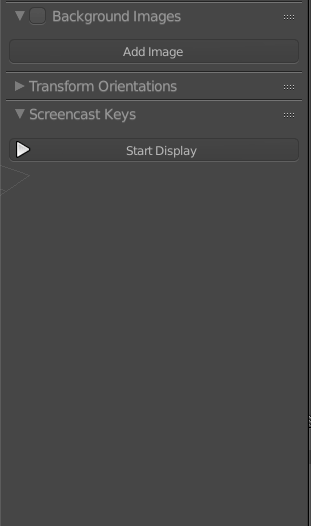
To add a background image I go to the properties menu of the viewport with N, then to Background Images and click on Add Image and Open to choose the image (1.5.1). If the image does not have the correct proportion it is necessary to go to the Render menu in Dimensions and change the resolution in X and Y of your image (1.5.2)
Blender 2.79
1.5.2
Blender 2.79
1.5.1
Blender 2.80
Exclusive to this version
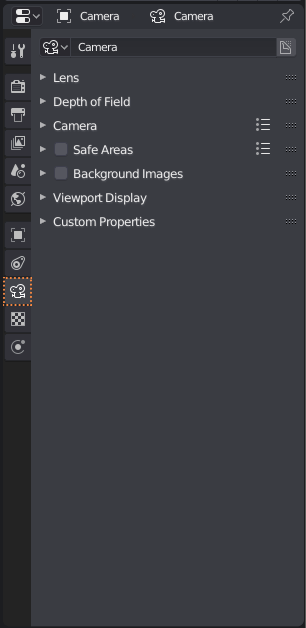
To add a background image select the camera in the properties menu, select the camera icon, activate Background Images and click on Add Image, then Open to choose the image (1.5.3). If the image is not in the correct proportion it is necessary to go to the Output menu and click on the icon of the printer. In Dimensions, change the resolution in X and Y (1.5.4)
Blender 2.80
1.5.4
Blender 2.80
1.5.3
Modeling
Blender 2.79 & 2.80
- Poligonal & Sculpting
- Retopology
- UV Maps
- ID Maps
- Export to Substance
2.1 Polygonal Modeling & Sculpting
Sometimes it is necessary to combine poligonal modeling and sculpting
Blender 2.79 & 2.80
The workflow is the same in both versions of Blender
When the object is simple, Polygonal Modeling is sufficient and you can sculpt details at the end. If the form is complex, first make a very basic Sculpture, then a Retopology and at the end sculpt the final details. In this part of the process, I used only 3 modifiers, Solidify to give thickness to planes, Subdivision Surface to subdivide the model and Multiresolution to add details in Sculpt Mode.


Blender 2.79 & 2.80
2.1.1
Beard
Started with some spheres, in Sculpt Mode activate Dyntopo to give it the general shape of the beard and add some detail, then Retopology to give shape to the mesh, finally add the modifier Multiresolution and again in Sculpt Mode give some last details.


Blender 2.79 & 2.80
2.1.2
Body
With cylinders and boxes I make the base, detailing general forms in Sculpt Mode, making a Retopology and refining the form, at the end I added the modifier Multiresolution and sculpt some details in Sculpt Mode.


Blender 2.79 & 2.80
2.1.3
Hat
The base is a cylinder and a plane, I use the Solidify modifier and the Grid Fill tool, then the Multiresolution modifier to add the last details in Sculpt Mode.


Blender 2.79 & 2.80
2.1.4
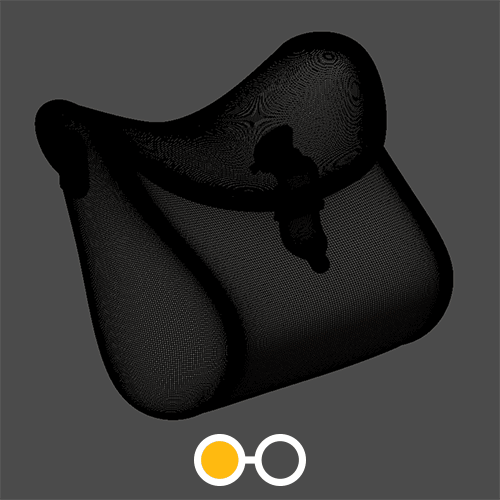
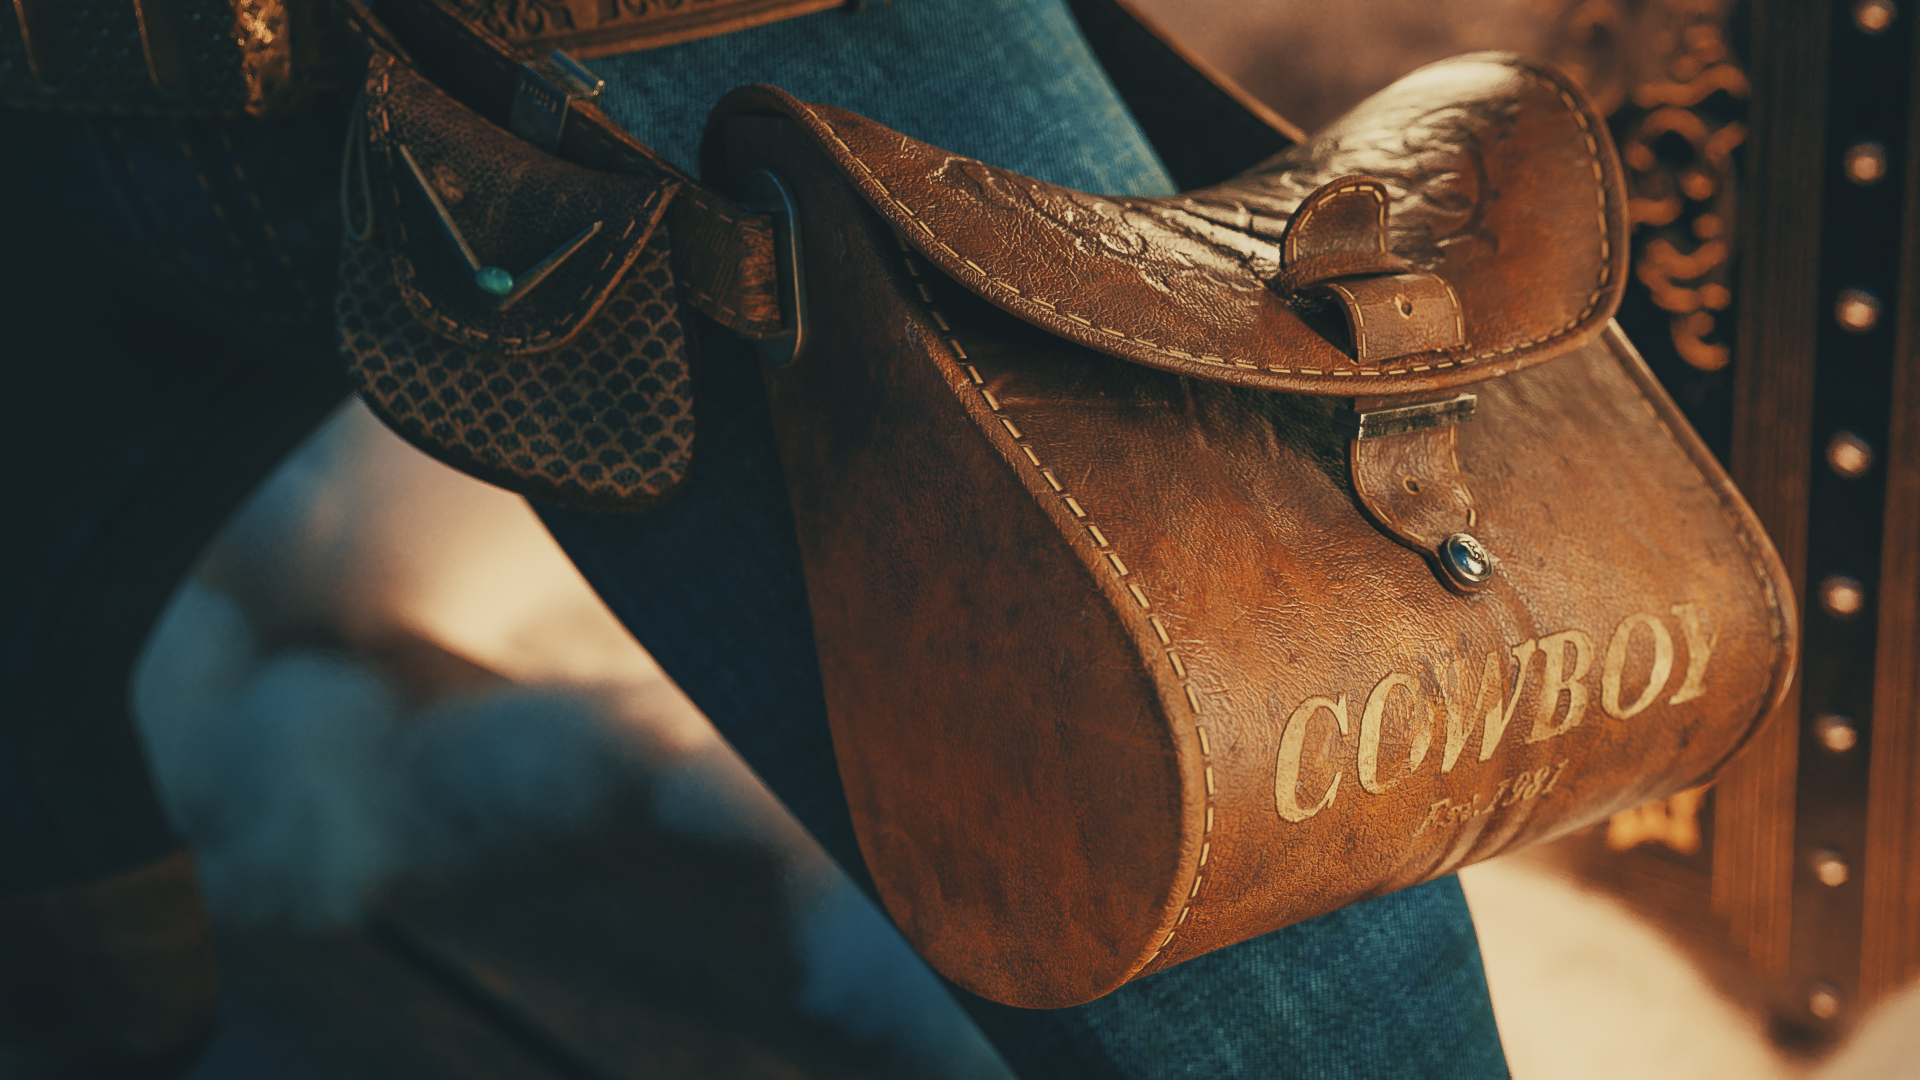
Bag
Making the base with a cube and some planes, giving thickness with Solidify and then doing a Subdivision, add Edge Loops. Finally a Multiresolution modifier and add detail in Sculpt Mode.


Blender 2.79 & 2.80
2.1.5
Exhaust
Added a Cylinder, made holes in zigzag, then added the modifier Subdivision and then the Solidify and apply it.


Blender 2.79 & 2.80
2.1.6
Cables
Add a Curve, give it thickness with Bevel Depth and turn it into Mesh.
SHORTCUTS
Vertex Bevel / Control + Shift + B
Mesh from Curve / Alt + C
Add Loop / Control + R
Grid Fill / Shift + A
Extrude / E
Scale / S
Fill / F
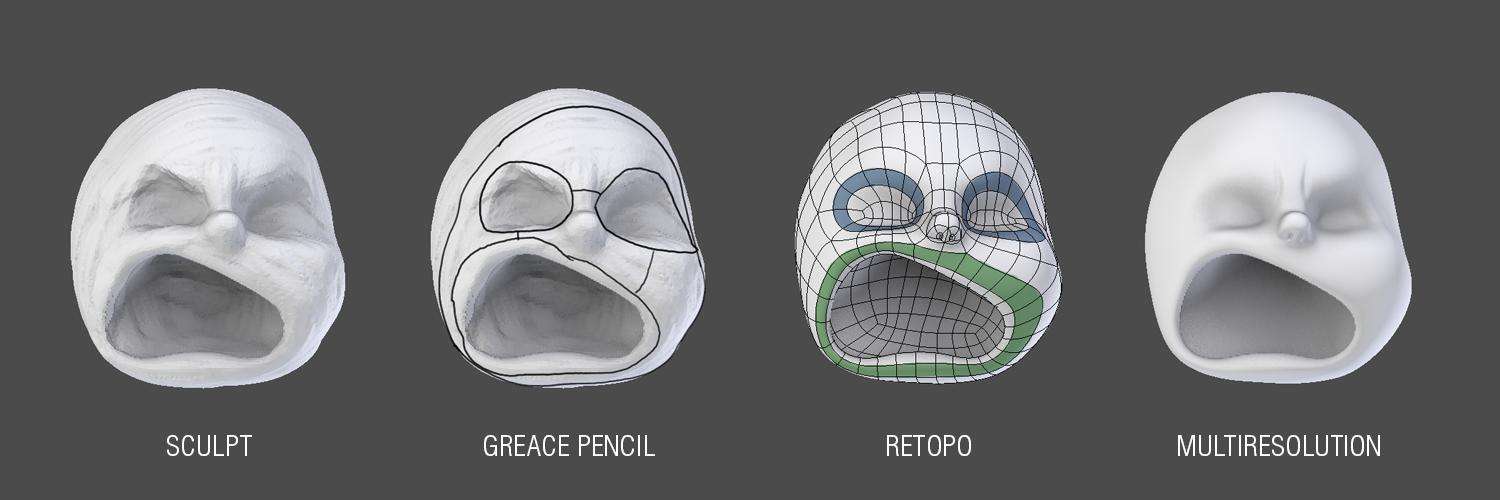
2.2 Retopology
A clean topology makes our work easier, use less memory, and is necessary to animate a model correctly
Blender 2.79 & 2.80
The workflow is the same in both versions of Blender
Started by sculpting the face with rough shapes in Sculpt mode, then with the tool Grease Pencil drew some guides for the topology that I look to achieve, then I do the Retopology, finally add the modifier Multiresolution and sculpt some last details. Used the Add-On “F2” which accelerated this stage quite a lot with the option to create Faces with the “F” key.
Blender 2.79 & 2.80
2.2.1
ADD-ONS
F2
(also known as the ‘spider-script’) extends Blender native functionality of creating faces. It allows you to create a face from a single vertex selection or a single edge selection, while retaining all the built-in functionality. Simply enable the add-on, and pressing the F-key will be better than ever before.
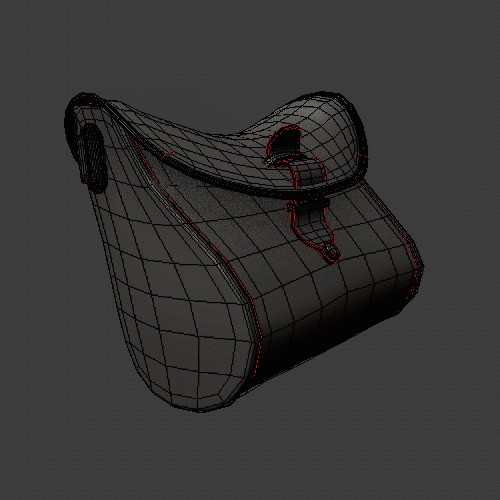
2.4 UV Maps
The UVs are necessary to paint the model in Substance Painter
Blender 2.79 & 2.80
The workflow is the same in both versions of Blender
Blender 2.79 & 2.80
2.4.1
Blender 2.79 & 2.80
2.4.2
Blender 2.79 & 2.80
2.4.3
-
PREPARE THE MODEL:
In this model, I have a HighPoly bag with the Multiresolution modifier with 5 subdivisions, I make a copy downscaling to 1 subdivision, then apply the modifier. This new one is the LowPoly. (2.4.1)
-
MARKING SEAMS:
To the LowPoly I marked the seams with Mark Seams and hide them as best as possible, it is necessary to do several tests to get a good result when doing the Unwrap. (2.4.2)
-
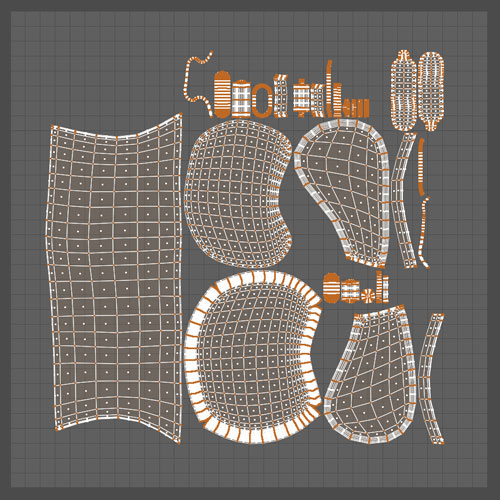
UNWRAPING:
Select all the faces and then Unwrap with U> Unwrap, there are two methods and I always try both to see which has the best result Angle based or Conformal. Pack everything with Pack Island. Finally, the TexTools Add-On to align and make some islands straight in the UV / Image Editor. (2.4.3)
-
TEXEL DENSITY:
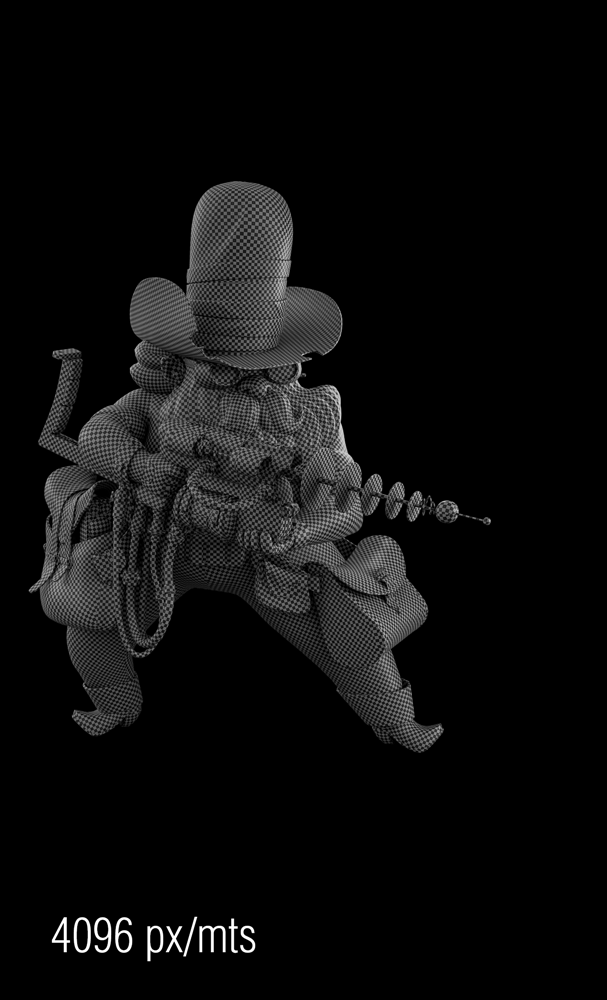
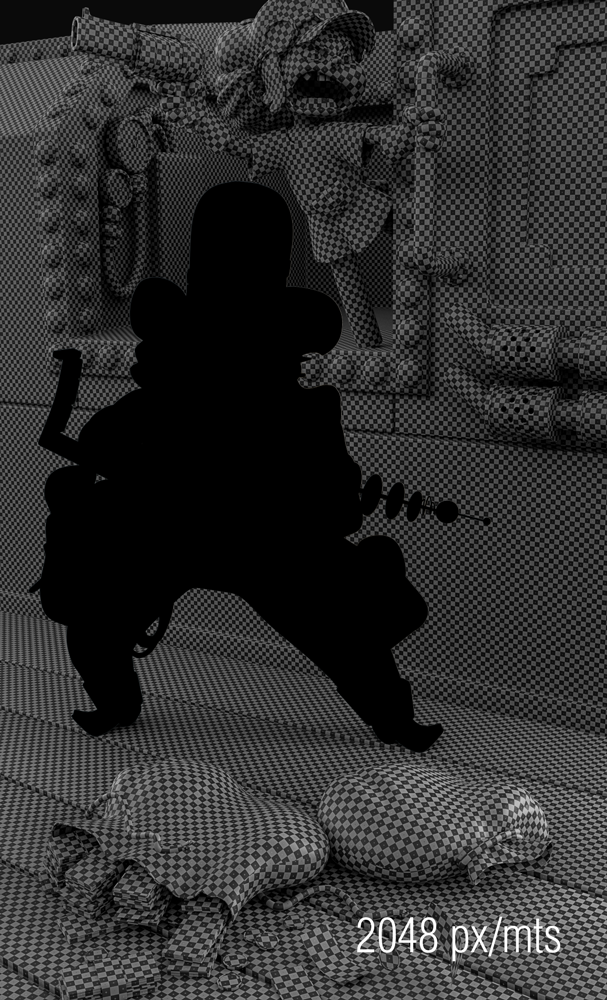
The resolution of the texture is measured with texel density, the goal is that all objects have the same texel density, but sometimes it is not possible. In this case, I made two categories, one with the general objects with a texel density of 2048 px / mts and the Cowboy with the double 4096 px / mts to be able to make shots like Close-ups, for this I used the Add-On Texel Density Checker. (2.4.4)
Blender 2.79 & 2.80
2.4.4
SHORTCUTS
Move G
Rotate R
Scale S
Stich V
Select UV Island L
Select All A
Average Scale Control + A
Pack Island Control + P
COMMON MISTAKES
Distorted Textures:
To avoid this kind of errors, it is necessary to use “Control + A > Scale” before the Unwrap.
Incorrect Normals Direction:
To fix this problem you only need to recalculate the normals with “Recalculate”.
ADD-ONS
Texel Density Checker
With Texel Density Checker you can: Calculate Texel Density for model for different texture size and rescale UV for getting texel density what you want
TexTools
TexTools is a Free addon for Blender 3D with a set of professional UV and Texturing tools. Back in 2009 I released the Original TexTools for 3dsMax which has been very popular with many veteran realtime 3D artists
TIP
If you want to know more information about the texel density, Leonardo Lezzi has an amazing tutorial focused only on this topic.
2.5 ID Maps
Having ID Maps facilitates the selection of areas in Substance Painter
Blender 2.79 & 2.80
The workflow is the same in both versions of Blender
Enter the Vertex Paint Mode, click on Face Selection, create a series of colors, select areas that will use the same material and press Shift + K to apply the desired color.


Blender 2.79 & 2.8
2.5.1
2.6 Export to Substance Painter
Blender 2.79 & 2.80
The workflow is the same in both versions of Blender
To be able to paint the model in Substance Painter we have to export it correctly.
Select all LowPoly objects, and export the scene as FBX. Then export a selection of objects separately in HighPoly, for this it is necessary to activate “Selected Objects” when exporting. The HighPolys will serve to bake details about the LowPoly within Substance Painter.


Blender 2.79 & 2.80
2.6.1
TIP
Texturing
Substance Painter 2019
- Import from Blender
- Baking
- References
- PBRs
- Basic Material
- Masks
- Hide Seams
- Paint a Scene
- Export Maps to Blender
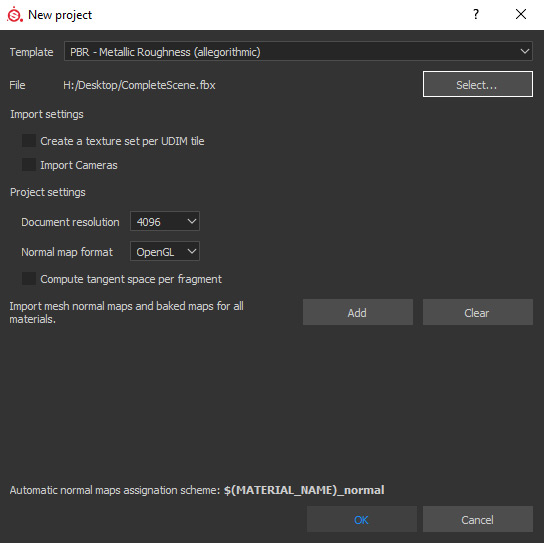
3.1 Import from Blender
Substance Painter is the most intuitive way to texturize
Select the template PBR – Metallic Roughness (Allegorithmic), select the scene in FBX LowPoly. It is very important to select OpenGL in the Normal map format. For the resolution of the document, I used 4096.
Substance Painter 2019
3.1.1
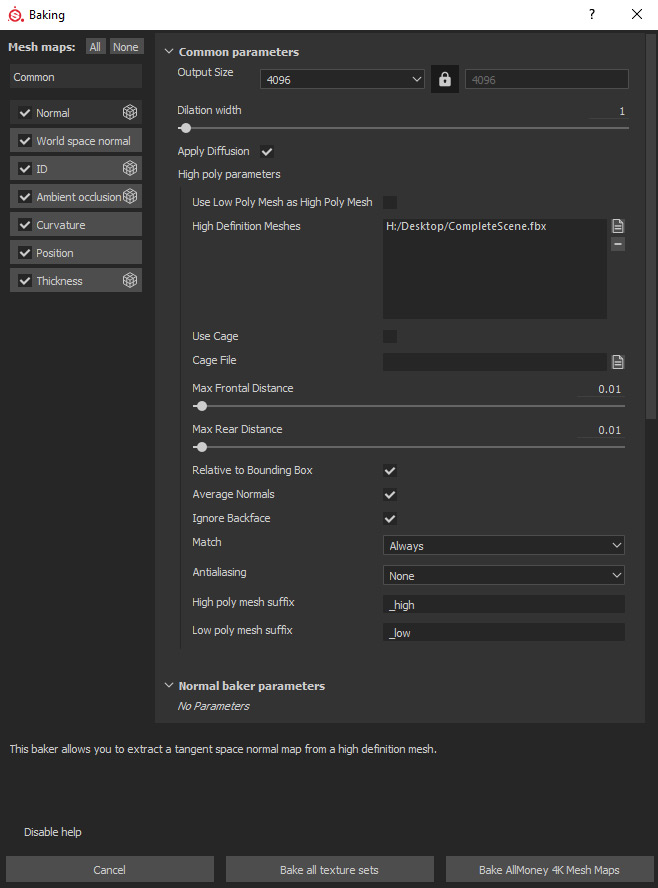
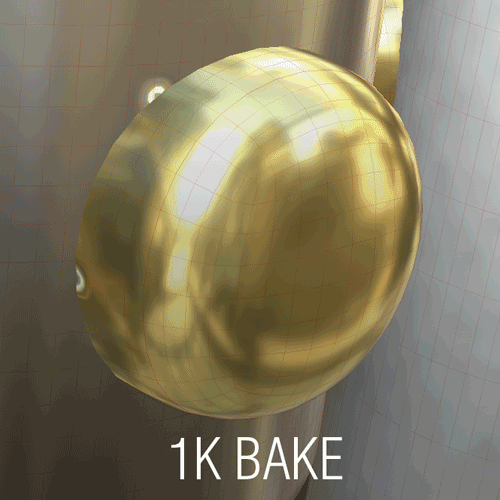
3.2 Baking of Textures
It is necessary to generate the maps to be able to work in Substance Painter
Select the output size of 4096 and do the bake of all the maps except the Normal map, for those I make another bake for each mesh, selecting the mesh HighPoly in the Area of High Definition Meshes.
Substance Painter 2019
3.2.1
COMMON MISTAKESS
Very low output size
When the output size is not high enough, errors can be seen in some cases. To correct this, you only need to bake at a higher resolution.
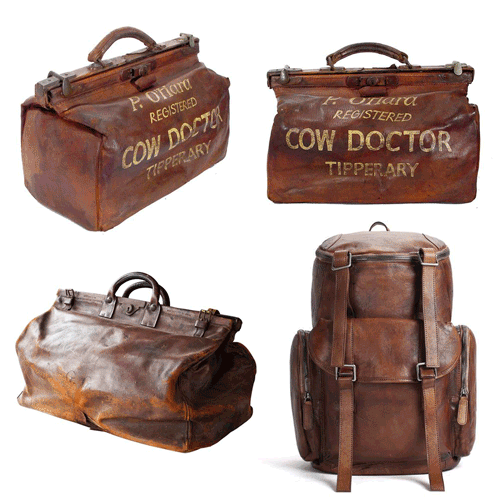
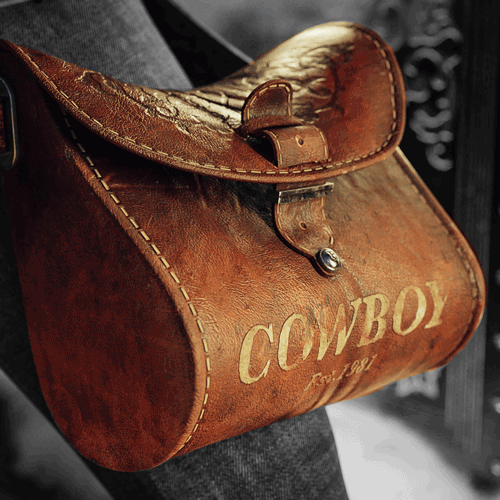
3.3 References
There is no better way to make a texture, than having a clear idea of what we are looking to achieve
The quality of details in texture increases with more and better references, to achieve this I make a collage for each object
3.3.1
3.3.2
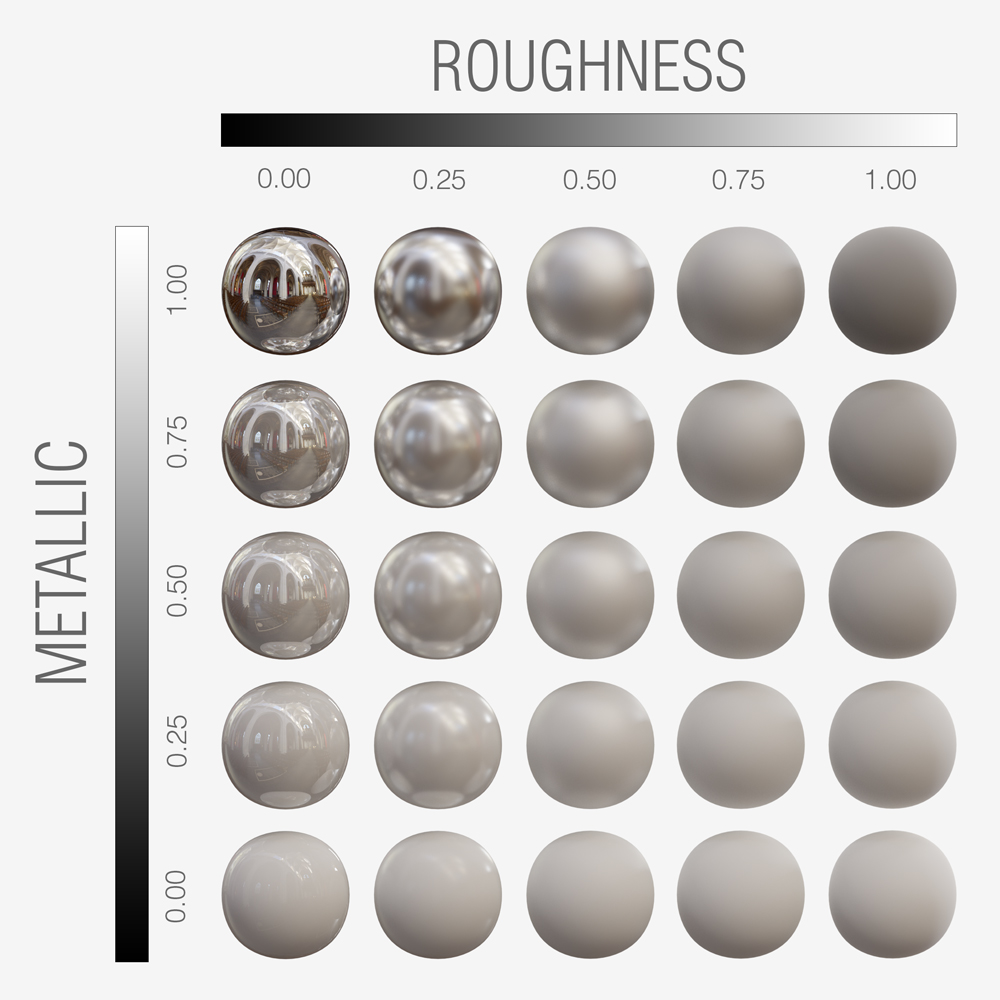
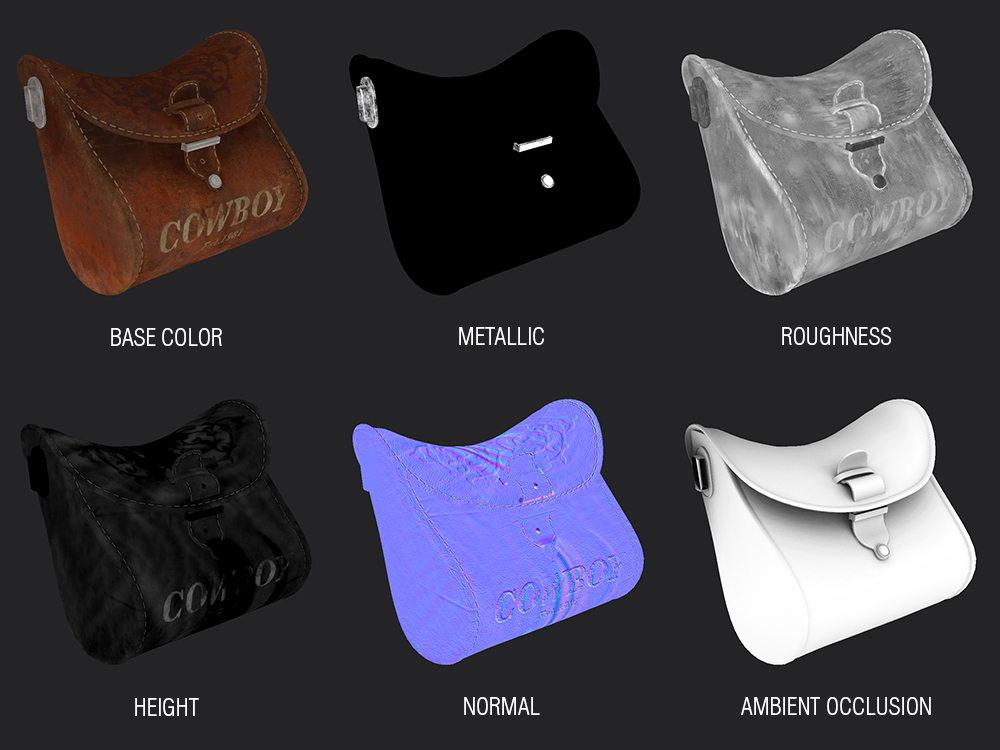
3.4 PBRs – Physically Based Rendering
Understanding the theory of PBRs is the base for creating better textures.
PBR is a physically correct method for texturing and rendering, it is easier to achieve more realism than the previous method (Specular / Glossiness), since it has the limitation that it always looks realistic and that light behaves well in any environment. Within Substance Painter I used the Workflow Metal / Roughness where different types of maps are used.
-
Base Color (sRGB – RGB)
This map is composed of diffuse reflected color (Albedo), and metallic reflectance values.
-
Metallic (Grayscale – Linear)
It is a mask where white is metallic and black is non-metallic
-
Roughness (Grayscale – Linear)
It represents the Microsurfaces, indicating with black the areas that are soft and with white the rough
-
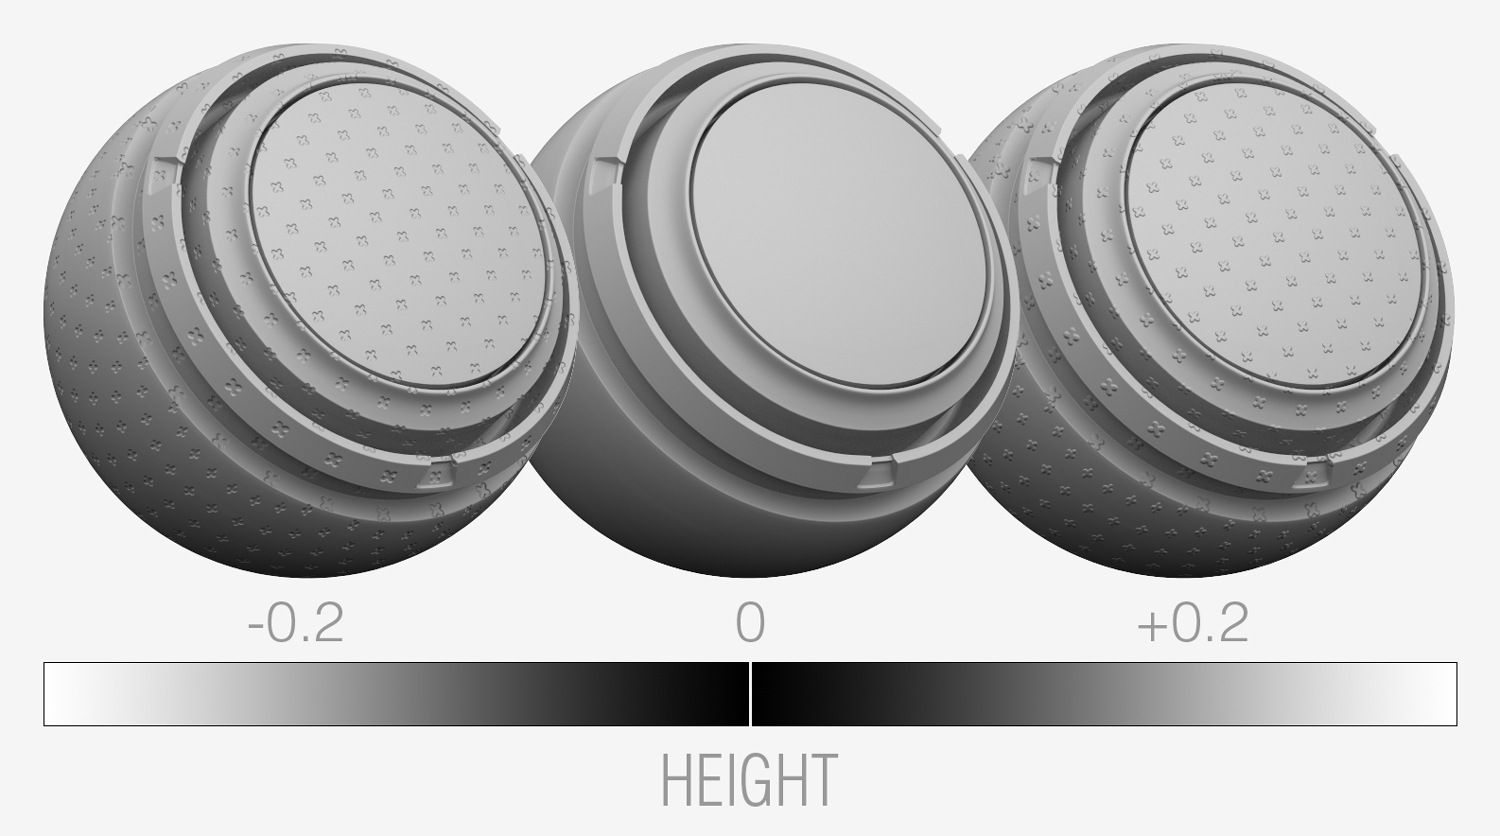
Height (Grayscale – Linear)
This map adds apparent thickness to the surface.
-
Ambient Occlusion (Grayscale – Linear)
It defines how much light from the environment is accessible to the surface.
-
Normal (RGB)
Simulates details by projecting them on the surface based on an RGB map, where the R (red) is the X-axis, the G (green) is the Y-axis and the B (blue) is the Z-axis.
-
Emissive (RGB)
Select where and what color are the emissive materials.
-
Scattering (Grayscale – Linear)
It is a mask where the white is translucent and the black area is not..
3.4.1
3.4.2
Substance Painter 2019
3.4.3
TIP
3.5.1
3.5 Basic Materials
The structure of the most basic material that I use consists of only three maps
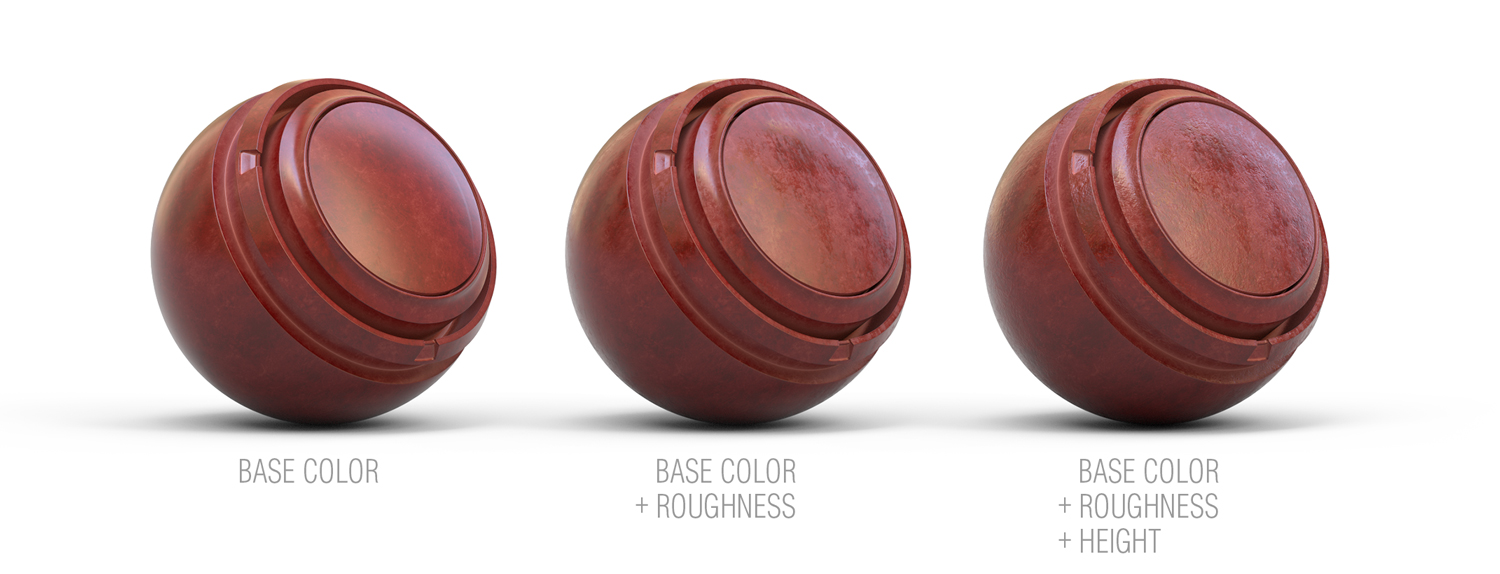
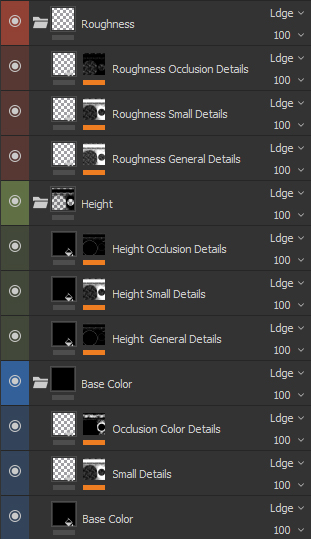
Base Color, Roughness and Height are the base of the basic materials (3.5.1). With this basic combination, I solve non-metallic materials. I use three levels of details for each type of map and grouped them into folders. (3.5.2) General Details, Small Details, and Occlusion Details.
Substance Painter 2019
3.5.2
3.6 Masks
The Generator is used to design the masks that affect the materials
This method is used to apply the masks:
1. Add a Fill Layer.
2. Add a Mask.
3. The mask is seen to the right of the Fill Layer.
4. Add a Generator to the Mask.
5. The Generator is below the Mask.
6. Select Mask Editor.


Substance Painter 2019
3.6.1
Substance Painter 2019
3.6.2
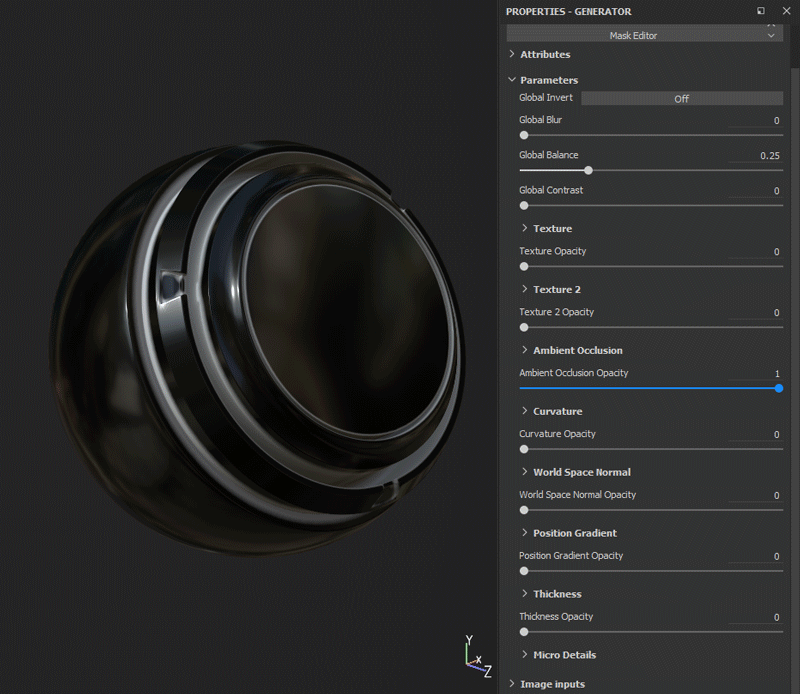
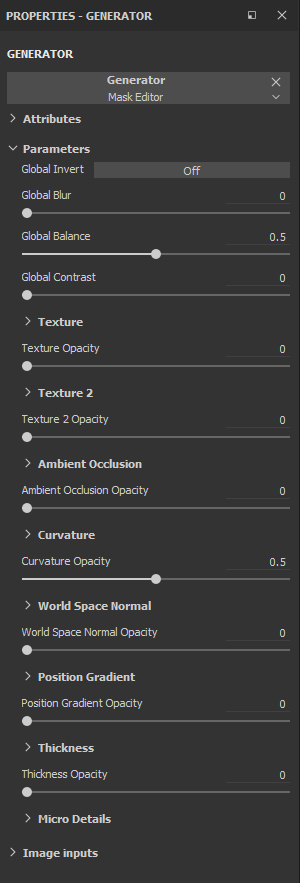
There are several parameters within the Generator – Mask Editor (3.6.3), each parameter has different effects. The most used are the Ambient Occlusion and Curvature, you can see the different parameters working in the image (3.6.2). Also, you can add up to 2 textures and you can combine the parameters.
Substance Painter 2019
3.6.3
You can make the mask as complex as you need it, it is only necessary to stack effects one over another using different Blending Modes
1. Add a Generator to the mask and choose the Mask Editor.
2. Add a Fill and select a map in Grayscale.
3. Again add a Fill and select a different map in Grayscale.
4. Repeat the previous step, but on the Grayscale Map use a smaller scale.
5. Add the Levels effect.
6. Finally add a Fill and select a map in Grayscale.


Substance Painter 2019
3.6.4
COMMON MISTAKES
The generator does not work correctly
Make sure that you baked the mesh, it’s possible that you missed it.
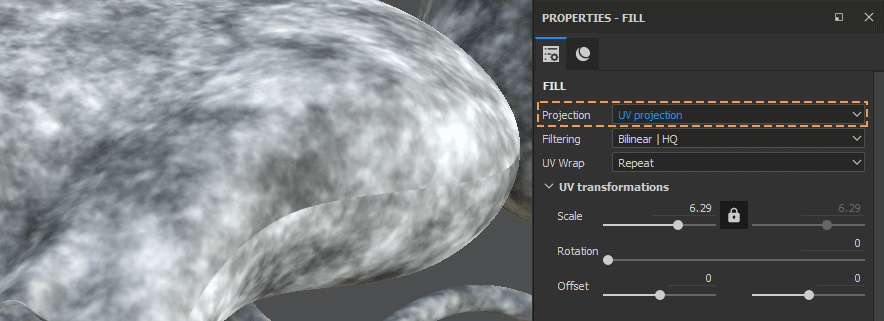
3.7 Hide Seams
With the Tri-planar Projection option I hide seams easily
You can not always use this option and fix all problems with seams, but in many cases it is possible. Just change the UV Projection to Tri-planar Projection and make a test.
Substance Painter 2019
3.7.1
3.8 Painting a Scene
When it is a medium or large scene, painting everything with the highest resolution generates problems due to lack of memory.
To solve this I used the same .FBX file, and made different .SPP files of Substance Painter, for this project I divided the scene into six files of Substance Painter:
FILE 1: Bags, belts, and other objects.
FILE 2: Clothing, glasses, hats, gloves and arms.
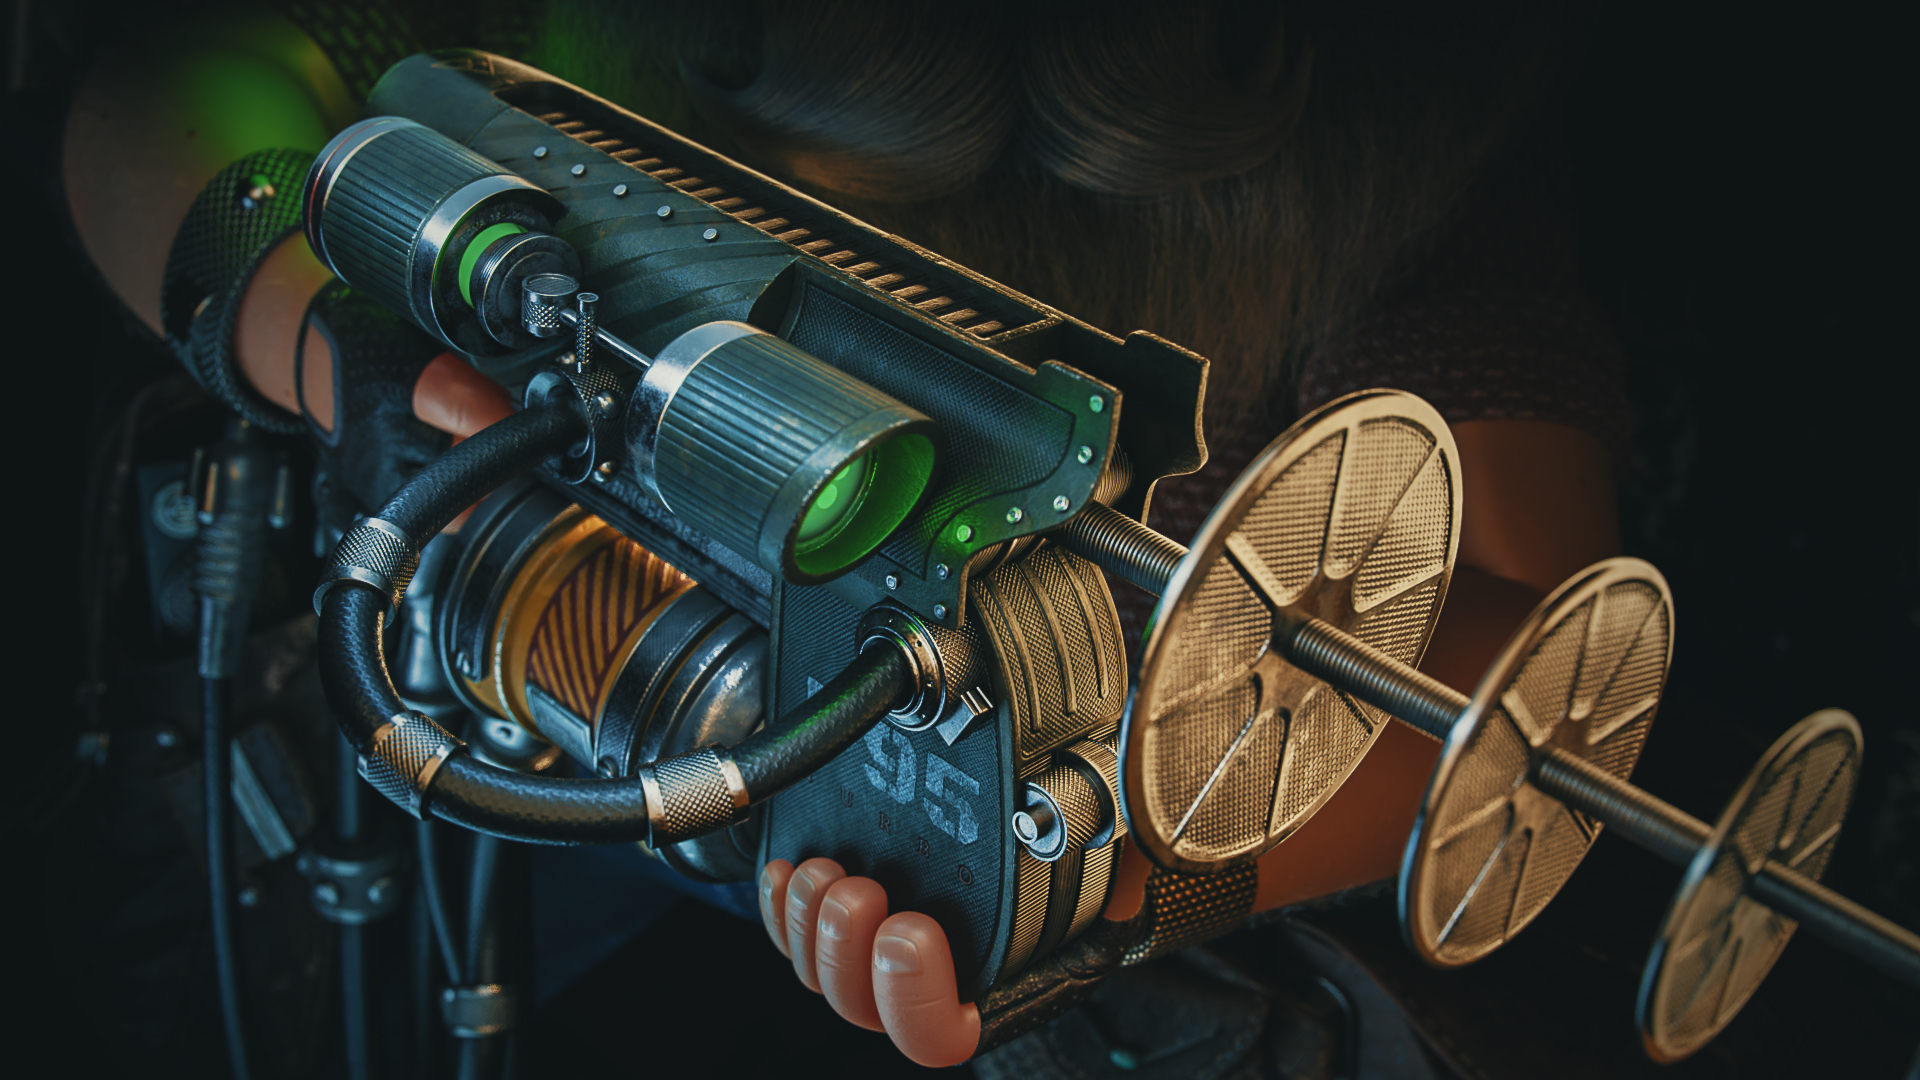
FILE 3: Main weapon.
FILE 4: The girl.
FILE 5: The train.
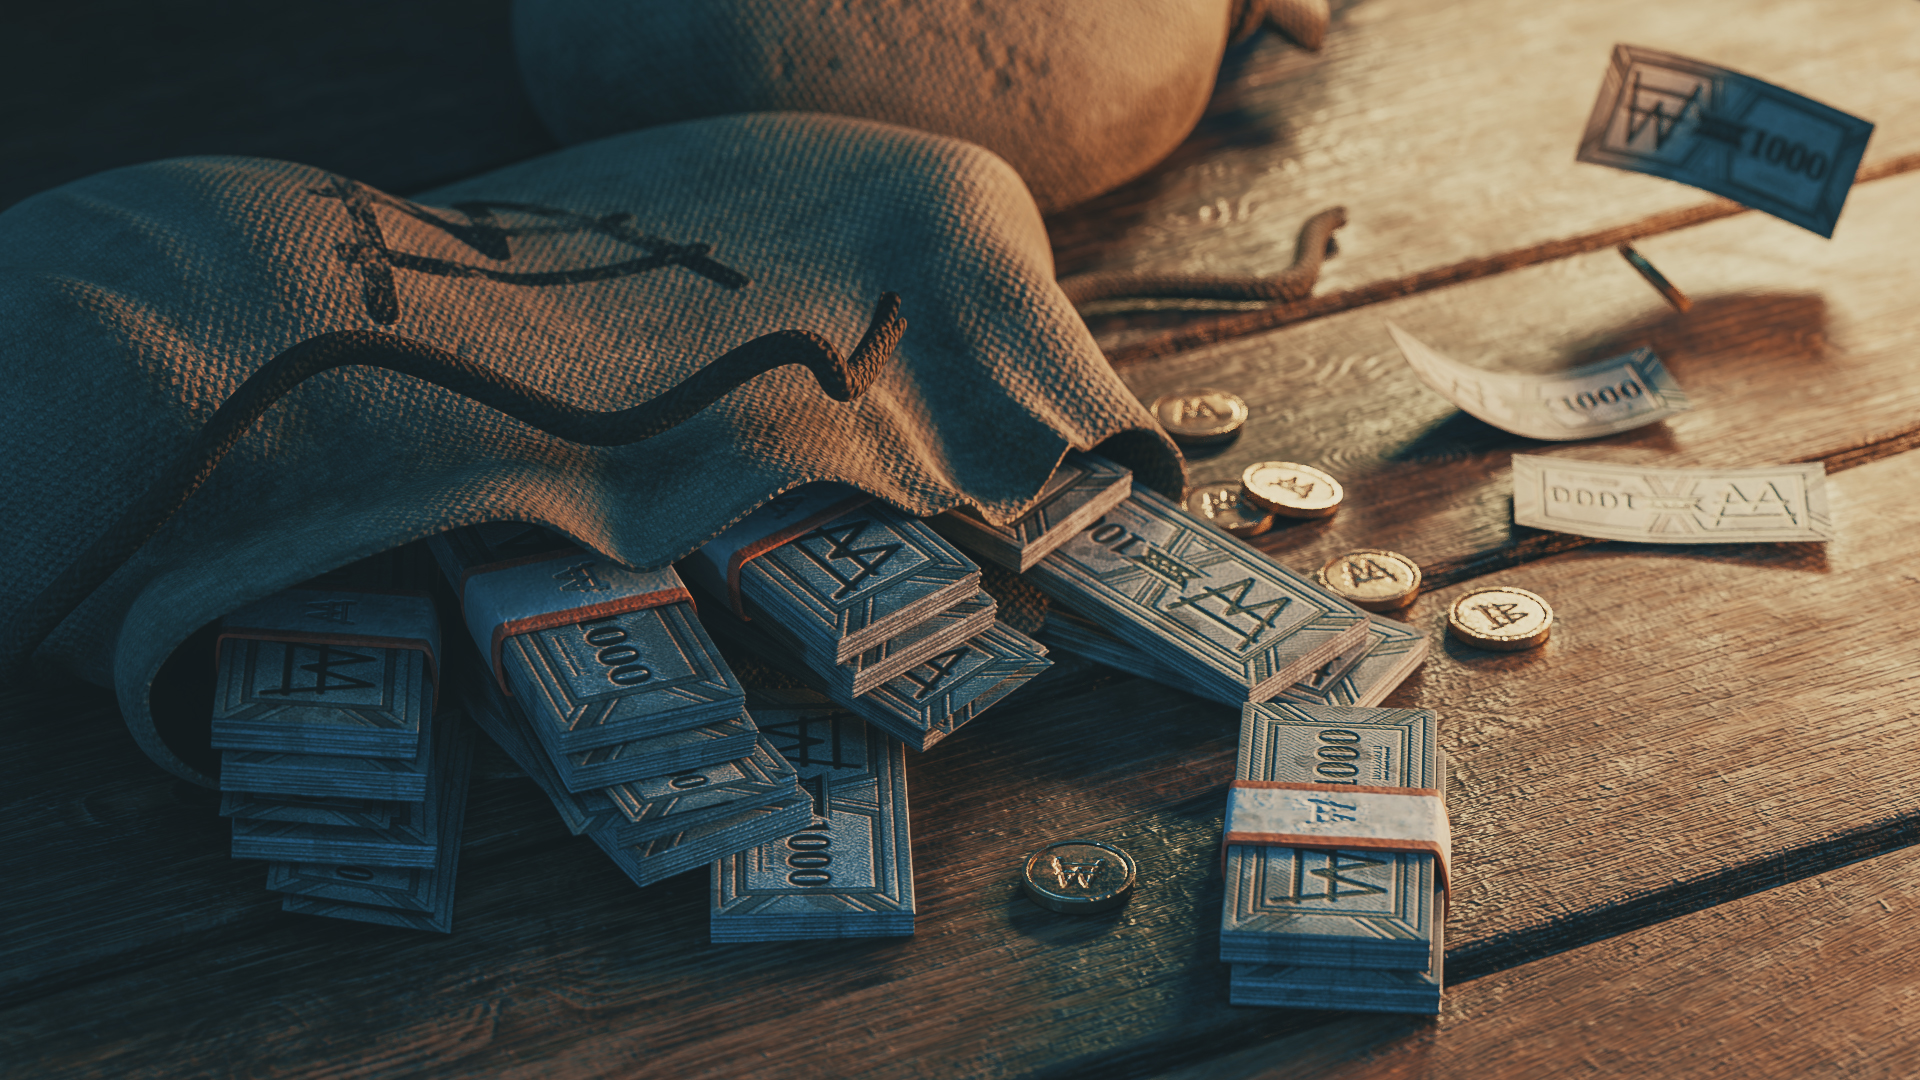
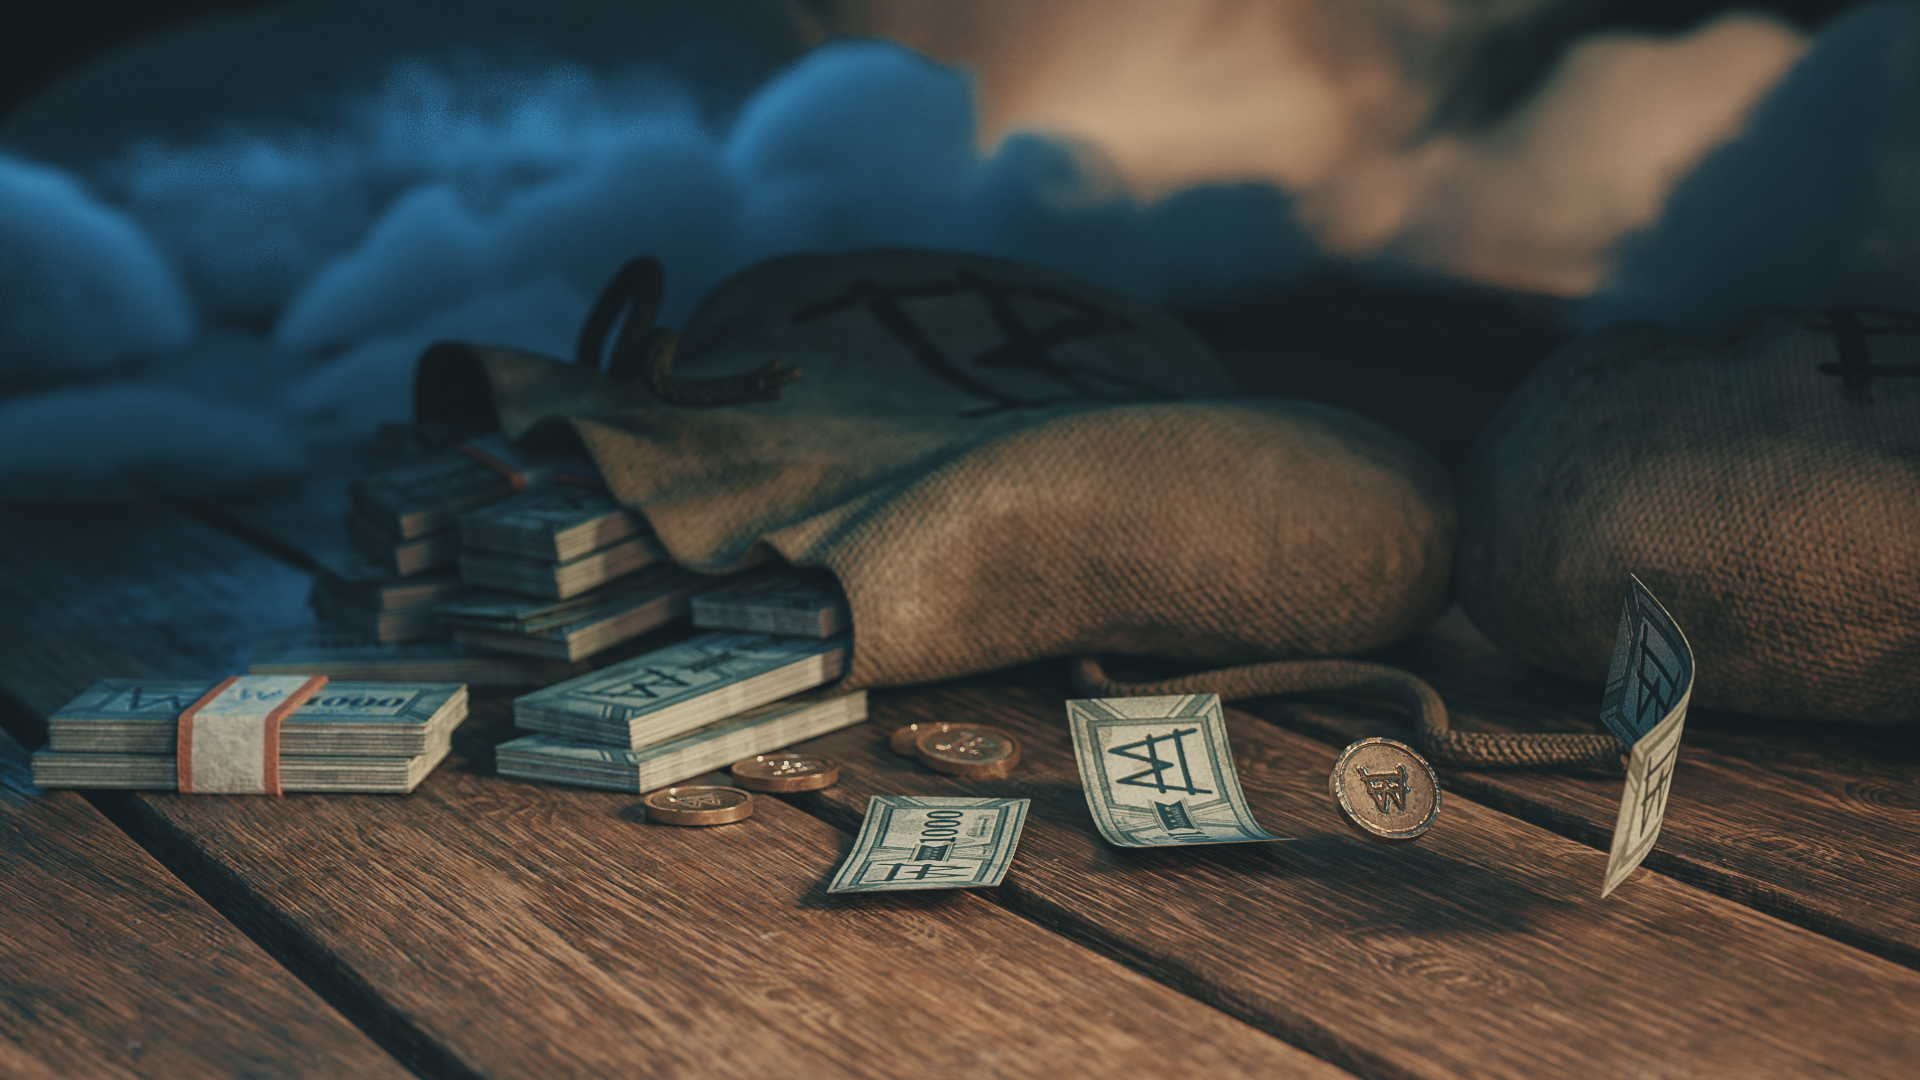
FILE 6: Floor, money and bags.

Substance Painter 2019
3.8.1
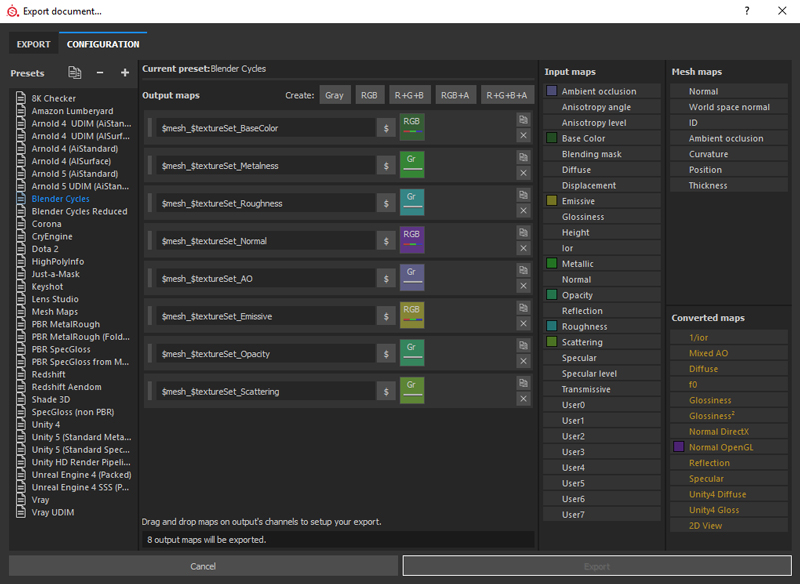
3.9 Export Maps to Blender
I have a Preset ready for Blender that exports the maps correctly
To export the textures, go to File > Export Textures, create a new Preset and name it Blender Cycles (3.9.1)
Substance Painter 2019
3.9.1
Rendering
Blender 2.79 & 2.80
Photoshop CC
- Principled BSDF
- Particle System
- Smoke Simulation
- Basic Lighting
- Depth of Field
- Global Configuration
- Memory Management
- Post-production
4.1 Principled BSDF
Save time by adding PBR maps in bundle
Blender 2.79 & 2.80
The workflow is the same in both versions of Blender
With the Add-On Node Wrangler activated, I used the Control + Shift + T shortcut and load the basic PBR maps. Selected the BaseColor, Metalness, Roughness and Normal Map maps, they connect automatically. Manually you have to add maps such as Ambient Occlusion, Emissive or Scattering.


Blender 2.79 & 2.8
4.2.3
ADD-ONS
Node Wrangler
Node Wrangler is a suite of tools to help make node editing in Blender easier and quicker, for both compositing and material workflows. Node Wrangler is included in Blender by default, so you already have it, just need to install on the Add-On section.
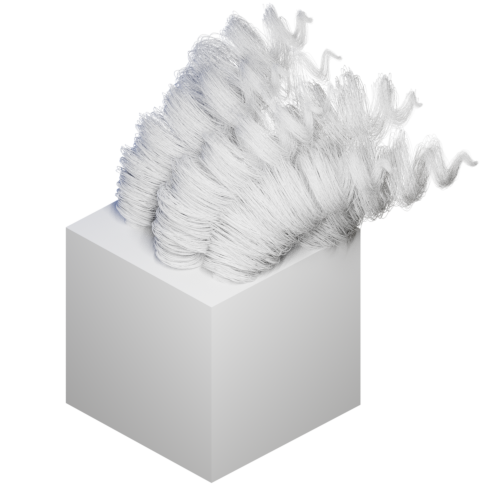
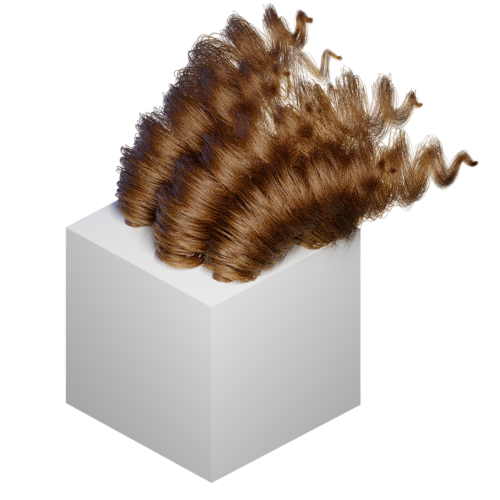
4.2 Hair Particle System
The beard is one of the most important parts of the main character
4.2.1
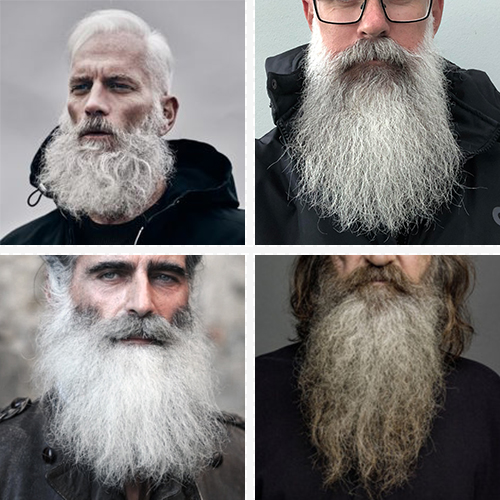
References
As for the textures, I made a collage of my references for each character, in this case the cowboy. Defining the type of hair, then deciding which part is smooth and which is rough.

4.2.2
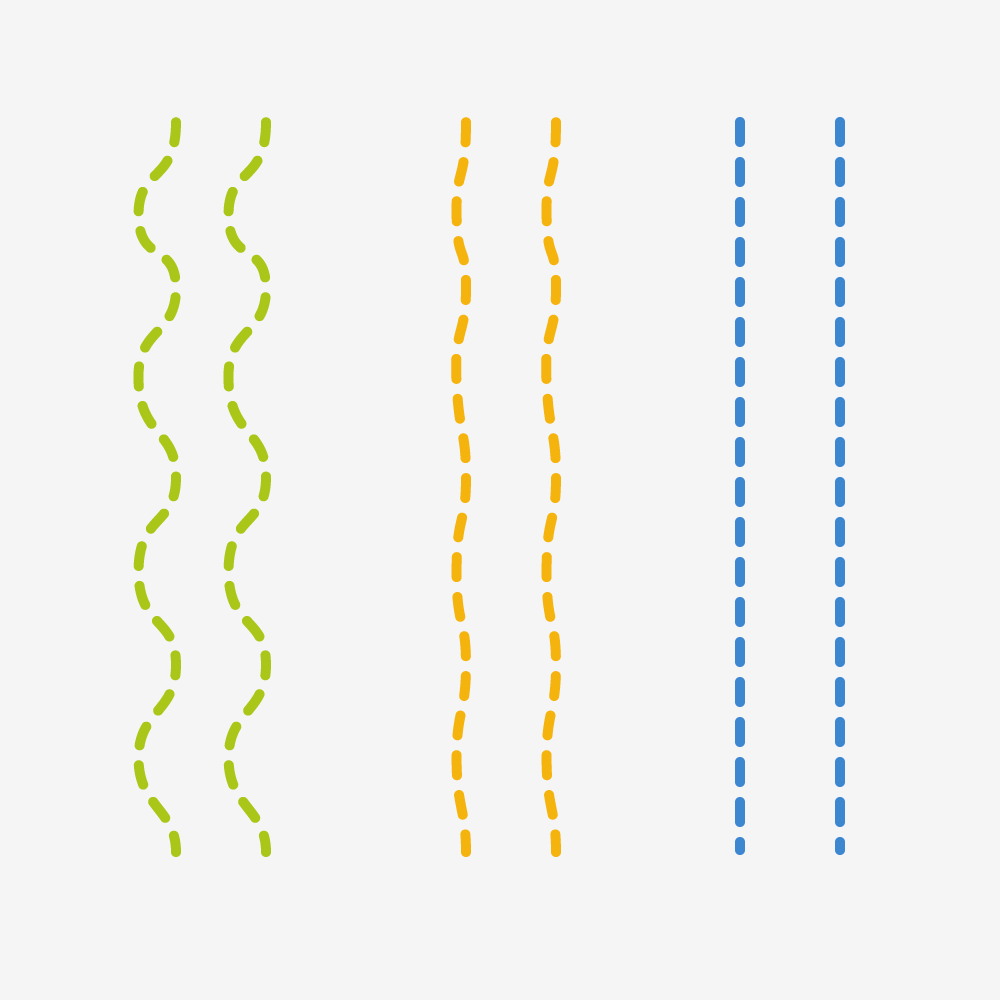
General idea
Divide the hair into three areas: In green the beard, in blue the hair and in yellow the moustache. Each area has 2 particle systems.
4.2.3
Hair Types
The beard (in green) has more roughness, the hair (in blue) is smooth and the whiskers (in yellow) are between smooth and rough.
To generate hair we need three things; An Emitter where the hair comes out, the Particle system where we decide how to behave and finally, the Material that defines how it looks.
4.2.4
Emitter
Any type of mesh can be an Emitter, it can be visible or invisible.
4.2.5
Particles
Here the length and number of particles are decided, also the roughness and style.
4.2.6
Material
With the new Principled Hair BSDF material, it is easier to be more realistic.
For this Workflow first chose the Emitter and add a Hair Material, then added a Hair Particle System, choosing the length and style of the hair, finally, in the Particle Edit mode arrange each hair one by one
Blender 2.79
Exclusive for this version


Blender 2.79
4.2.7
Material:
1. Activate the use of hair.
2. Use Principled Hair BSDF.
( Principled Hair Shader is only found in Blender 2.79 Experimental onwards )
Particle System:
3. Went to the particles and selected the Hair type.
4. Selected the material, and left the same amount in B-spline and Display Steps.
5. Selected Interpolated, and match Display and Render. Finally used Clump and Roughness Curves.
6. In Kink selected the style.
7. Decided the length and left the number at zero.
Particle Edition:
8. Activate Particle Edit, turn on the Selection by Points, and in tools I select Add.
9. Select Count to define the number of hairs per click, Keys is the number of vertex per hair. I matched Draw to the last Path Steps (8) and mark Children.
10. With Add you can insert a hair and move it with Comb, finally used Clump Curve to decide the thickness of the hair.
Blender 2.8
Exclusive to this version


Blender 2.80
4.2.8
Material:
1. Used Principled Hair BSDF.
( Principled Hair Shader only works in Cycles )
Particle System:
2. Went to the particles and selected the Hair type.
3. Selected the material, and leaving the same amount in B-spline and Display Steps.
4. Selected Interpolated, match Display and Render.
5. Used Clump and Roughness Curves.
6. In Kink selected the style.
7. Decide the length and left the number at zero.
Particle Edition:
8. Activated Particle Edit, turned on the selection by points and in tools I select Add.
9. Selected Count to define the number of hairs per click, Keys is the number of vertex per hair. I match Draw to the last Path Steps (8) and mark Children.
10. With Add insert a hair and move it with Comb, finally use Clump Curve to decide the thickness of the hair.
COMMON MISTAKES
Can’t See Hair in the Active Render
1. The viewport is in Particle Edit. You just have to change to Object Mode.
2. In the particle system panel, increase the option Cycles > Thickness > Scale option. (Only Blender 2.79)
3. Check that the Render > Geometry > Use Hair option is active. (Only Blender 2.79)
REALISTIC HAIR
Realistic Hair Shader
An uber hair shader for Blender cycles that eliminates the struggle of creating your own from scratch. It’s based on a PBR shader model that replicates the naturalistic properties of real hair and fur.
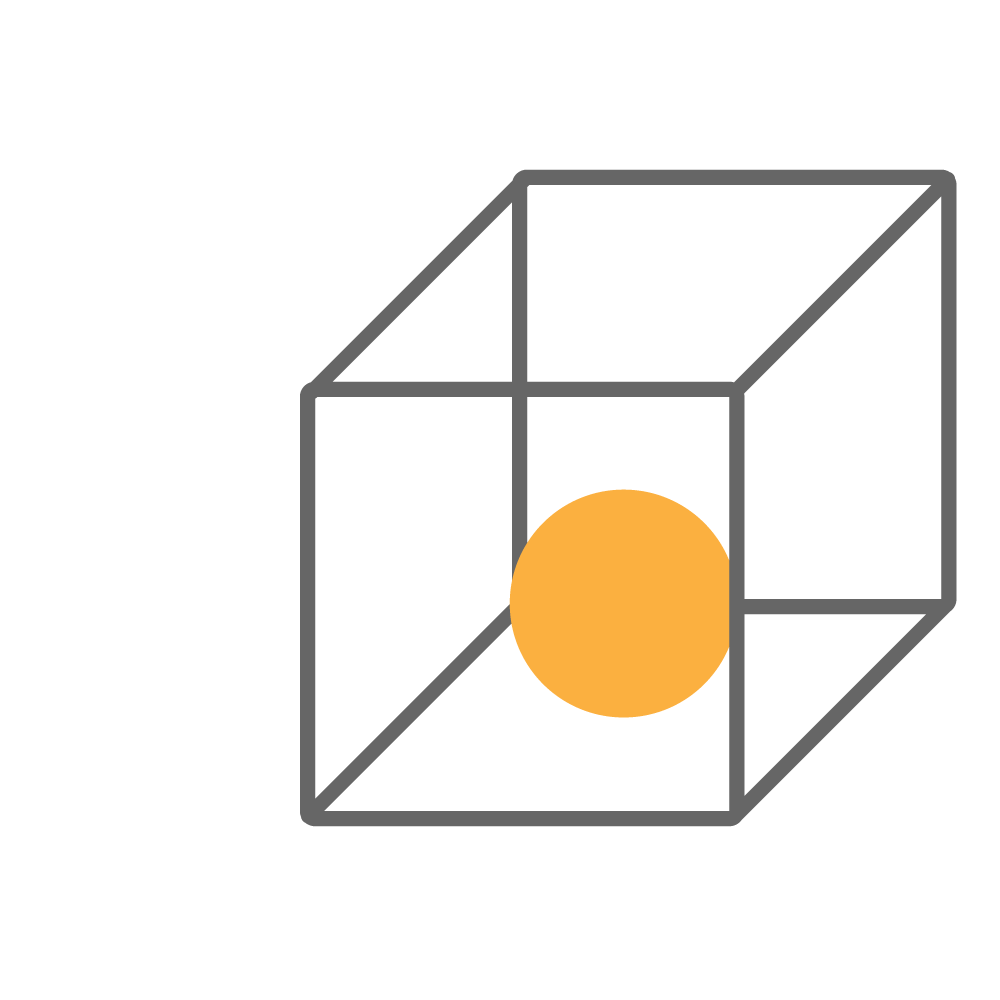
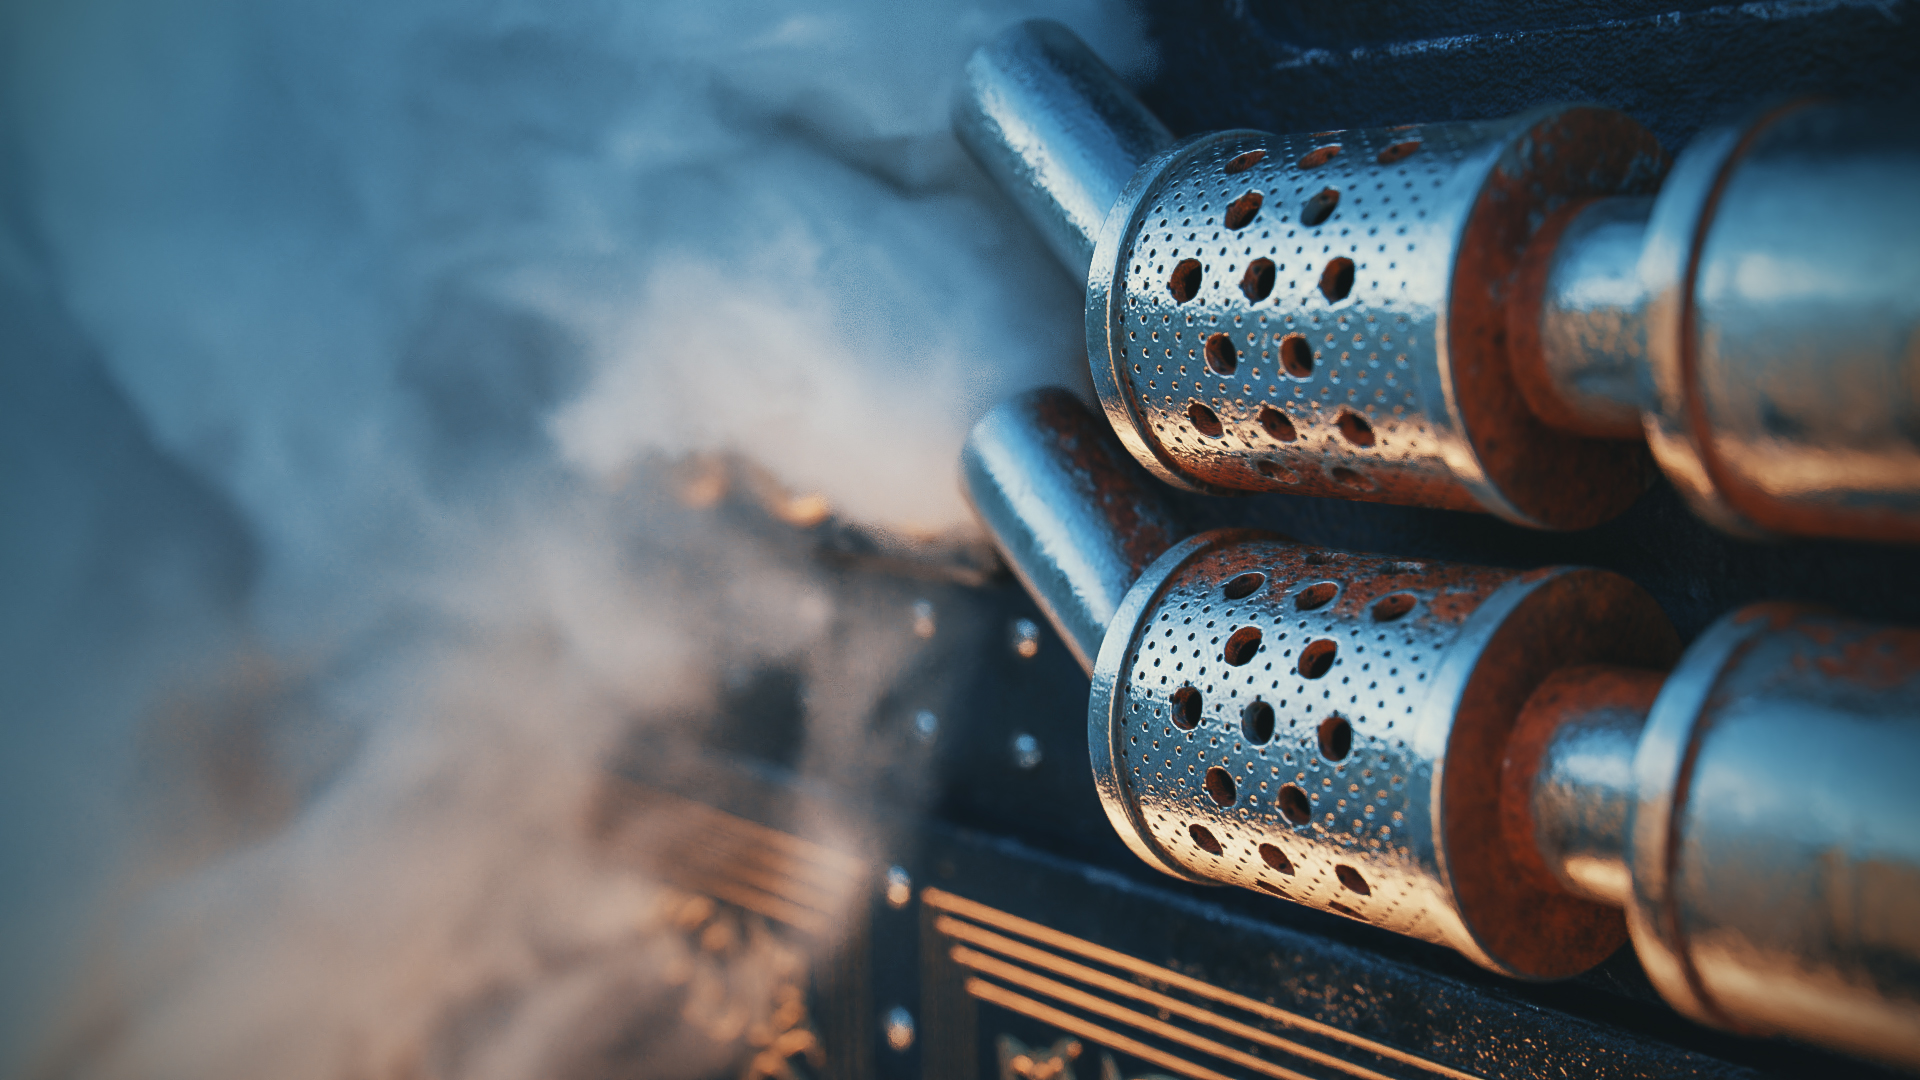
4.3 Smoke Simulation
With the steam train in the background, a smoke simulation was inevitable
Smoke simulation is part of the fluid system, which is animated in voxels representing the density, heat and velocity of the fluid. To do the simulation we need four elements.
4.3.1
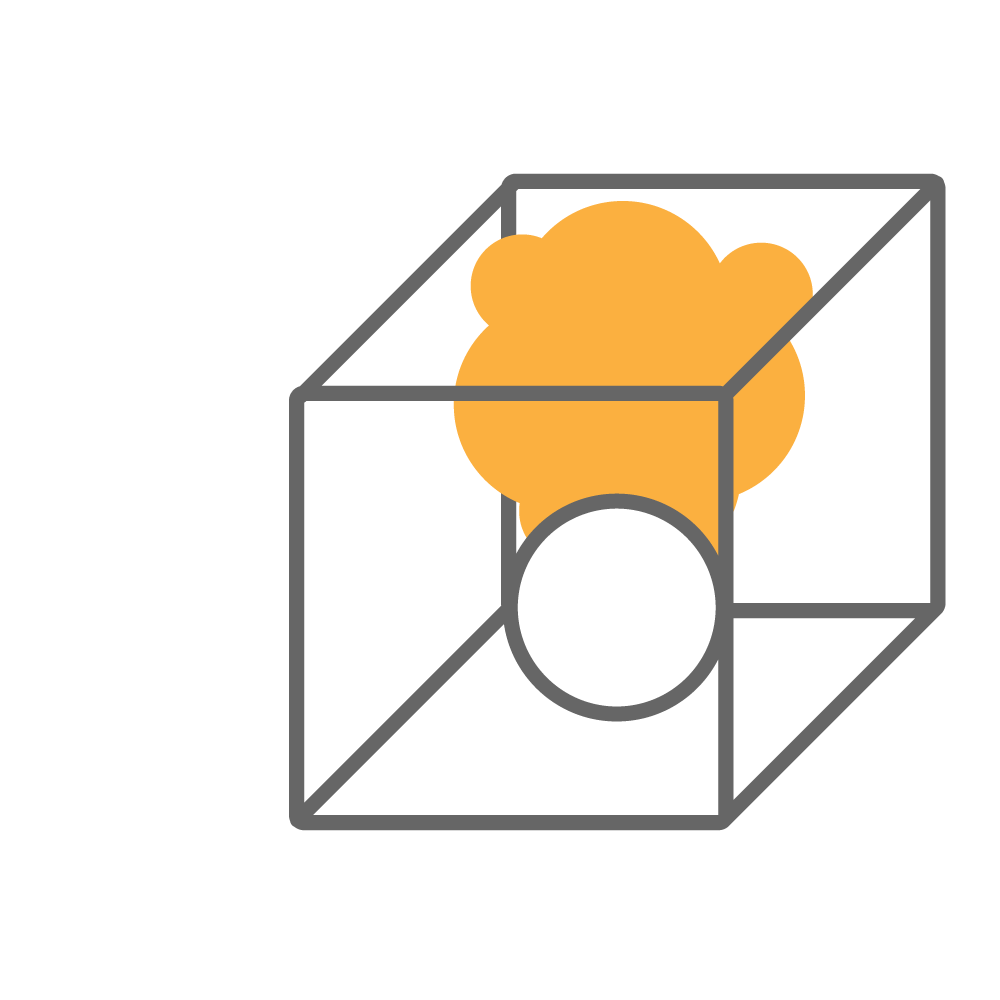
Domain
The area where the simulation is located, the smoke can not leave this area.
4.3.2
Flow
It is the mesh where smoke, fire or both are produced.
4.3.3
Material
The Principled Volume BSDF material is the PBR material for making smoke.
4.3.4
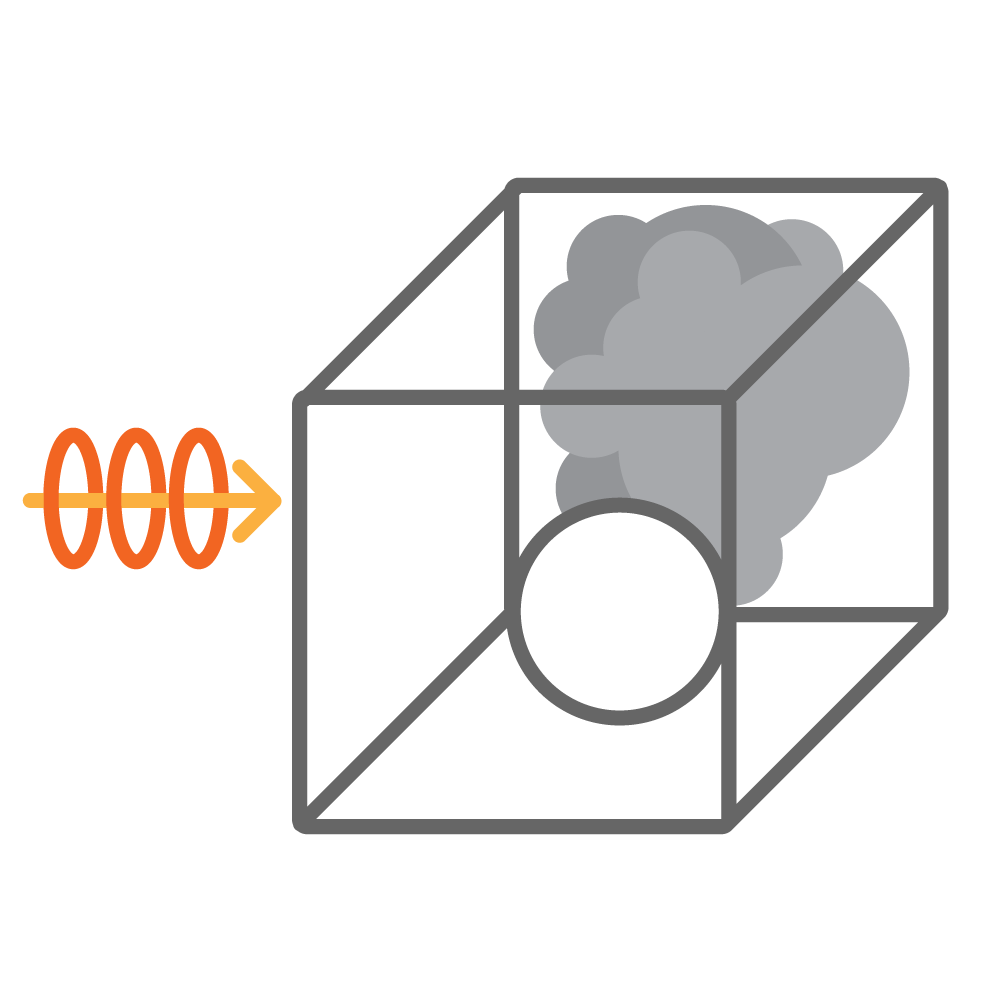
Wind
This generates a constant force in only one direction.
Blender 2.79 & 2.80
The workflow is the same in both versions of Blender


Blender 2.79 & 2.80
4.3.5
1. Domain
Select Smoke and then Domain. I start with 64 Divisions. Adaptative Domain makes the simulation faster. High Resolution increases the resolution to the details. I make the Bake in OpenVDB format.
2. Flow:
Choose Smoke and then select Flow, upload Surface to have more smoke in the scene.
3. Material:
The material Principled Volume combines all the components of Volume in a single node. In this case, I increase only Density so that the smoke is thicker.
4. Wind:
It generates a force field in only one direction, the power is indicated in Strength and it is noted in the distance between each circle.
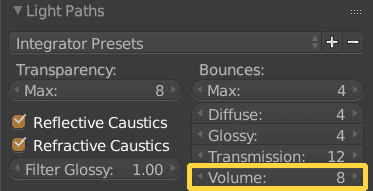
COMMON MISTAKES
Smoke not showing up
By default the Blender scene comes with the Light Paths > Volume at zero, give it a number.
Before doing the simulation you have to record the file and in the timeline return to the first frame and give it play.
Blender 2.79 & 2.80
4.4 Basic Lighting
The goal of lighting is to explain the depth, shape and emotions in the best possible way
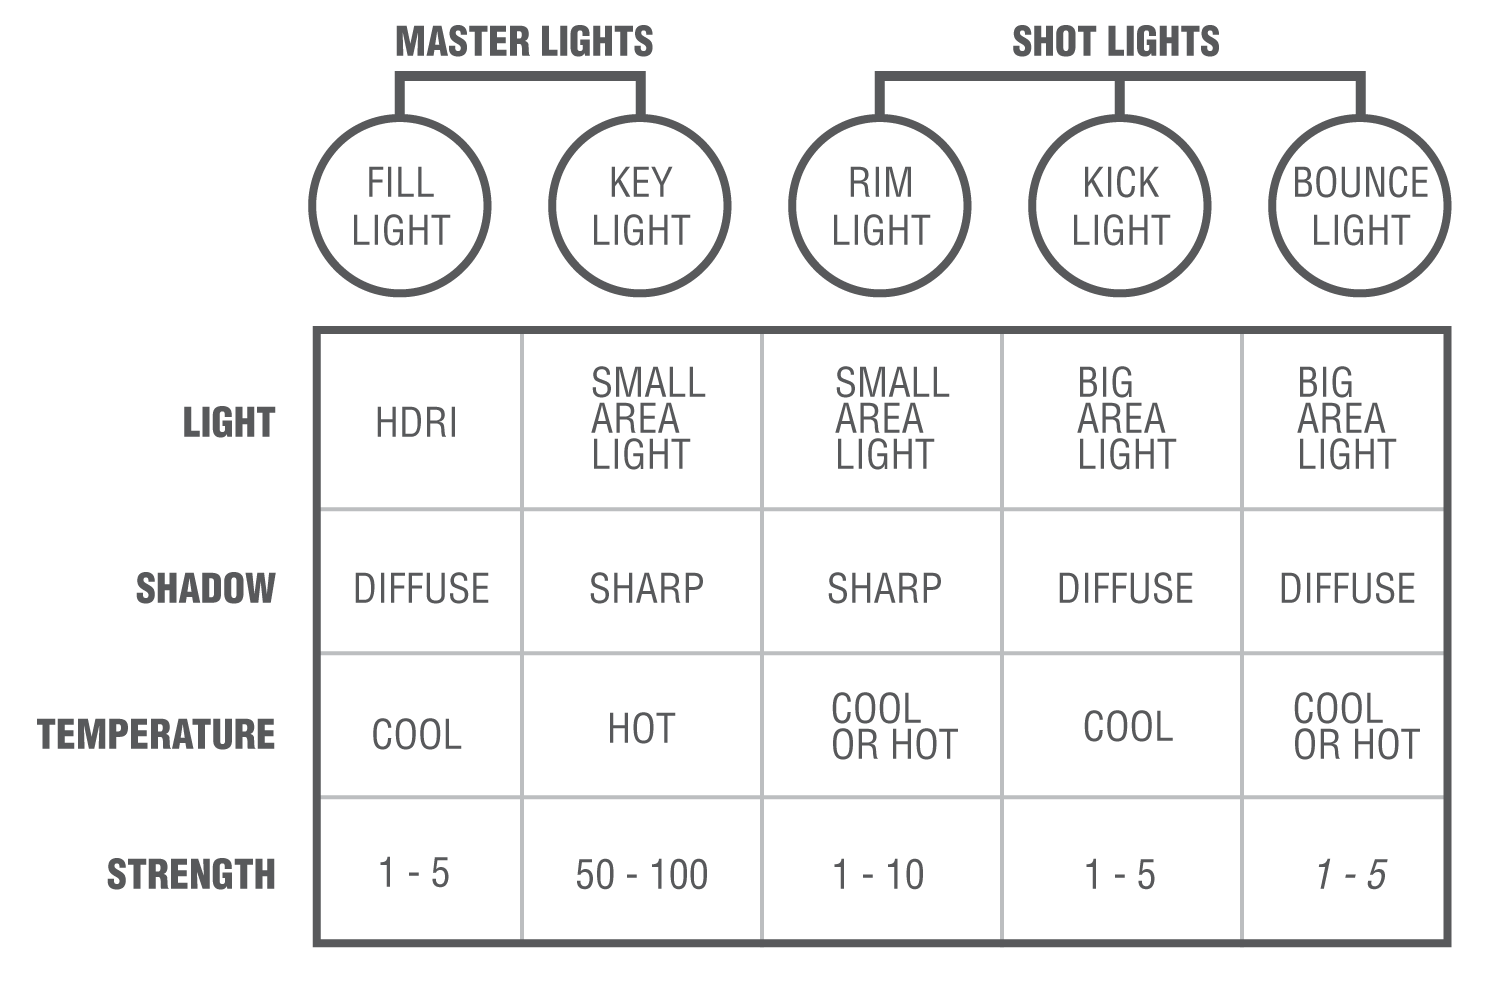
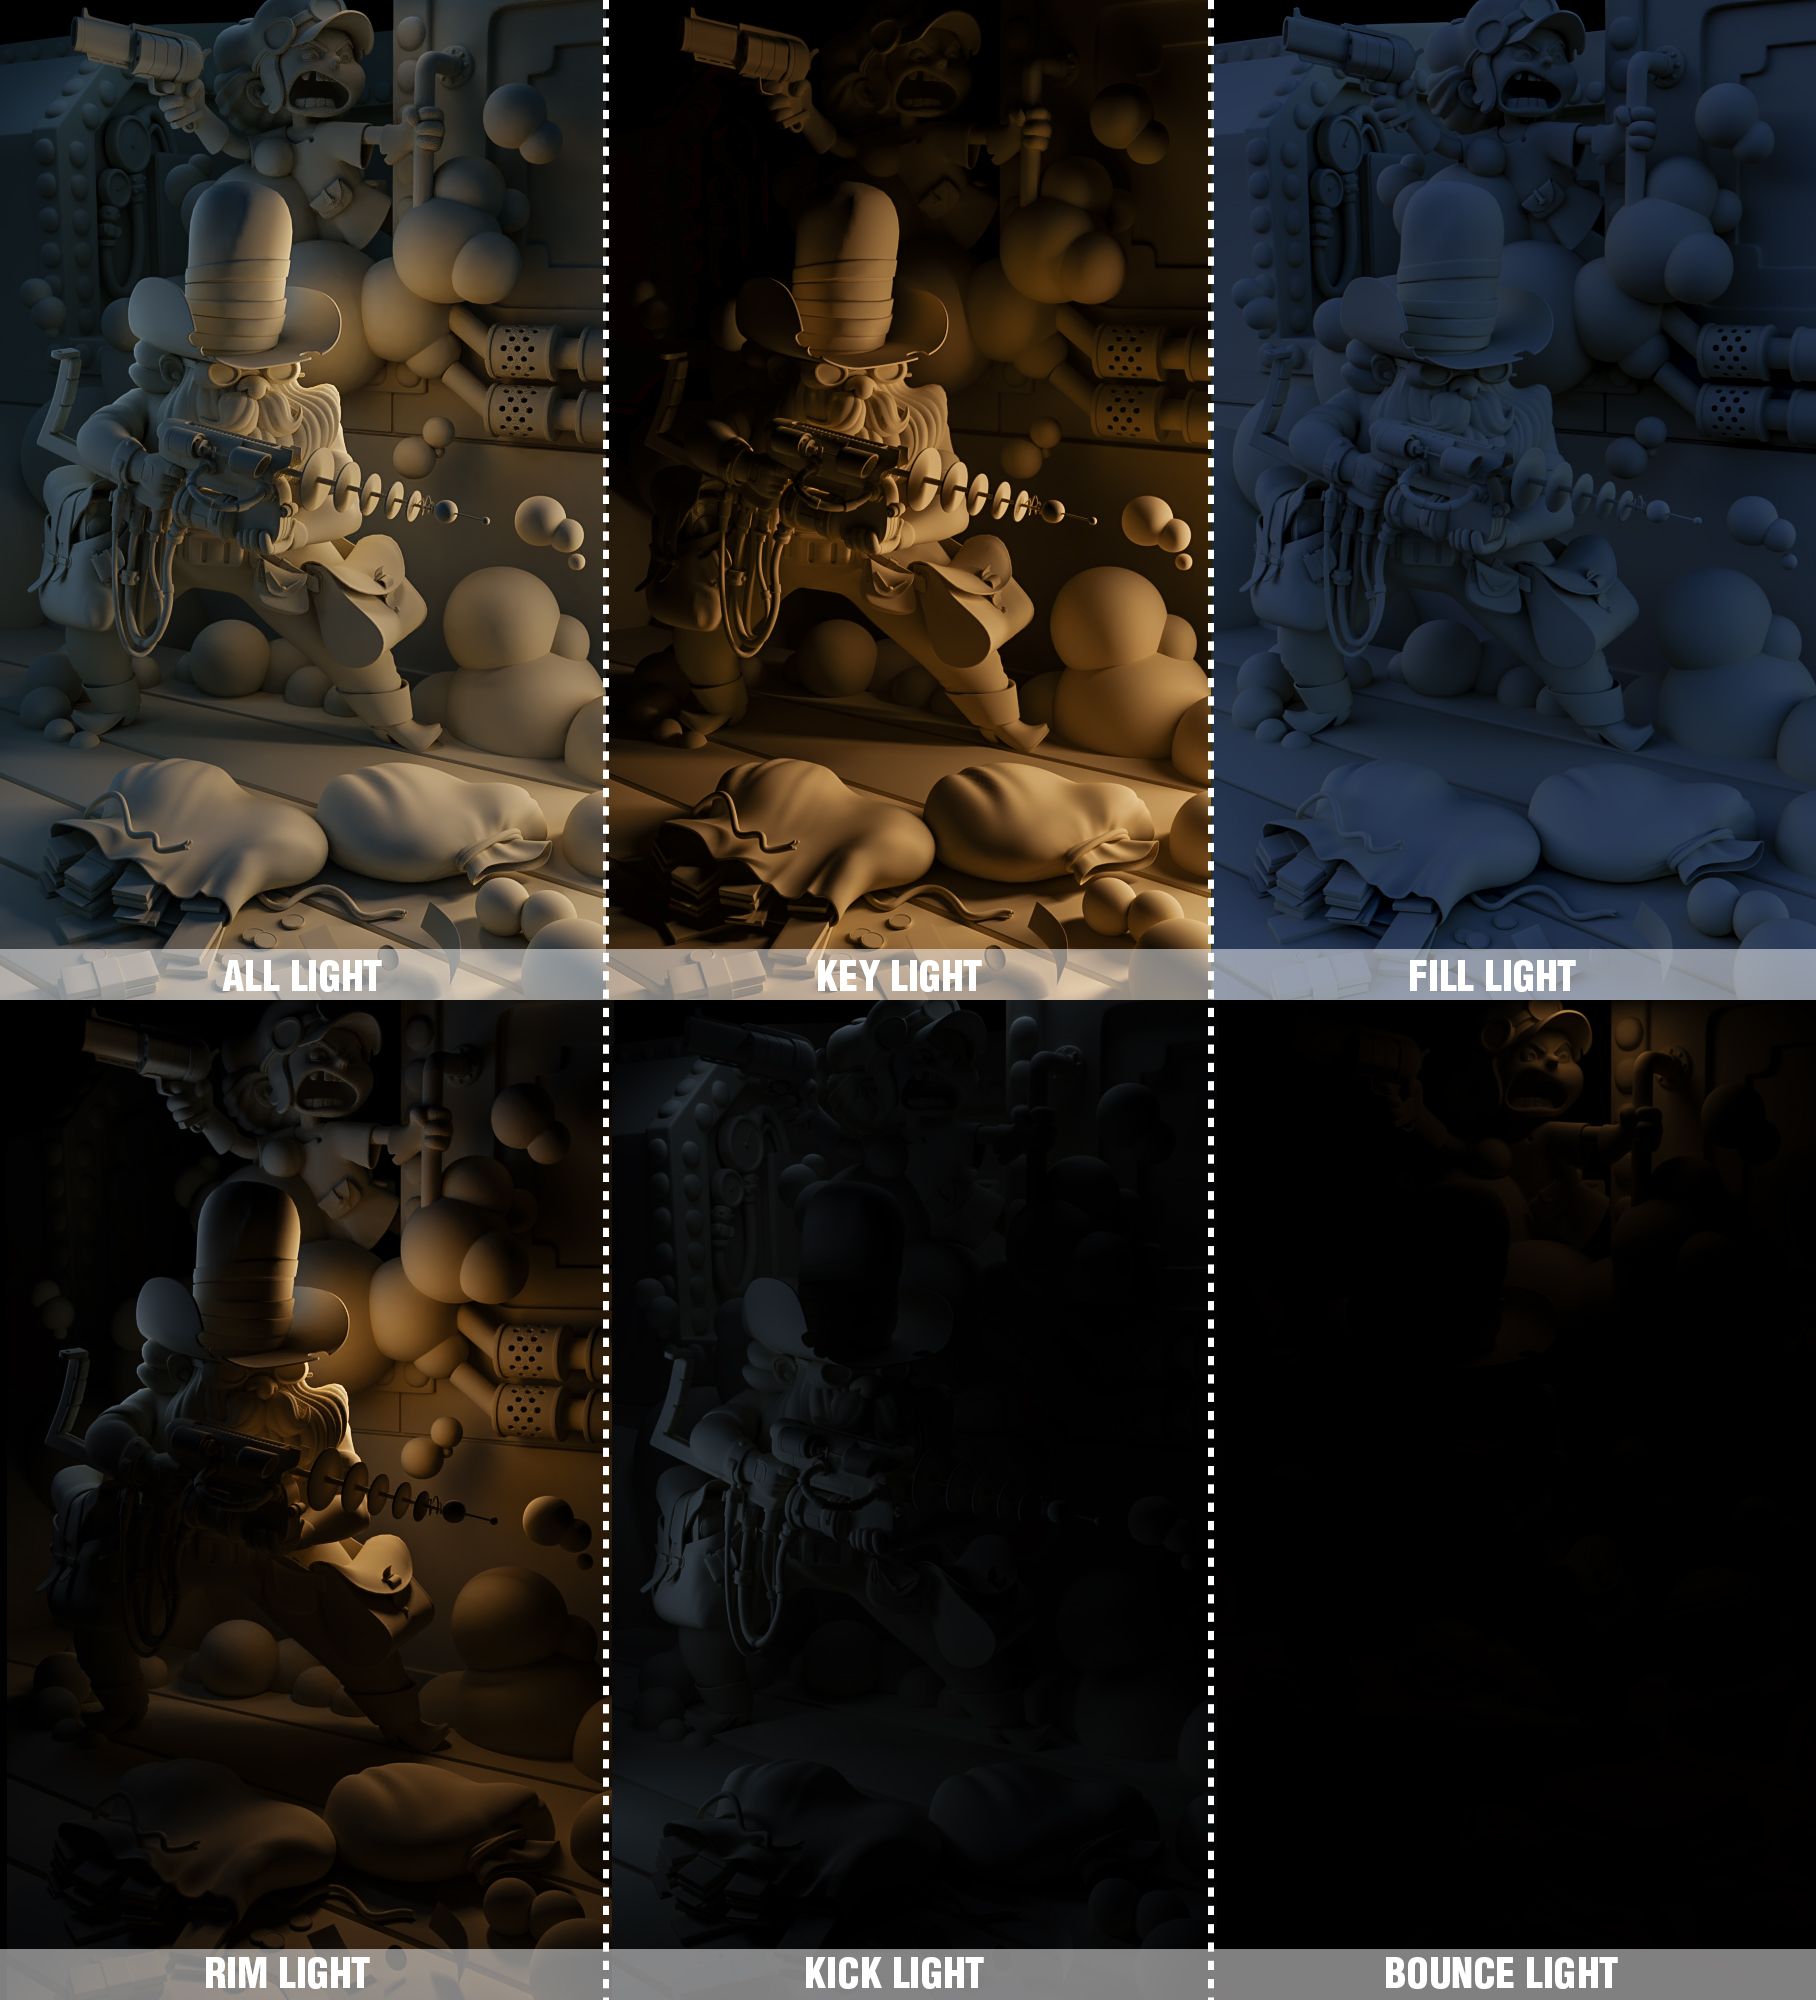
We have five types of lights: Key Light, Fill Light, Rim Light, Kick Light and Bounce Light. The Key Light and Fill Light are the most important and fall into the category of “Master Lights”, the others fall into the category of “Shot Lights”. Also, we must bear in mind that when we talk about color we have to think about temperature, whether warm or cold.
4.4.1
-
KEY LIGHT
This is the most important light, with it you explain the shapes of the scene, giving dimensionality with the shadows. This is a light with hard shadows.
-
FILL LIGHT
It adds light to the shadows and reduces the contrast, illuminating a large part of the scene and using soft shadows.
-
RIM LIGHT
Helps the object separate from the background, with a line on the edge using a hard shadow, this is achieved by positioning the light behind the object.
-
KICK LIGHT
Helps the Fill Light to reach more places, it has a soft shadow and uses the same color as the Fill light.
-
BOUNCE LIGHT
Adds extra bounces to the scene, exaggerating them or simply adding a little light, its shadow being soft.
4.4.2
TIP
In this project I used an HDRI that PIXAR shared from the short Piper, to use them change the filename extension .tex to .exr, there are other options like HDRI Haven that are basic in our resource library.
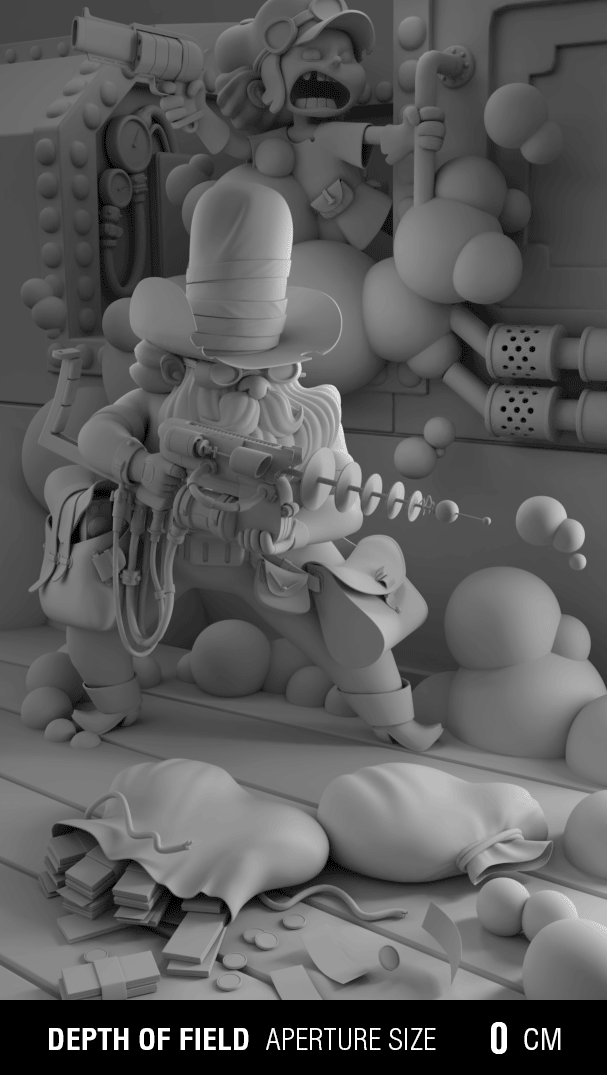
4.5 Depth of Field
With this camera effect, I emphasized the main character over the rest of the scene
Blender 2.79 & 2.80
The workflow is the same in both versions of Blender
To use the Depth Of Field in Blender, it is necessary to have a Camera and an Empty Object, this is used to Focus. Blender 2.79 Use Size to Focus, but in Blender 2.80 Emulate a Camera and use F- Stop. (4.5.1). I did several tests on Size before deciding which one I would use. (4.5.2)


Blender 2.79 & 2.80
4.5.1
4.5.2
4.6 Global Configuration
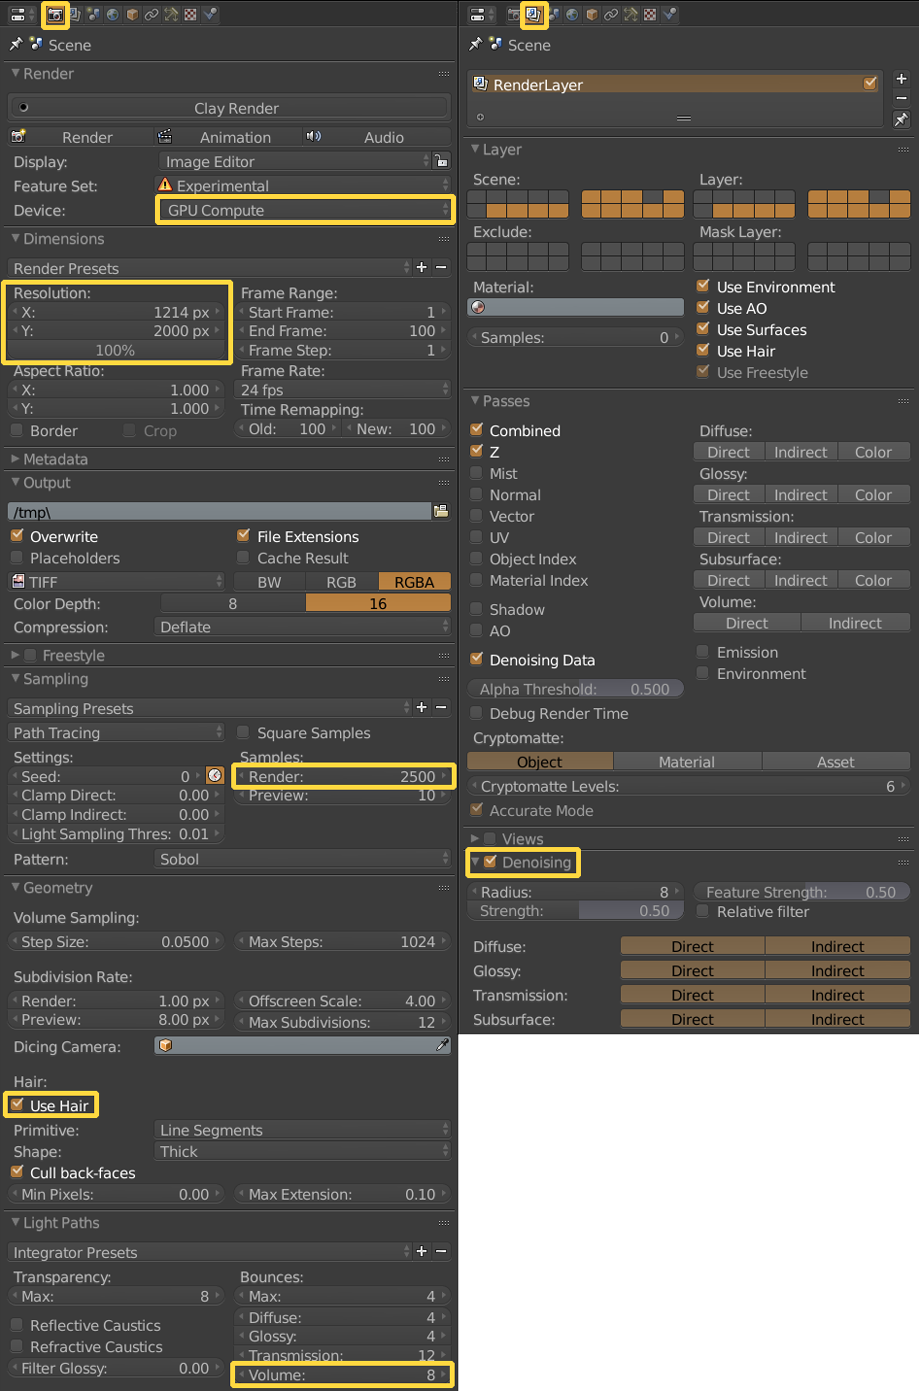
Before doing the final render, it is necessary to check that the configuration is optimal for the scene.
Make sure that the resolution is correct and to 100%, The minimum necessary Samples, in case of using Hair have selected that option, in case of simulating smoke it is necessary to have a number in Volume. The Passes option that suits you best. Finally, Denoising to remove the noise.
Blender 2.79
Exclusive to this version
Blender 2.79
4.6.1
Blender 2.80
Exclusive to this version
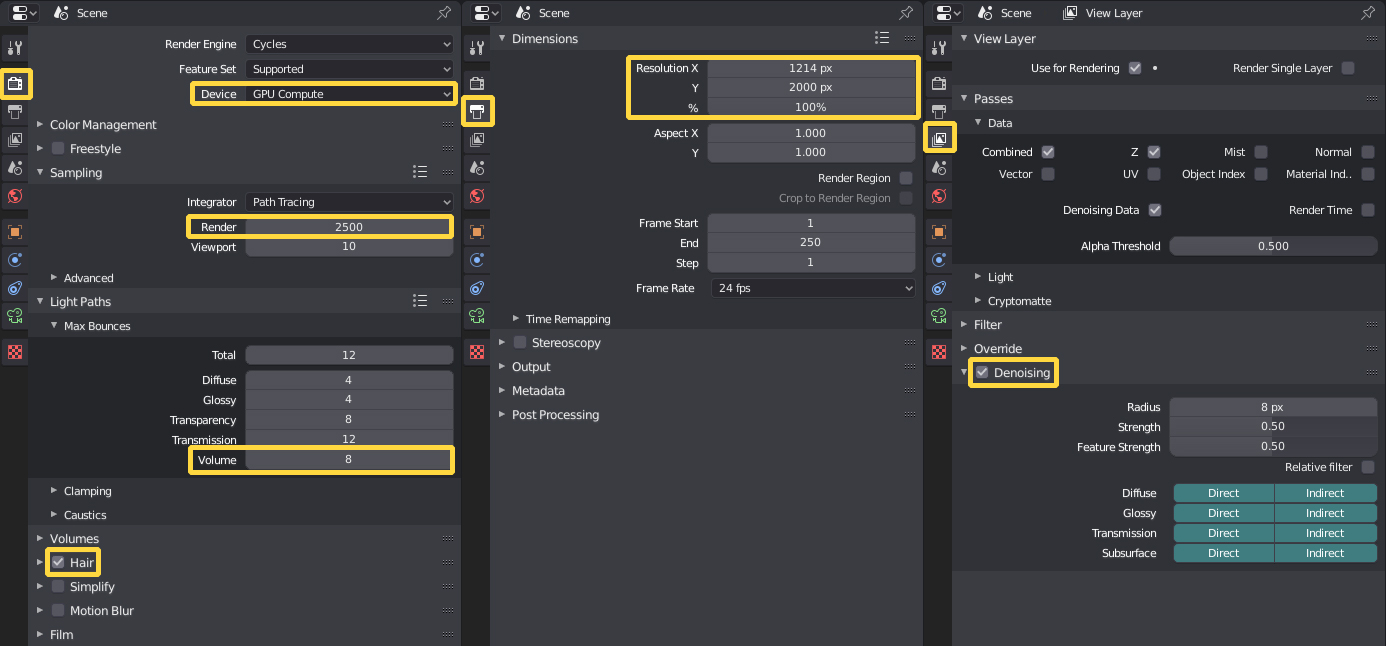
Blender 2.80
4.6.2
4.7 Memory Management
Now it is possible to render using GPU + CPU
Blender 2.79 & 2.80
The workflow is the same in both versions of Blender
Normally I use the GPU to render, but I have a limit of 8 Gigabytes of VRAM Memory when the scene passes that amount of memory it gives me a Memory error. With the new option in Blender User Preferences, we can use GPU + CPU, with that the memory limit is ruled by the CPU. In this new project, I upgraded the memory of the PC to 64 Gigs of RAM to take advantage of this specific option.


Blender 2.79 & 2.80
4.7.1
4.8 Post-production
In this stage, I highlight the details with different methods and decide the general colors to generate an atmosphere.
I divide the post-production into three methods:
Color Correction With Camera RAW I seek to balance the colors, modifying the lights, shadows and sharpness of the image.
Color Grading Using LUTs improving the visual tone of the image for aesthetic and narrative purposes.
Emphasis Use Vignetting, Gradients and Masks to focus the eyes on the most important parts of the image.
4.8.1
Project
- Video Tutorials
- Conclusion
- Final Renders
- Resources
5.1 Video Tutorials
For those who prefer the video guide instead of a written one
The video version of the guide is different from the written version, the order of some things change, it is also shorter than the written one. With the video version, I’m looking to make the basic workflow clearer. This guide is only for Blender 2.80
PREPARATIONS This video is the first chapter of the guide, where I explain why this image was chosen, talk about the artist, folder management and a practical way to handle folders and add a background image.
MODELING About the bases of the modeling process focused on one asset. Starting from the polygonal modeling, then the UVs and IDs. Finally, export in FBX to use it in Substance.
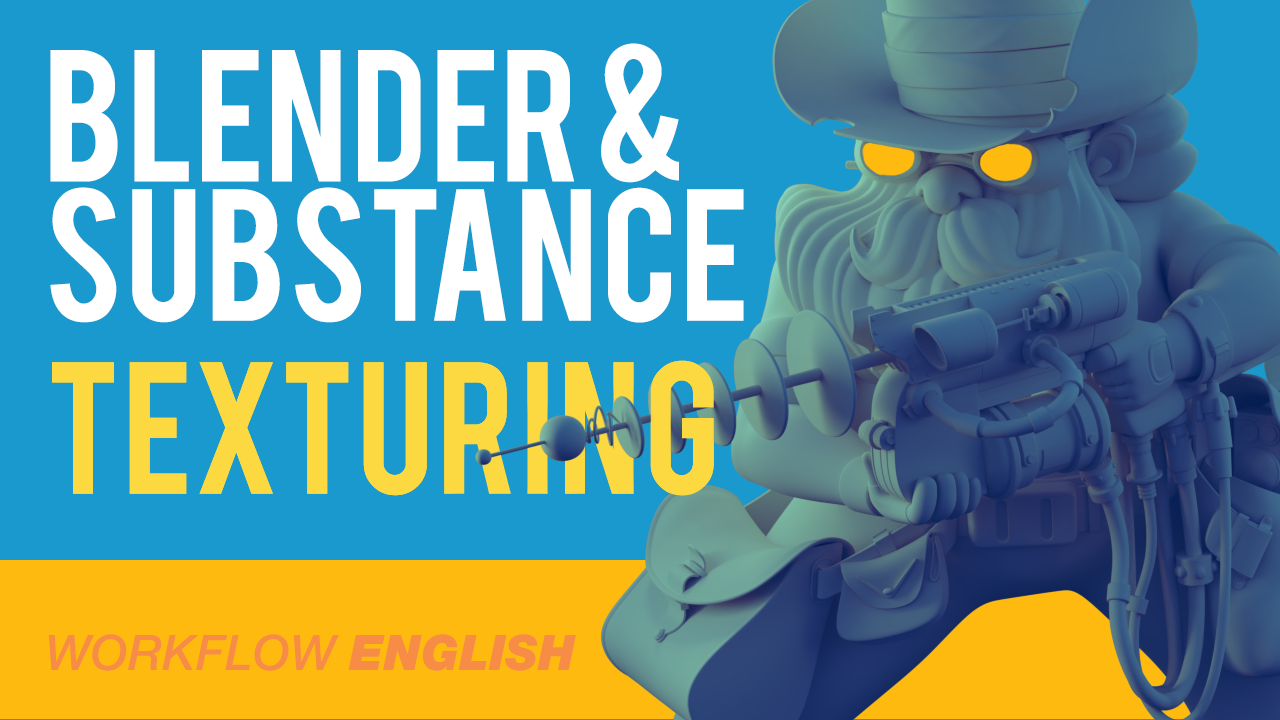
TEXTURING In the third chapter of the guide, I import the FBX, do the bake, explain how to make the most basic material, spoke about the masks and how to export the maps.
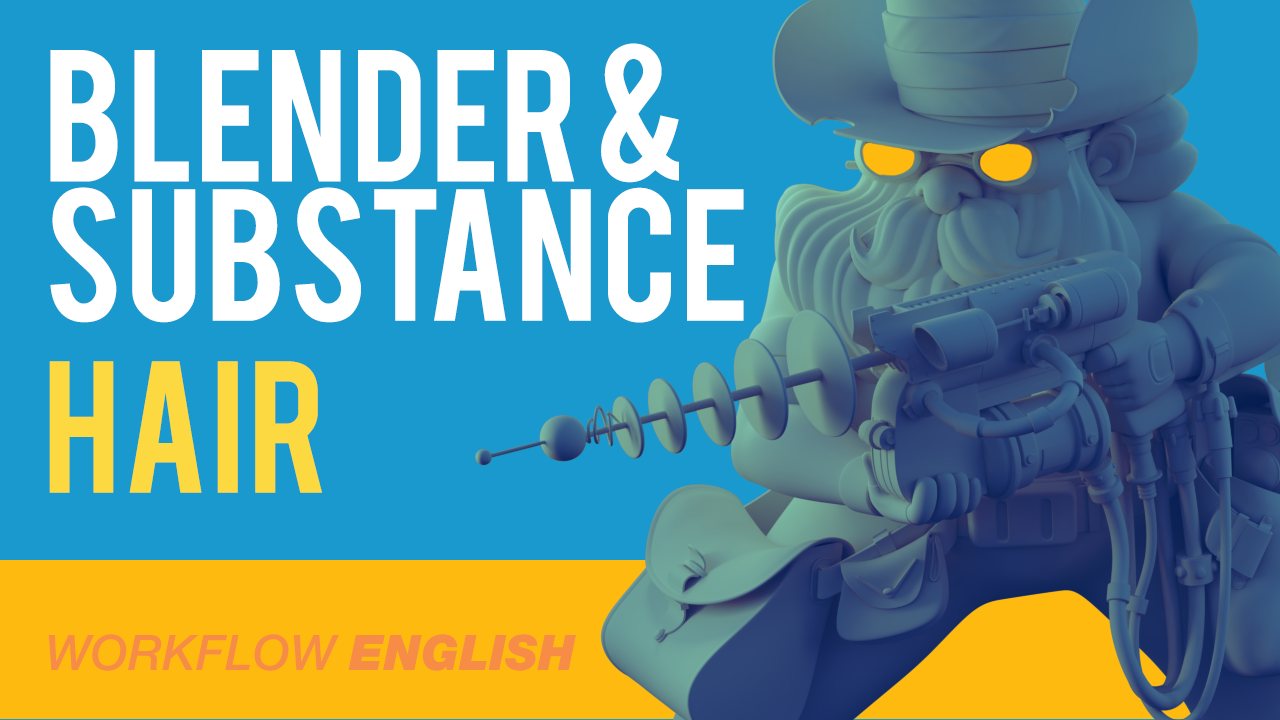
HAIR The fourth video focuses on how to use hair particles. I start with the basic principles, how to make the material, use the particle system and manage the hair in particle edit mode.

SMOKE This video explains how to simulate smoke, basic principles, operation of the domain, flow, wind and what material to use.
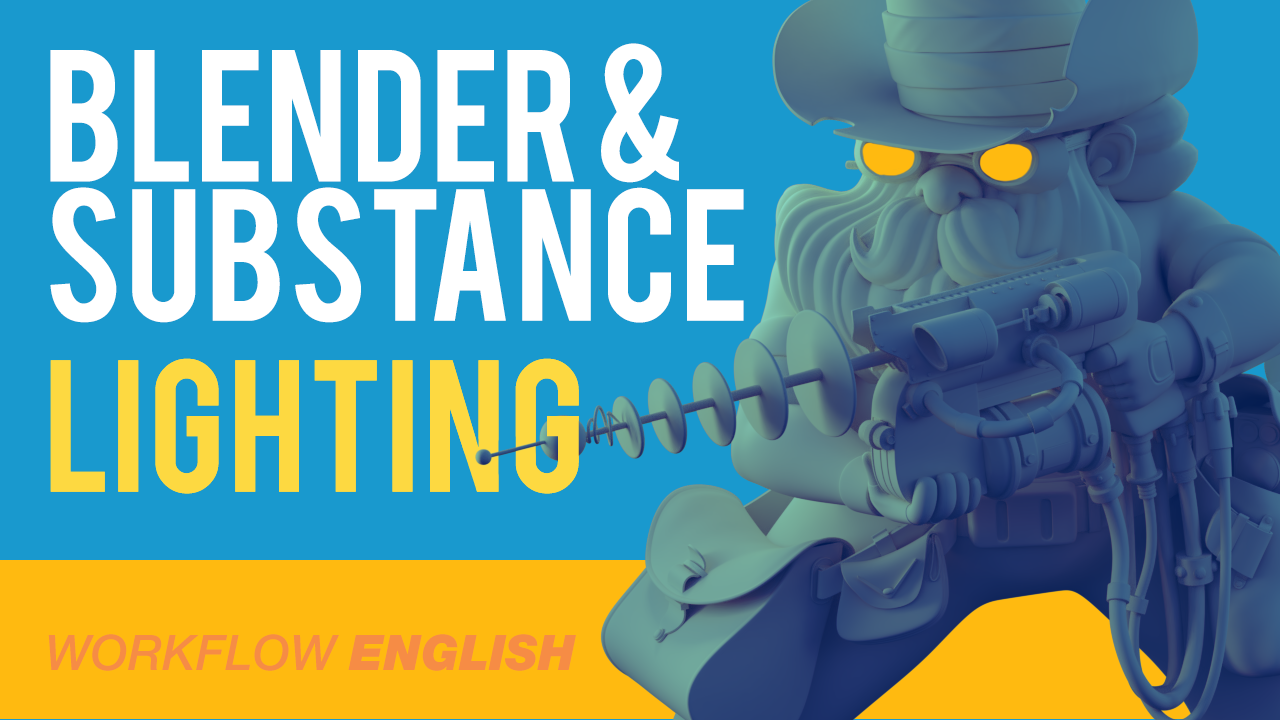
LIGHTING In this video talks about the basic principles of lighting, the types of lights, how to use shadows and how to use temperature (Kelvin) to illuminate the scene.
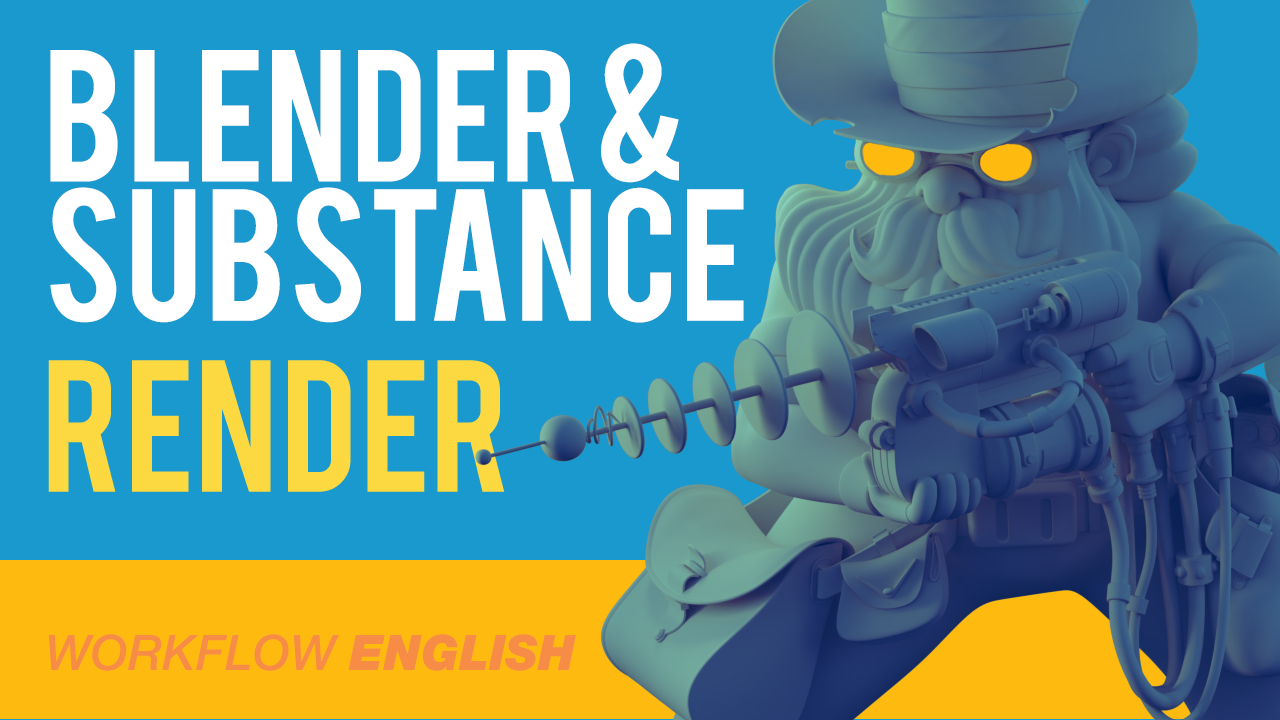
RENDER I explain the last steps, starting with the Principled BSDF material, the use of depth of field with the camera, memory management for rendering and postproduction in Photoshop.
5.1 Conclusion
Thank you for taking the time to read this guide, hope it will help you in your project. This is my first full-body character and it was a great personal challenge. Some things were big barriers like anatomy, smoke, the texel density and memory management to achieve the render, but having solved this I have removed any doubts about the process and has given me a lot of motivation to continue learning new skills. I hope this clarifies the general process to make a project of this type
The first big goal of the AENDOM project is to develop a Video Game, so the next project will be very focused on that area. I still have not decided if I’ll use “free” engines like Unreal Engine and Unity, or switch to the new and open source Godot, which looks pretty promising. The idea is to create an environment that feels alive with small animations and see what is necessary to make it work in VR.
Again, thank you very much for your time and see you until the next project.
Alex Treviño


I want to thank Gaspard Sumeire for allowing me to use his work, Nina Lagler for all the support, Julio Cesar Benavides for advising me on anatomy, Matias Sebastian for giving me feedback on the tutorial, and all the people who came to give me encouragement.
Free Pack
Download the Blender Clay Render scene for free, so that you can examine it yourself, includes the Cowboy Bag with IDs and UVs Maps ready to be painted in Substance Painter
Limited Pack
You can buy the UV Mapped Scene prepared for you to paint in Substance Painter, it also includes the Free Pack.
Complete Pack
Purchase all, the procedural materials made in Substance Painter for this project. The Complete Scene in Blender with all maps PBRs, Hair Particles and Smoke Simulation. It also includes the Free Pack and the Limited Pack.