

- Medusa Nodes
- Structure
- Object types
- Preparing
- Basic Groom
- Guide Basics
- Deformers
- Masking
- Layers
- Surface Deform
- Shading
- Tips & Tricks
This tutorial’s primary aim is to introduce the basics of Grooming with Medusa Nodes. It summarizes other areas, like modeling and rendering, to support the core focus.
Preparations
1.1 Software, Skills & Setup
Blender 4.2
The primary platform for creating, grooming, shading, and rendering the character.
Substance Painter 2024
Used for detailed texturing of the model.
Photoshop 2024
Employed for compositing and final image enhancements.
DaVinci Resolve 19
Used for editing the turntable video and other animations.
Hardware Used
GPU NVIDIA RTX 3080 Ti
CPU Intel i7 7700K
RAM 64 GB
Hardware Minimum
GPU 12 Gb VRAM
RAM 16 GB
The Goal is to exemplify the procedural grooming techniques using the Medusa Nodes Addon in Blender.
3D Knowledge Level Intermediate
Reading Time 15 minutes

1.2 Concept
This Blender Tutorial is designed to guide you through creating and manipulating a groom using the Medusa Nodes Addon
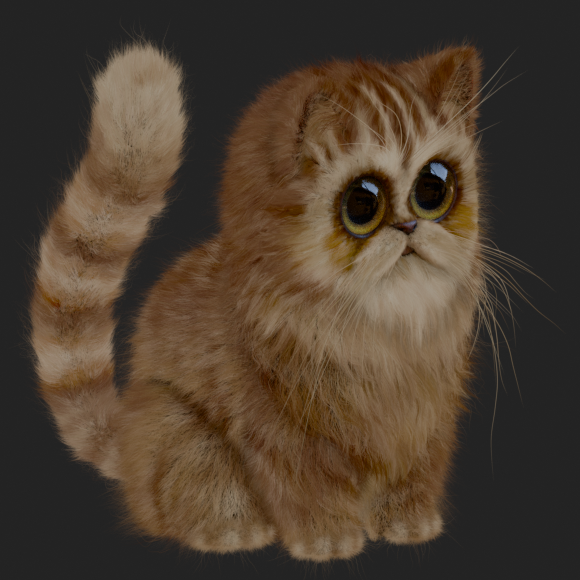
The character in this project is a blend of multiple concepts, translated into a 3D form. The aim was to create a mini fuzzy beast with a fat, stylized silhouette, balancing simplicity and personality. This process began with a series of rough sketches to define key shapes and features, serving as a blueprint before moving into Blender.

1.3 References
References played an important role in bringing this concept to life, having a specific goal is crucial
I focused on fat and hairy cats, gathering images that showcased various angles: side views, front views, and close-ups of features like the eyes, nose, and ears.
All these references were organized into a PureRef file, which acted as a visual guide. This helped in understanding the shapes, proportions, and textures essential to the character design. By building a strong reference library, the creative process became more structured and informed.

Modeling
Blender 4.2

2.1 Blockout
The first step in modeling this character was blocking out the basic structure
I focused on three key elements: silhouette, line of action, and flow. These fundamentals ensured the design was cohesive and expressive from all angles. By refining the shape through multiple viewpoints, I aligned the character’s proportions and pose to make sense in 3D space.
The Lattice Modifier was an indispensable tool during this phase. It allowed for efficient refinements, helping to adjust the overall form quickly without sacrificing accuracy.
Tip
Before applying the Lattice Modifier, avoid making edits in Edit Mode. Instead, scale and position the lattice in Object Mode to ensure proper deformation behavior.
2.2 Remeshing the Model
Once all the parts of the model were positioned, I combined them into a single piece
Then performed an automatic Remesh in Sculpt Mode. By setting the resolution to a balanced level, I created a unified base mesh that would serve as the foundation for retopology. Preparing the model for a cleaner topology and smoother transitions.

2.3 Manual Retopology
I focused on creating a clean mesh with only quad faces
For this project, I opted for a manual retopology approach to ensure smooth subdivision without artifacts. Since the character wasn’t intended for animation, I prioritized efficiency over strict adherence to animation-friendly practices, taking liberties with the topology to speed up the process.

2.4 Creating Face Sets
Simplify the workflow during the Shape Keys phase
I divided the model into manageable regions using Face Sets in Sculpt Mode. This segmentation made it easier to handle the topology and focus on specific areas when sculpting expressions or adjustments.
Use the Draw Face Sets brush and hold Ctrl while painting to extend an existing Face Set, maintaining consistent color and segmentation.

2.5 Shape Keys for Expressions
Shape Keys allow a range of emotions and versatility to the character’s expression
The process started with saving the original mesh as the first Shape Key, labeled “Base.” Additional Shape Keys were created for sculpting different expressions and features.
1. Set the Value of the Shape Key to 1 to preview the changes in real time. (2.5.1)
2. While modifications can be made in Edit Mode, using Sculpt Mode provides better control and smoother adjustments. (2.5.2)

(+) Zoomable Image
2.5.1

2.5.2
2.6 UV Mapping
By creating a traditional UV layout, I gained greater control over texturing and avoided complications later in the workflow
While not strictly necessary for the groom, UV mapping was essential to simplify painting the character and adjust the fur colors intuitively. Have in mind that the Medusa Nodes Addon does not support UDIM workflows, so ensure all UVs fit within the standard 0-1 UV space.

2.7 Export to Substance Painter
With the model finalized, prepared it for texturing in Substance Painter
Preparing for Baking to ensure clean bakes and seamless re-importing into Blender, I separated objects into individual meshes. This avoided overlapping or baking errors.
I separated the character’s body into two meshes: one for the skin and another for the fur.
Also, the eyes were divided into two meshes: the iris and the cornea, to allow precise detailing.

Download the clay render for free or support me to continue doing more projects like this, and buy the scene ready to paint or the scene ready to render!
Texturing
Substance Painter 2024
3.1 Texturing with Substance Painter
The texturing phase in Substance Painter 2024 Workflow focuses on supporting the procedural grooming process
Textures are kept straightforward and functional, tailored to enhance the character design while maintaining the spotlight on the fur. The workflow is divided into four main parts
Skin
Textures for the skin are applied selectively to key areas, such as the nose, lips, and eyelids, for detail where it matters most.
The rest of the body is given a dark tone to prevent the base mesh from showing through the fur.
Coat
The fur coat is painted with simple lines and varying shades, adding subtle depth and enhancing the procedural fur system’s visual impact.
Cornea
A very light roughness map is applied to the cornea to simulate its smooth and reflective surface, avoiding unnecessary complexity.
Iris
Only the visible part of the iris is textured, using symmetry to save time and effort. Hidden areas are left untextured as they won’t be visible.

3.2 Exporting Textures
For this project, I created a custom export preset
The textures are saved as PNG files, with a mix of 8-bit and 16-bit formats, depending on their purpose. Additionally, the displacement map is exported as an EXR file for greater precision in displacement effects. This setup ensures a balance between high-quality textures and compatibility with Blender for the grooming workflow.

(+) Zoomable Image
Grooming
Blender 4.2 & Medusa Nodes
4.1 Medusa Nodes
Procedural Hair System for Blender
The Medusa Nodes Addon offers an intuitive, efficient solution for creating procedural hair in Blender. Its streamlined interface and integration with Geometry Nodes surpass Blender’s default workflows in speed and flexibility. Users can modify underlying node structures to meet project-specific needs, making this addon invaluable for stylized and realistic hair design.

Attention
As the addon is in Beta, occasional bugs may occur. For issues, contact the developer via Twitter or BlenderArtists, or consult the Documentation for updates and solutions.
4.2 Addon Structure
Medusa Nodes organizes its workflow into three key sections in the viewport sidebar
1. Menu: Begin by adding a Groom object here, which serves as the foundation of the procedural setup.
2. Hierarchy: This is your primary workspace for managing utilities and deformers, refining the flow and behavior of the hair.
3. Properties: Adjust settings and parameters for utilities and deformers to fine-tune the hair’s appearance and dynamics.
Geometry Nodes: Beyond the interface, Geometry Nodes enable further customization, allowing for tailored adjustments that exceed the sidebar’s default options.

4.3 Object Types
Medusa Nodes employs three object types to define the procedural workflow, the Emittter, the Guide & the Hair

The Emitter Object: The base geometry from which hair strands are generated, akin to a “scalp.” It requires a UV-mapped surface and does not support UDIMs.

The Guide Object: Determines the flow and direction of the hair, acting as parent splines to shape its behavior.

The Hair Object: The visual representation of the hair strands, represented as splines for deformation and rendering.
4.4 Preparing for Grooming
Establish a solid foundation that ensures smooth progress throughout your hair creation process with Medusa Nodes

Prepare the Mesh
Ensure the mesh has a clean UV layout and proper normal face orientation.
Since UDIMs are unsupported, UVs must fit within the 0-1 space.

Set the Render Engine
Use Cycles for accurate previews and final renders of the hair splines.

Optimize the Viewport
Enable Cavity Shading in the viewport and adjust Valley settings for clear visualization of the grooming process.
4.5 Basic Groom Setup
Creating hair in Medusa Nodes involves a straightforward process broken down into three essential steps, each contributing to the final look and behavior of the hair system


Select the Mesh
Choose the base mesh for the hair and initialize the system by clicking “New Groom” in the menu. (1)
This adds two components:
Groom: Adjusts thickness. (2)
Generator: Controls length, density, and randomness of strands. (2)
Add a Guide and Comb It
Add the Guide Deformer to dictate the flow and direction of the strands. (3)
Comb the guides to shape the hair’s layout, aligning it with the desired style.
Add Deformers
Introduce deformers such as Noise (4), Clump (5), and Trim (6) to enhance the hair’s realism or achieve stylized effects.
Experiment with deformer order for different results.
Tip
Always select the Hair Object when adding deformers to ensure proper application.
4.6 Guide Control Basics
These principles ensure that your guides remain manageable while providing precise control over the hair system’s behavior and appearance
Guides in Medusa Nodes serve as the foundation for shaping and controlling the behavior of hair splines. To get the most out of guides, it’s best to start with a simple setup and refine it gradually. Here are essential considerations for creating effective guides.

(+) Zoomable Image
Smooth Normals Check
Ensure smooth normals on your mesh. This allows hairs to follow the surface accurately, even when subdivisions are applied.

(+) Zoomable Image
Surface Deform Check
Enable this option if your hair needs to follow animations or Shape Keys. It ensures that guides adapt seamlessly to deformations in the emitter mesh.

(+) Zoomable Image
Hair Thickness
Adjust the thickness of the hair to make guides easier to see and manage during editing. This improves visibility and precision in dense areas.

(+) Zoomable Image
Control Points
Use a low number of control points for easier manipulation and more intuitive control over the hair’s shape and flow.
Tip
Consistency is Key Make sure the main Generator and the one inside the Guide have the same number of control points. This ensures proper interpolation and avoids mismatches in the hair flow.
4.7 Understanding Deformers
Deformers in Medusa Nodes are procedural modeling nodes that modify and shape hair splines, adding layers of detail and realism
Each deformer contributes uniquely to the final groom. By strategically combining these deformers, you can create highly detailed and realistic grooms. Experiment with different settings to achieve a balance between control and natural variation.

Noise
Adds randomness to the hair strands, creating a natural, unkempt look.
Scale Controls the size of the noise pattern.
Scale Profile Adjusts the effect along the hair length.
Frequency Defines how often the noise pattern repeats.

Clump
Groups hairs into clusters for a natural appearance. Multiple clumps can be layered.
Clump Profile Adjusts the density and size of each clump.
Clump Density Controls the distribution of clumps across the groom.

Trim
Shortens the length of hair strands for added variety and precision.
Tips > Random Mask Group Use a random mask, especially at the tips, to create natural tapering and avoid uniform trimming.
This tutorial introduces only a selection of the deformers available in Medusa Nodes. The add-on includes additional deformers and utilities.
Want to Learn More About Medusa Nodes?
If you’re interested in diving deeper into Medusa Nodes, check out the official YouTube Playlist by the creator of the addon. These two introductory videos provide an excellent overview of the addon’s capabilities and workflow.
Boyo Groom Breakdown
Dividing and Layering Hair Systems
Two foundational principles guide the grooming process in this project, dividing the mesh into specific areas to create tailored designs for each region, and assigning different levels of detail to enhance depth and variation across the character.
4.8 Dividing by Masking Areas
This technique allows for fine control over fur placement, ensuring each area aligns with the intended design
Customize regions of the mesh by dividing it into masking areas.
Use a Density Map in the Generator settings. (4.8.1)
Paint areas in White to generate fur and leave areas Black for regions without fur. (4.8.2)


4.8.1

4.8.2
4.9 Multiple Groom Layers
Three distinct groom layers per area, each contributing a unique characteristic
Main Groom
Defines the fur’s general shape and volume, with Hair Thickness ranging from 0.0003 to 0.002 for a soft yet structured appearance. The Density is the highest, around 1,000,000, depending on the area.
Secondary Groom
Breaks the uniformity of the Main Groom with narrower Hair Thickness from 0.00015 to 0.0005, adding subtle textures for naturalism. This layer has about 20,000 of Density, providing fine detail without overwhelming the base.
Long Groom
Adds occasional long strands of 0.0005 to 0.001 Hair Thickness , disrupting the silhouette for depth and interest. With a Density of approximately 1,500, this layer introduces unique highlights to the fur.
You can add as many layers as you want. I tend to use three at a minimum, but additional layers can provide even greater detail and complexity.


4.10 Surface Deform
Surface Deform allows fur to follow mesh deformations, enabling natural animation responses to Shape Keys or rigged movements. To enable Surface Deform, you need to adjust settings in all the grooms associated with the emitter

How to Enable It:
Activate Surface Deform in the Generator Properties.
Enable the option in Guide > Generator Settings as well.


4.11 Shading
While not aiming for photorealism, this shading method achieves a visually complex and detailed effect with minimal effort
You can craft nuanced variations across the surface by leveraging the textures created in Substance Painter and integrating them with procedural masks and the Hue/Saturation/Value node. This technique gives the impression of intricacy and depth, which is ideal for stylized or artistic projects.
How to Create the Shading Nodes
The shading is built step-by-step, using Substance Painter textures and procedural masks, as follows:

(+) Zoomable Image
1. Base Texture
Start by adding the base texture generated in Substance Painter. This forms the foundation of the material.


2. First Layer of Masks
Generate two procedural masks using Noise Textures. These masks create patterns for the initial variation.


3. Modify Texture with Masks
Combine the masks with a Hue/Saturation/Value node to adjust and alter the base texture.


4. Groom Masks
Generate two additional masks specifically for the groom. These help define unique areas on the surface.


5. Adjust Groom Textures
Use these masks with another Hue/Saturation/Value node to apply variations to the fur texture.

6. Clump Attribute Mask
Generate a final mask based on the Clump attribute from the Medusa Nodes addon. This adds further detail to the shading.


7. Final Texture Modifications
Use the Clump-based mask with the Hue/Saturation/Value node for the last round of adjustments.


8. Assign Textures to Shaders
One texture connects to a Principled Hair BSDF node and another connects to a Principled BSDF node.

9. Mix the Shaders
Use the Mix Shader Node to blend the two materials, assigning 25% to the Principled Hair BSDF and 75% to the Principled BSDF.

4.12 Tips and Tricks
1. When you Comb the guides, ensure you have a Low Density in the Groom.
2. Try not to use Undo, but if you must go to Edit > Undo History and select a specific state.
3. When I add the Guide Deformer, I erase all the guides and start from scratch. Also, I select the groom, not the generator, when adding the Deformer.
4. Keep Hair Flow between the different Areas
5. Keep Project Notes on the side
6. Have Backup Files in incremental
Rendering
5.1 Linking Scenes
High-density grooming systems can make moving scenes sluggish
Linking separates the character’s heavy groom data into its own file, allowing smooth performance and seamless integration into the environment without duplicating large datasets.

Prepare the Character Scene
Open the file with the character.
Organize related objects (mesh, groom, guides) into a Collection. In this case, “Cat”.

Create the Environment Scene
Open or create a new file for the environment, which will serve as the main scene.


Link the Character
Go to File > Link. Navigate to the character file, select the collection, and add it to the environment.
The character will appear as a linked object.
5.2 Rendering Preparation
Organizing assets, setting up light groups, and configuring render passes before rendering ensures efficiency, minimizes rework, and optimizes quality


Set Up Light Groups
Assign lights to groups (key, fill, rim) and enable light groups in View Layer Properties.
This provides individual control over lighting during compositing.

Apply AGX Punchy
Use AGX Color Management for vibrant and dynamic results, applying the “Punchy” look for this project.

Use File Output Nodes
Add a File Output node in the compositor and add each render pass and light group.
Set output paths for organized renders and ensure proper connections for automation.
5.3 Compositing
Raw renders often need more depth and polish
Compositing enhances visual quality by blending passes, adjusting tones, and adding subtle effects, creating a professional final image.


1. Start with the Base Image
Use the render’s base as the foundation and enhance it in Camera RAW, adding Texture and Clarity to refine details and mid-tone contrasts.
2. Blend Light Groups
Backlight: Screen mode, 50% opacity.
Rim Light: Screen mode, 100% opacity.
Face Key Light: Screen mode, 25% opacity.
3. Enhance with Render Passes
Diffuse Color Color Dodge, 10% opacity.
Indirect Transmission Screen, 25% opacity.
Ambient Occlusion Multiply, 50% opacity.
Fill Light: Screen, 15% opacity.
4. Apply Final Touches
LUT for unified tones.
Noise and Chromatic Aberration for organic texture and cinematic effects.
5.4 Turntable 360
Presenting Your Character in Motion
Turntables provide a comprehensive view of the character, showcasing textures, and silhouettes from all angles. This is a standard for 3D presentation and critique.

Set the Goal and Parameters
Duration 12 seconds.
Framerate 24 fps.
Timeline 1–288 frames.
Animate the Rotation
Frame 1 Rotation 0°.
Frame 288 Rotation 360°.
Use Linear Interpolation.
Output the Turntable
Export as a 16-bit PNG sequence for high-quality results with flexibility for post-production.
Lighting and Camera
Use neutral lighting or an HDRI . And keep the camera focused on the character’s center.
The Project


6.1 Conclusion
This project, while relatively short, has been incredibly fulfilling and a significant step in my growth as a 3D artist. Grooming in Blender, once one of the most challenging aspects of my workflow, has become a process I genuinely enjoy. The Medusa Nodes Addon has been a game-changer in making grooming both intuitive and rewarding.
I hope this tutorial has helped you understand the fundamentals of Medusa Nodes and given you a solid foundation for exploring procedural hair techniques. While this is not a paid endorsement, I wholeheartedly recommend this tool to anyone interested in Blender procedural grooming.
Looking forward, I’m excited to embark on my next project. This year, I’ve had the opportunity to work on environment modeling for a feature film, and I can’t wait to share what I’ve learned about procedural modeling and animation using Geometry Nodes. The journey ahead is full of possibilities, and I look forward to continuing to grow and share my experiences with you.
Thank you for following along with this tutorial and being part of this. See you in the next one!
Alex Treviño
Free Pack
Download the Clay Render for free. This pack includes Boyo’s base mesh and a 360° Turntable, ideal for practicing UV mapping and exploring basic 3D workflows.
Download Clay Render and 360°
Limited Pack
Dive deeper with the UV-ready Boyo scene with Shape Keys. This pack also includes all the assets from the Free Pack.
Complete Pack
Unlock the full experience and gain exclusive access to the entire grooming setup in Blender, including shaders and all the assets from the Free and Limited Packs. Perfect for mastering advanced 3D workflows.
Medusa Nodes Addon is necessary for this project to function.