
Software
Blender 2.90
Substance Painter 2020
Affinity Designer
Photoshop CC
Substance Painter 2020
Affinity Designer
Photoshop CC
Featured
- Blockout
- Edge Control
- Edge Flow
- Hair with Curves
- Aligning Vertices
- Avoid UV Distortion
- UV Orientation
- Export to Substance
- Import from Blender
- Baking
- Creating Alpha Maps
- Dirty Fabric
- Selection Methods
- Exporting Maps to Blender
- Topology Render
- The Perfect Eyebrow
- Principled Hair BSDF
- Illumination
- Global Settings
- Denoise Node
- Cryptomatte
- Post Production
It is necessary to know the basics of Blender 2.90 and Substance Painter 2020
Download the clay render for free or support me to continue doing more projects like this, and buy the scene ready to paint or the scene ready to render!
Preparations

1.1 Concept
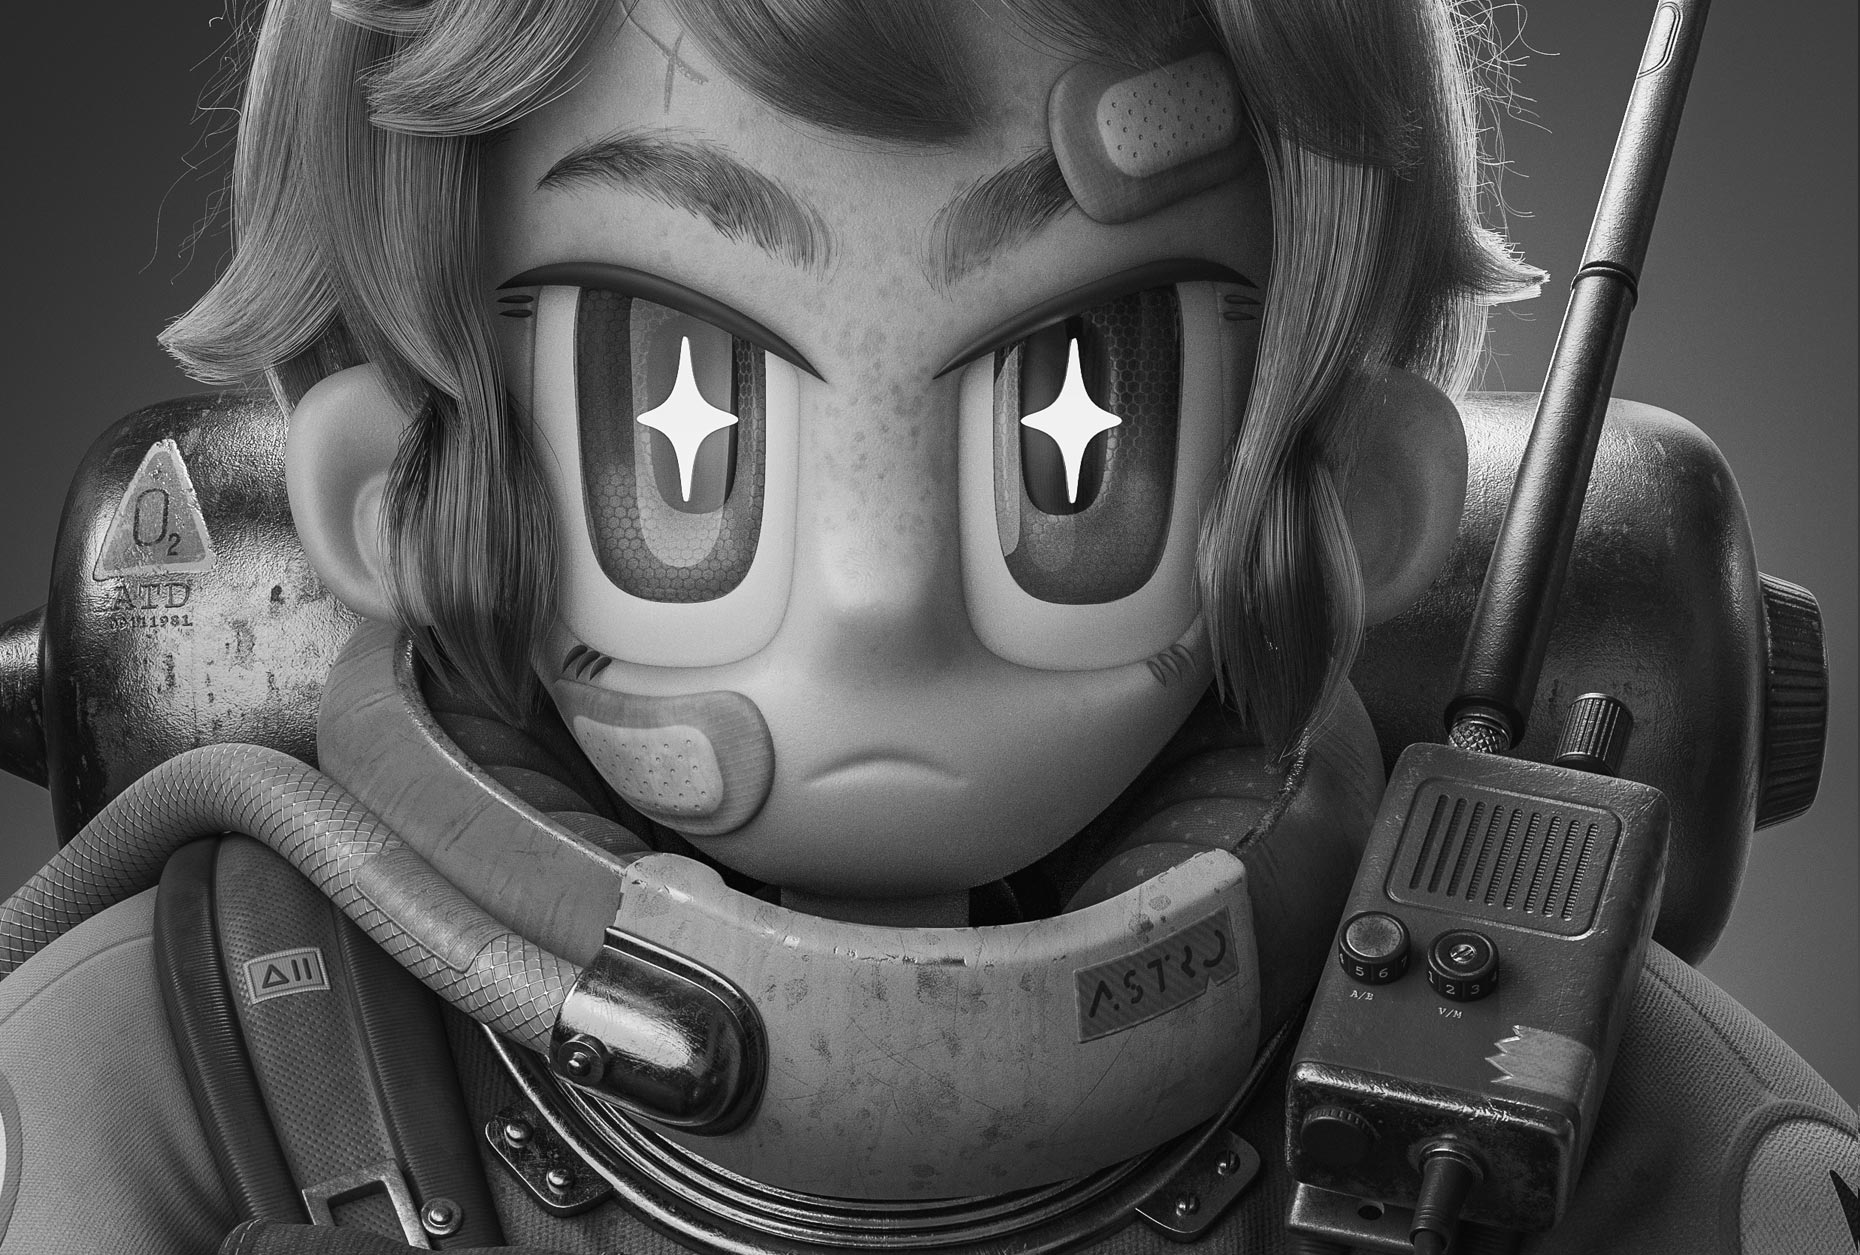
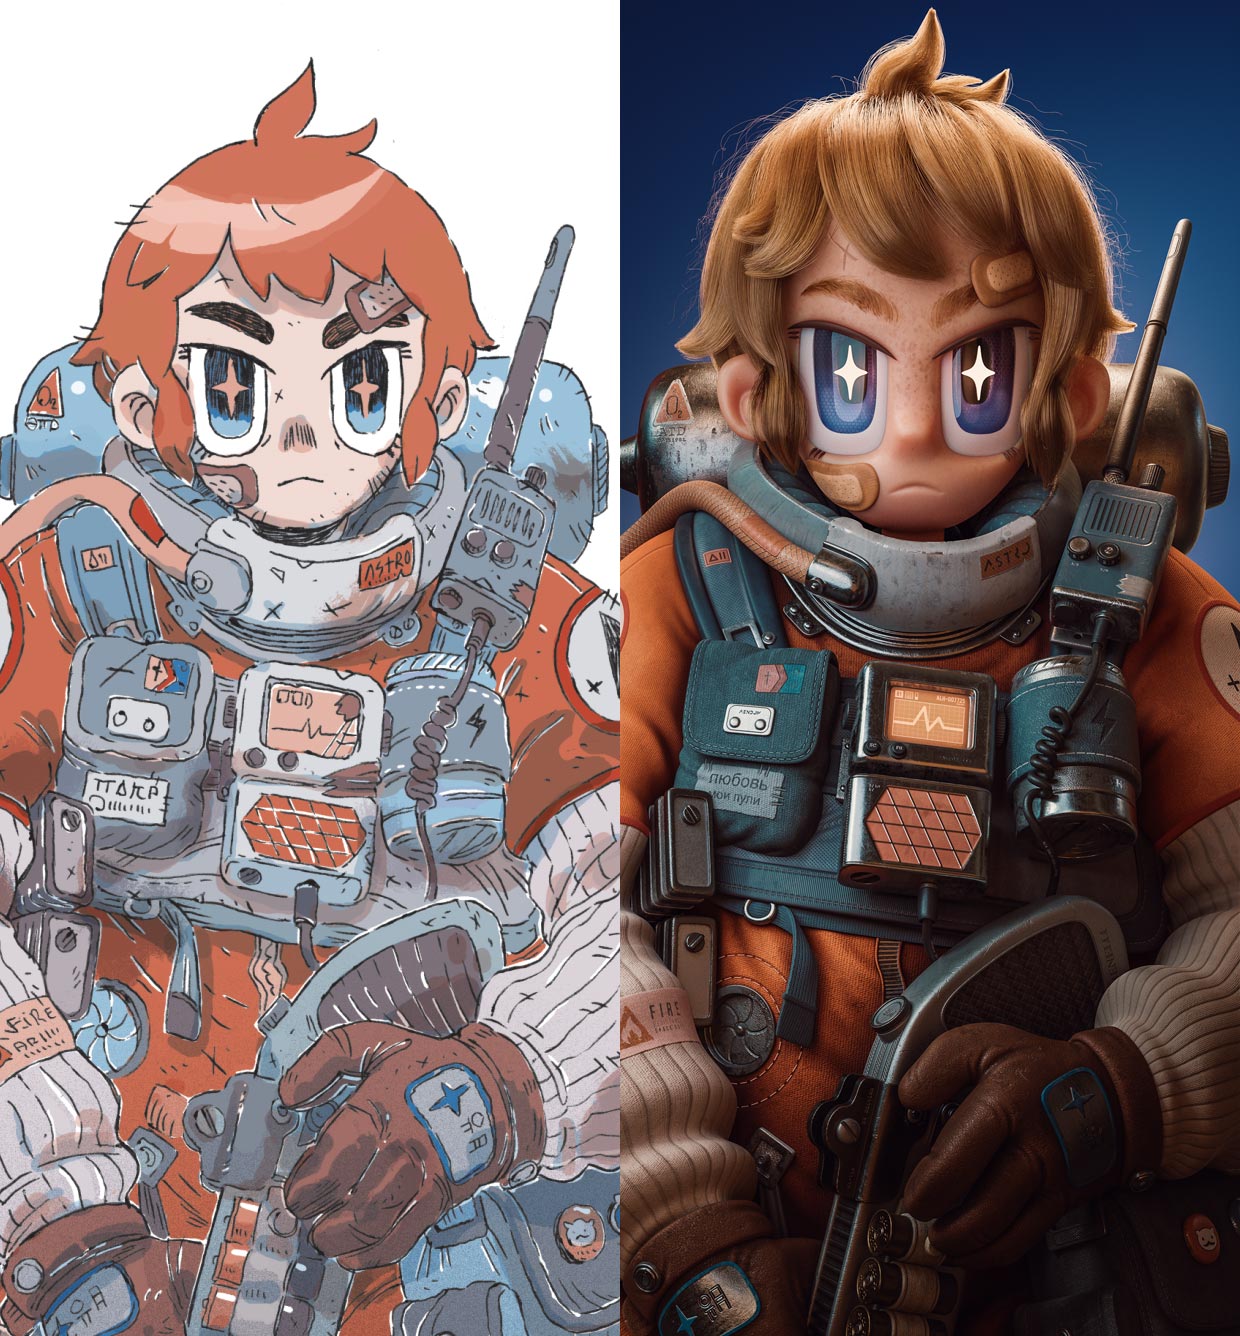
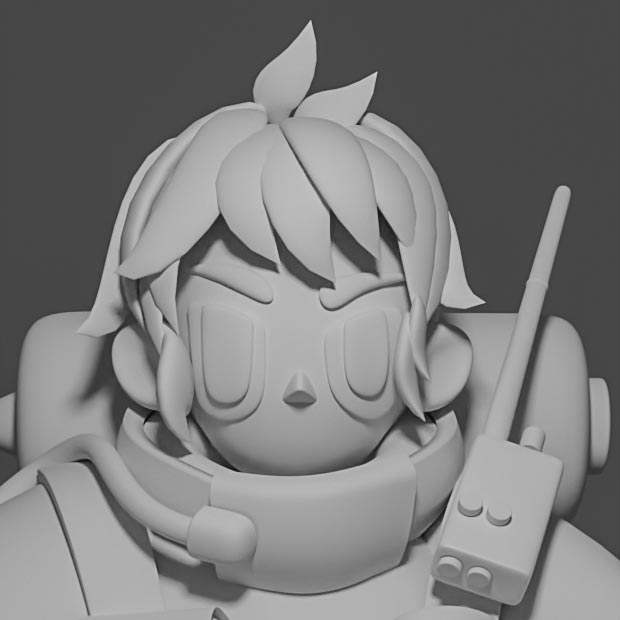
This time I was looking to make a character, but only a bust, which exclusively focuses on recreating the upper body.
With this, I started looking for artists who had a charming character and found an image of Guilliame Singelin. I looked everywhere for more information about this image. When I couldn’t find anything I ended up asking him if he had more images about this character, he told me that this was only a small illustration and he never drew this character again. Although I didn’t have more information about this character, I was convinced that this would be my next work, and I was ready to commit to making my 3D version.
1.2 The Artist
Guillaume Singelin is a French illustrator of the new wave of European comic authors.
His work is strongly inspired by manga artists such as Akira Toriyama and Katsuhiro Otomo. He focuses on cartoon characters and comic book projects. His remarkable style made me fall in love from the first character I saw, the amount of detail, the vibrant colors and the combination of caricature with serious themes is something I can’t help but admire. He has excellent works that you can’t miss, although my favourite is PTSD. Don’t let another minute go by and check out his social networks to give you a visual treat.
Modeling
Blender 2.90
2.1 Blockout
It is overwhelming to start a project, but put aside the fear and start creating the scene with simple objects.
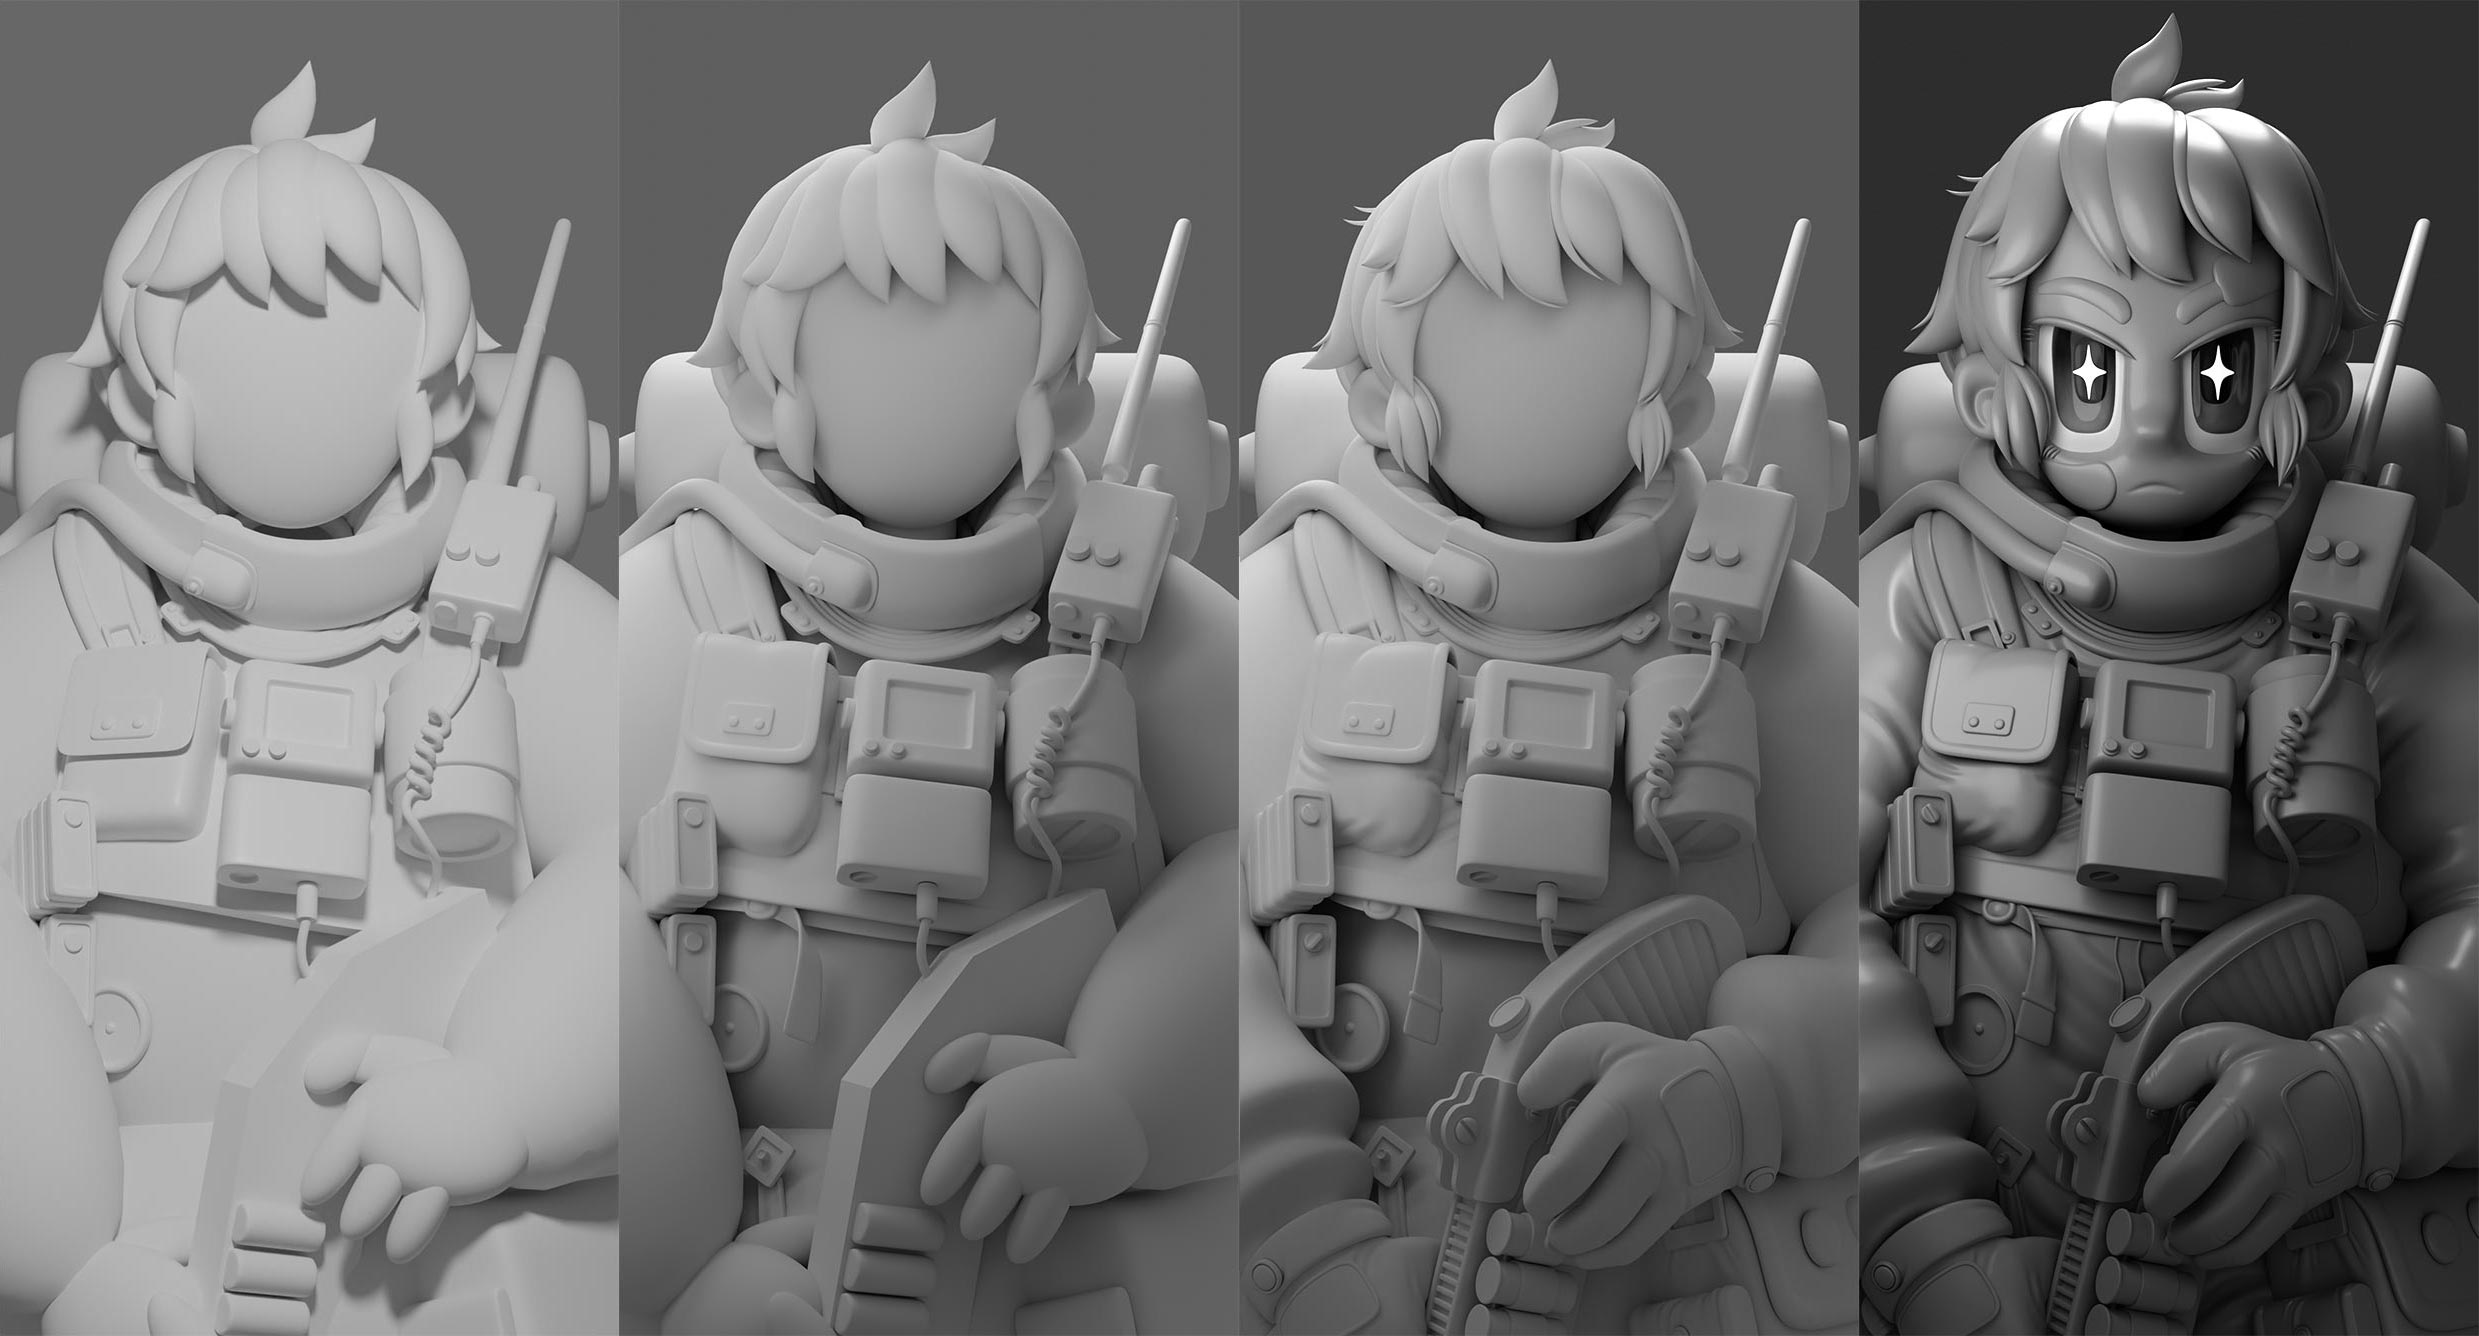
Always start from the general to the particular. Divide the process into at least three stages, beginning with the basic shapes, then medium details, and finally small details. This project was modeled in a traditional way called Polygonal Modeling, using the Subdivision Surface modifier to smooth the model. But I used the Multiresolution modifier to add the last details on the clothes in Sculpt Mode.
Keep Going Forward
Do not get fearful if you don’t get the result you are looking for quickly, keep improving the model until you like it even if it takes longer. As you can see in this image, the first version of the face was terrible, and although it lowered my confidence, I kept working on it until the quality was improved.
2.2 Edge Control
Control the edge angle with a very simple but quite useful technique
To control the angle of a corner, you need to have Three edges and the Subdivision Modifier. If you have the edges very close to each other, you get a sharp angle, and if you have the edges apart, you get a smooth angle (2.2.1). Although this is a straightforward principle, it gets a little complicated when trying to apply different angles to the same object. (2.2.2)
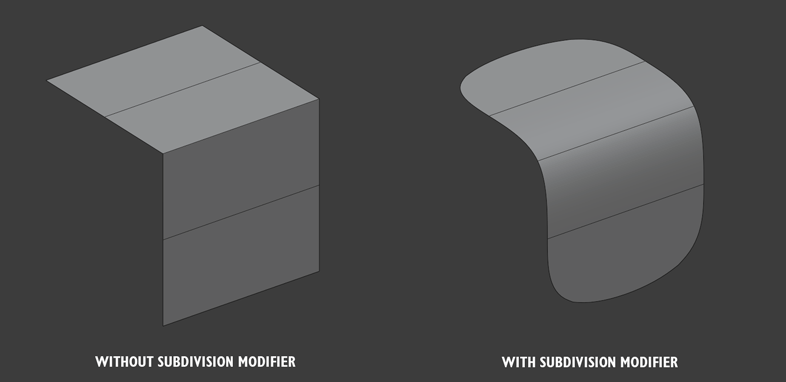
2.2.1
2.2.2

2.2.2
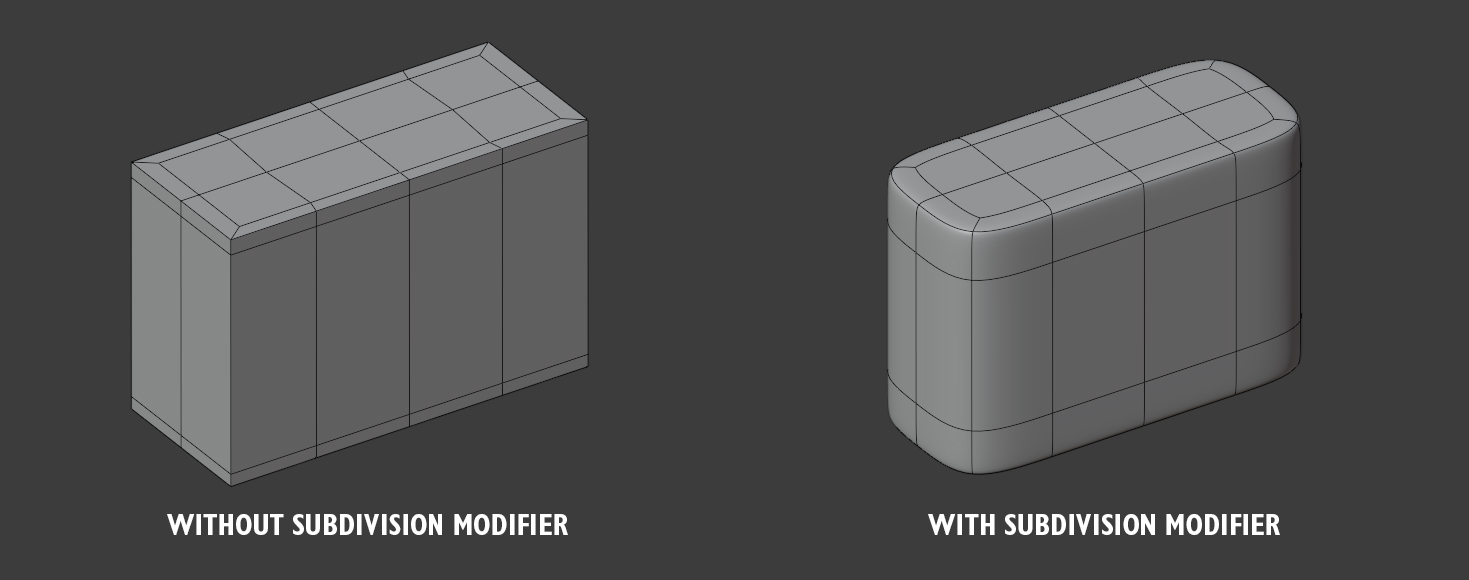
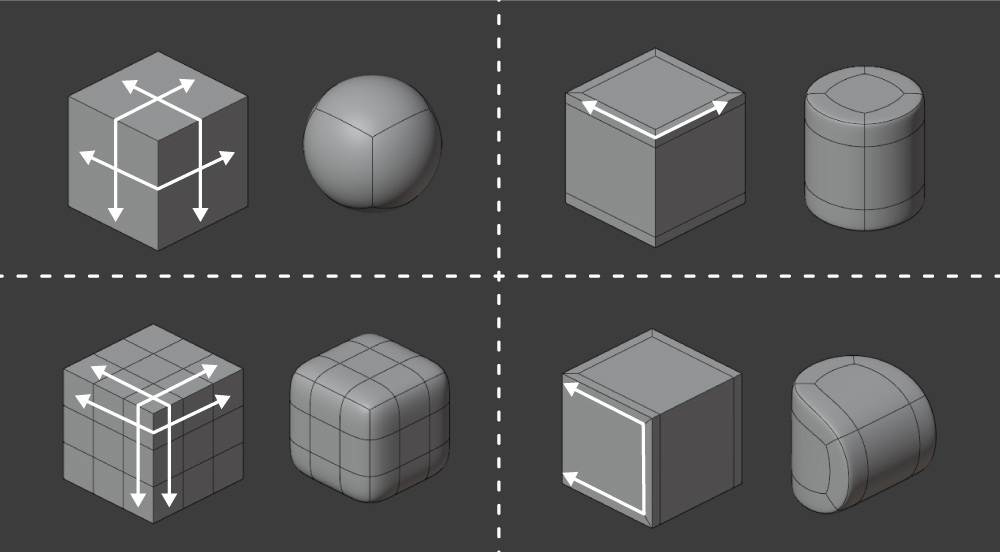
2.3 Edge Flow
Depending on how we place the edge flow, we will have different shapes when subdividing a mesh.
Having the same mesh as a base; in this case, the default cube, we can see how the direction of the edge flow affects the behaviour of the shape when it is subdivided. This process is not so natural at first, and you need to do several experiments to be able to achieve what you are looking for.
SHORTCUTS
Loop Cut Ctrl + R
Bevel Edges Ctrl + B
Select Loop Alt + LMB
Grab G (Twice)
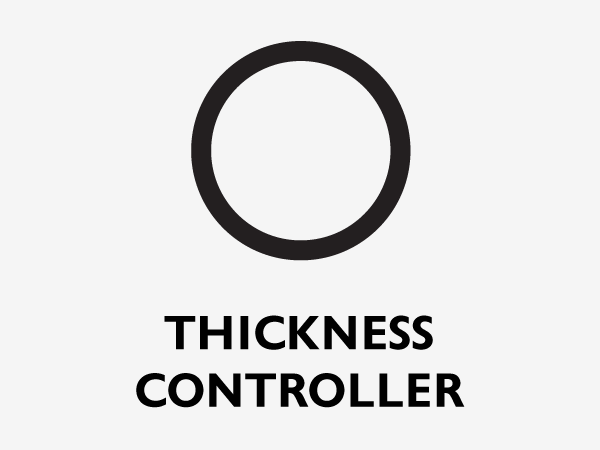
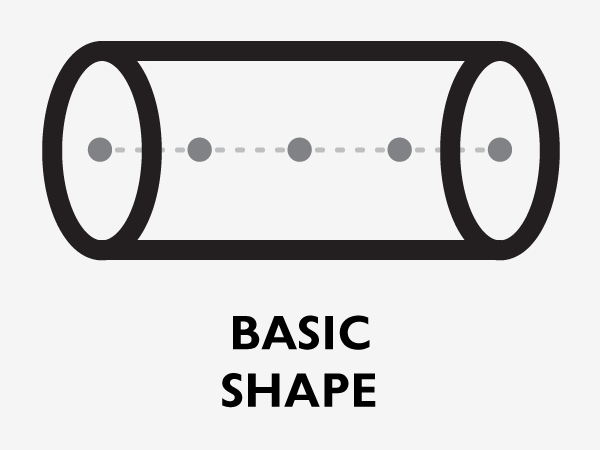
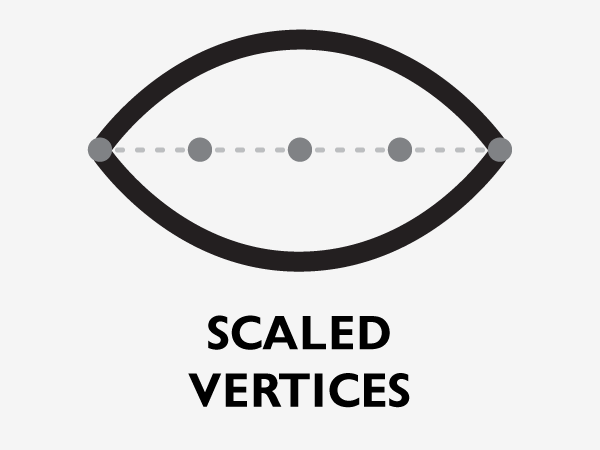
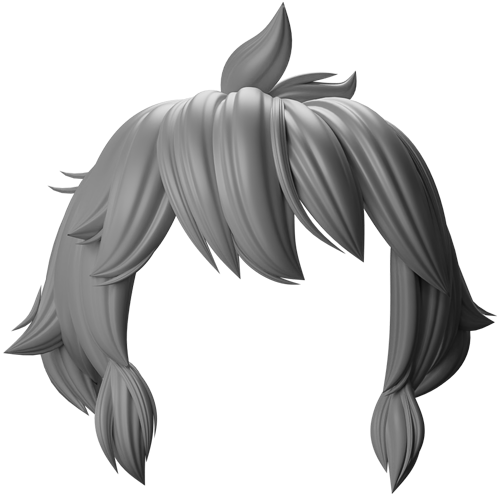
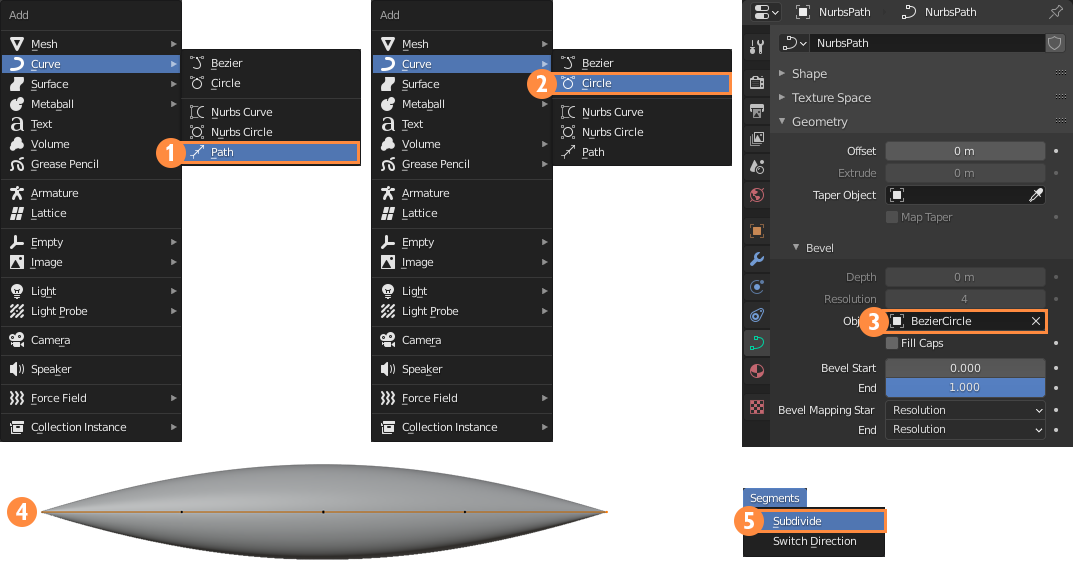
2.4 Hair with Curves
There is a simple way to model hair in five steps.
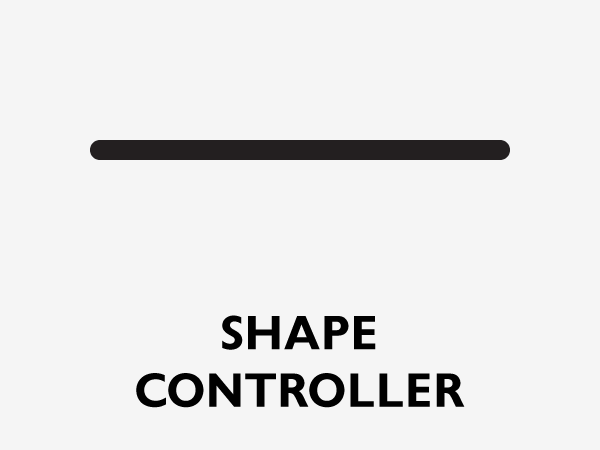

1. Create the Shape Controller with Shift + A > Curve > Path. With this, we will manage the hair strand.
2. Create the Thickness Controller with Shift + A > Curve > Circle. With this, we will control the thickness of the hair.
3. Select the Shape Controller, go to Properties > Object Data Properties > Geometry > Bevel > Object and select the Thickness Controller. Now we can see how this affects the shape of the hair.
4. To close the corners, choose the Shape Controller, go to Edit Mode and select the vertices and scale them with Alt+S.
5. To add more detail to the thickness of the hair, subdivide the Thickness Controller. To do this, first select the controller, go to Edit Mode, and select two or more vertices and go to Segments > Subdivide.
2.5 Aligning Vertices
Manually aligning vertex by vertex is not the best option.
There is no function or shortcut to align vertices automatically, but we can solve this with four simple steps.
1. In Edit Mode choose the vertices you want to align.
2. Now use the S shortcut and then click 0 (Zero).
3. Decide on which axis you want them aligned by clicking on X, Y or Z.
4. Although they are aligned, they are not always where you want them to be, so you will have to move them manually to their final position with G.
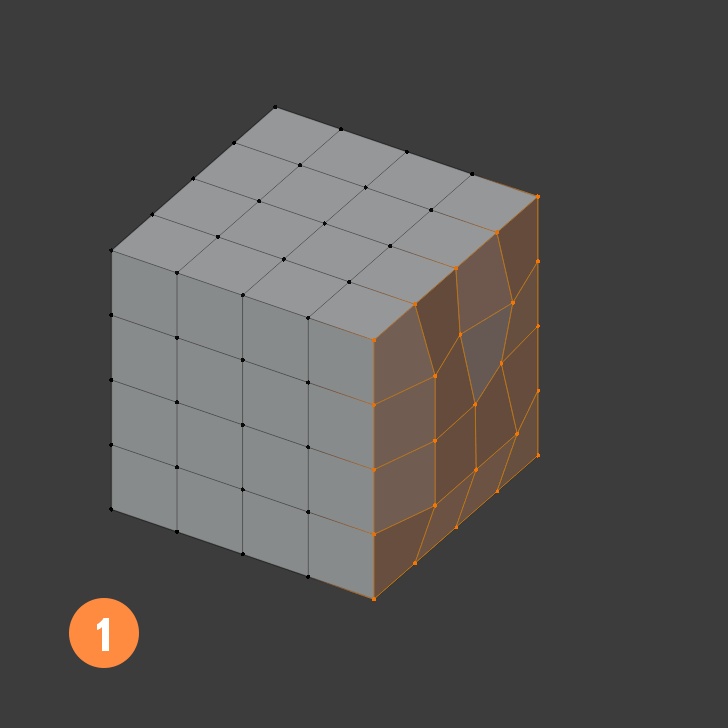
2.6 Avoid UV Distortion
It is imperative to avoid distortion in the UVs to have sharp textures.
To solve distortions, you have to follow an elementary rule. The edge that you will use as a seam needs support on both sides. If it only has one edge, as the first and second object, the distortion will be evident when you subdivide the model. This does not fix all possible problems when doing UVs, but it is a very recurrent problem that we can easily avoid.
2.7 UV Orientation
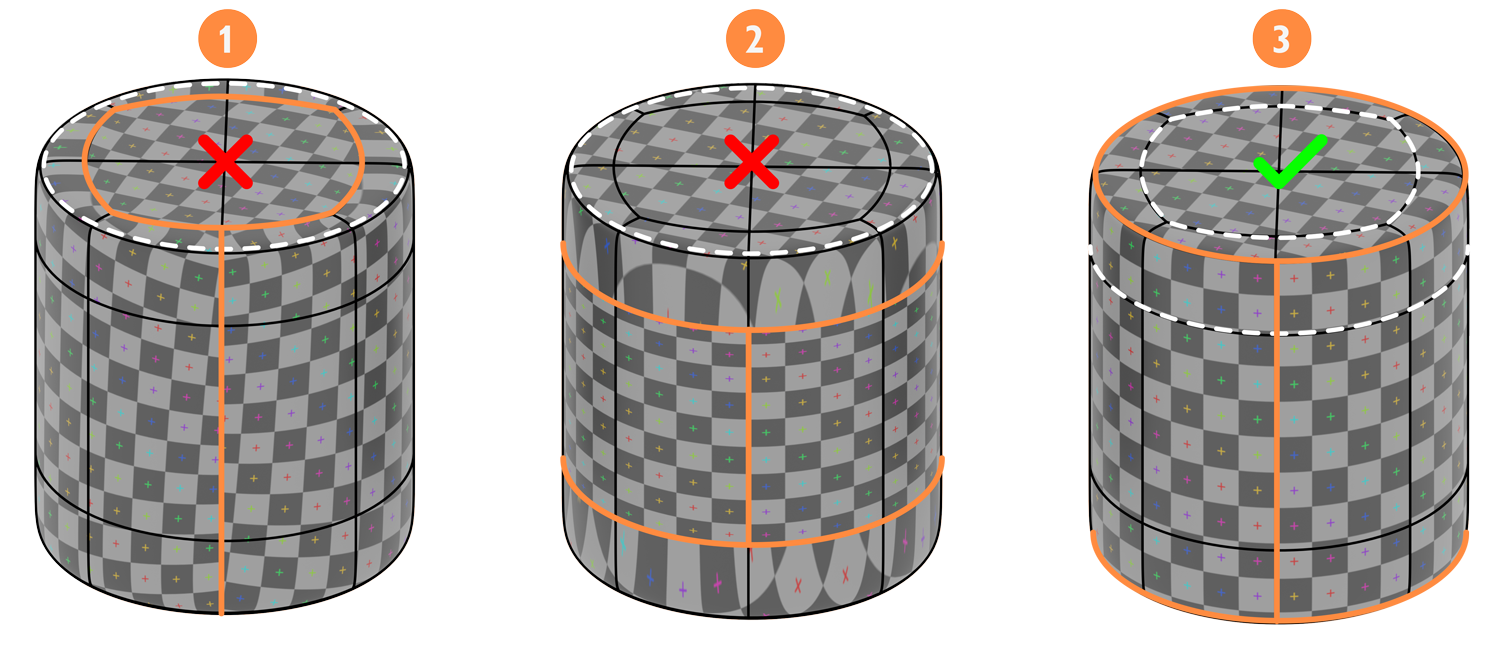
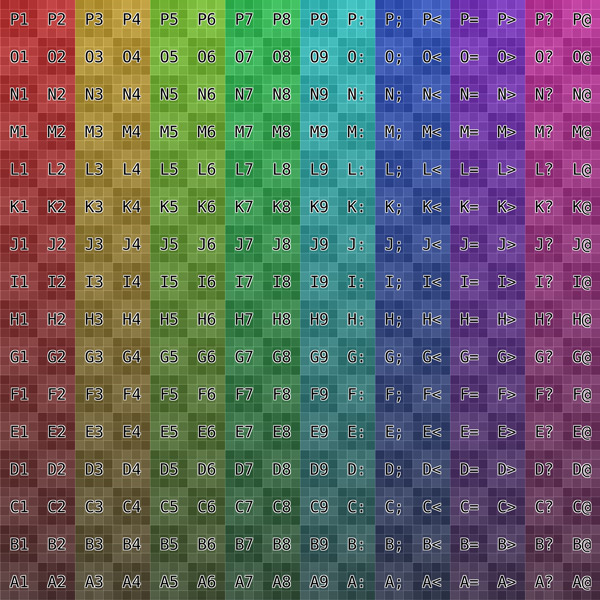
Having the UVs oriented in one direction facilitates texturing in Substance Painter.
We need to generate a Color Grid image (2.6.1), which has a pattern of colors and letters. With this, we can see the orientation of the UVs and rotate the UV islands until they are all oriented to the same side. (2.6.2)
2.6.1
2.6.2
2.8 Export to Substance
We need to export correctly to make it work in Substance Painter without problems.
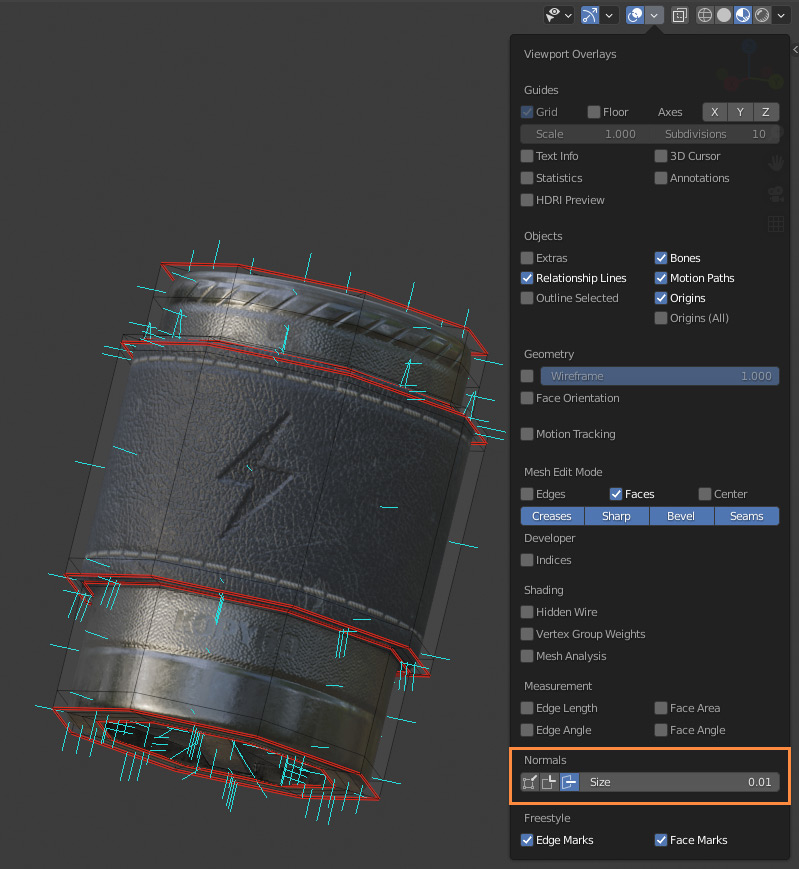
It is crucial to check that the Normals are facing out (2.7.1), and if they are not, this needs to be fixed. To do this, go to Edit Mode, select all faces and go to Mesh > Normals > Recalculate Outside. We also have to be sure that we have a material for each Tileset.
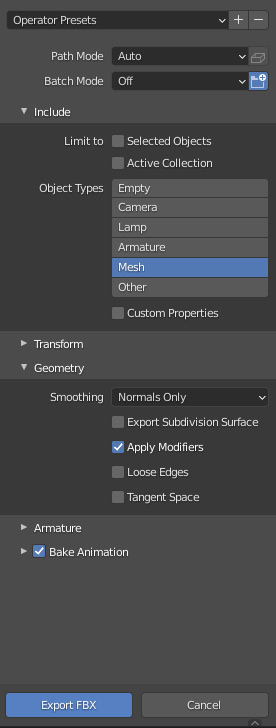
To export select all the meshes, then go to File > Export > FBX, with that it appears a menu where you have to leave selected only Object Types > Mesh and check that in Geometry you have activated Apply Modifiers. With this, we are ready to click on Export FBX. (2.7.2)
2.7.1
2.7.2
Texturing
Substance Painter 2020 & Affinity Designer
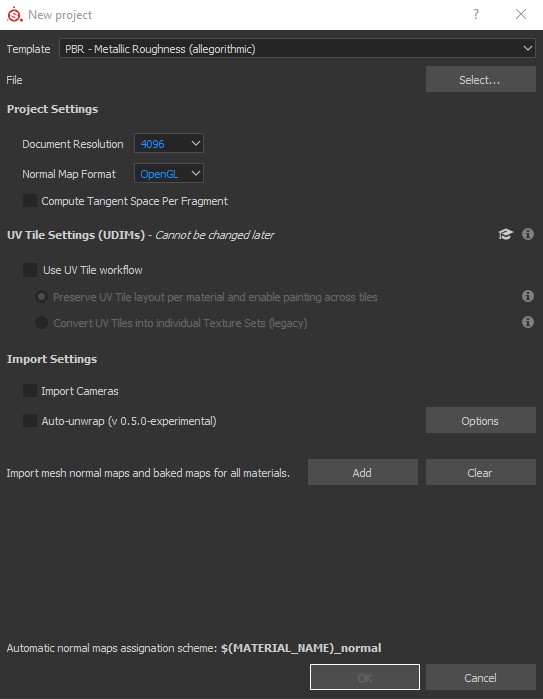
3.1 Import from Blender
It is better to start with the correct configuration, although some of the options can be changed later if necessary.
The import settings come with the PBR – Metallic Roughness (Allegorithmic) template by default, so we leave it as it is. We choose the FBX that we exported from Blender, in the resolution I used 4096 and OpenGL in Normal Map Format. Finally, we click OK.
3.2 Baking
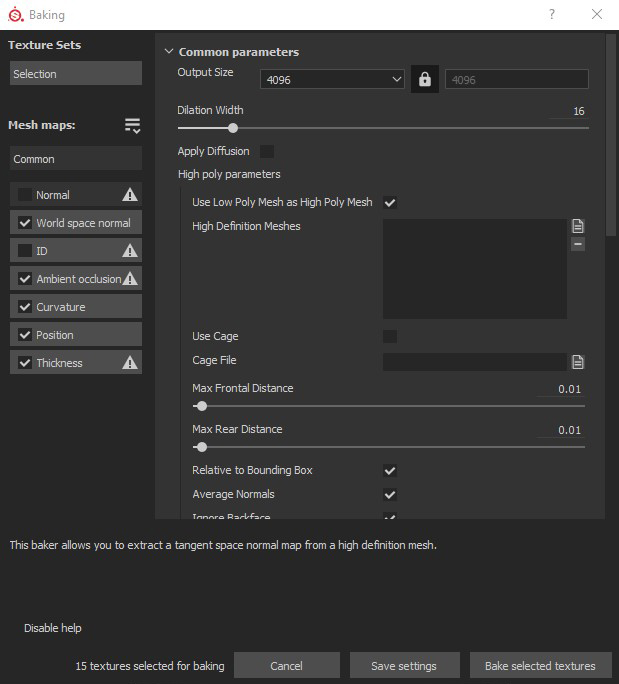
It is not always necessary to bake all maps.
I have realized that Baking with the same size as the final resolution of the textures avoids many problems, that’s why I use 4096 in Output Size. In this case, I choose all maps except Normal and IDs.
When a project has a lot of Tilesets, I prefer to Bake each Tileset separately, to avoid overload the scene from the beginning.
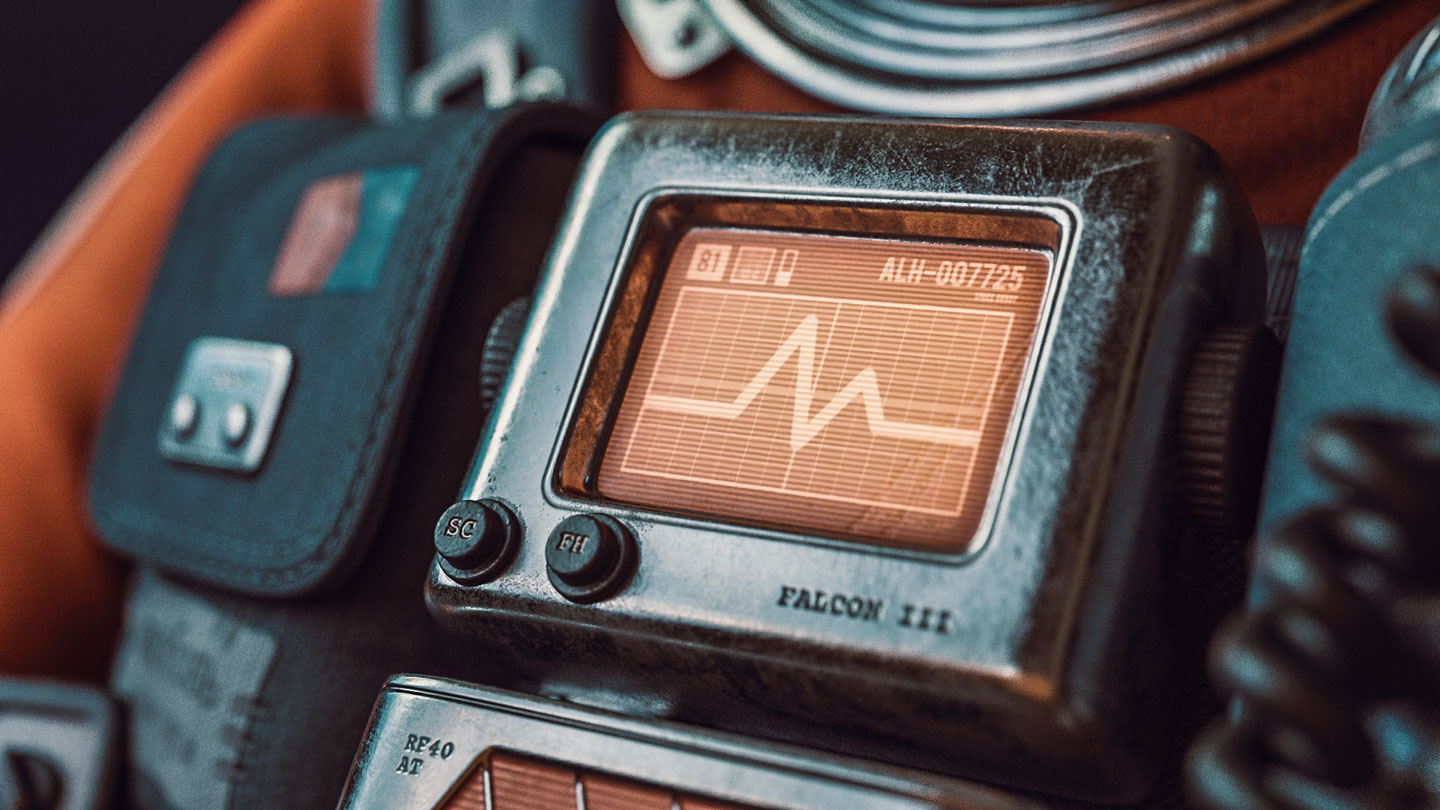
3.3 Creating Alpha Maps
Create specific designs that we will use inside Substance Painter.
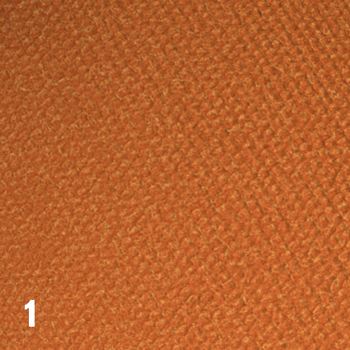
The original illustration has a specific designs that I can hardly draw by hand within Substance Painter, so I create a list of black and white images called Alpha Maps.
I use Affinity Designer because it is simpler for me to work with vectors. Keep in mind that they need to be squared to work correctly in Substance Painter. I usually use a 4K size (4096 x 4096px) to avoid pixilation.
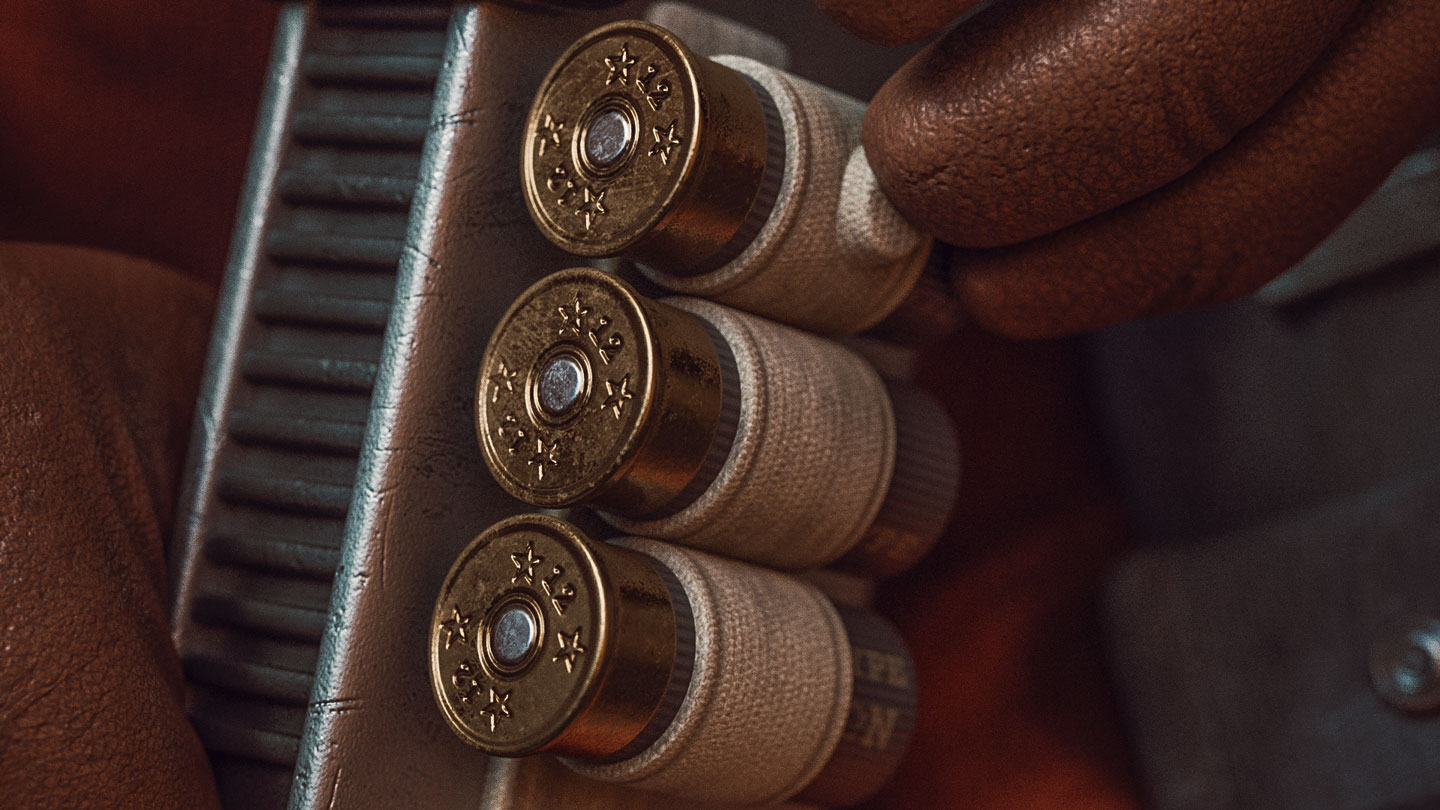
3.4 Dirty Fabric
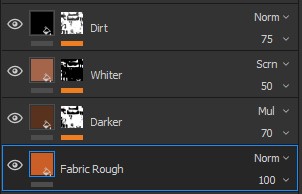
The default Substance Painter materials are very clean and make the texture look fake.
To give complexity to the material, I add four layers.(3.4.1)
1. In the first layer, I use a pre-made Fabric material as a base.
2. The second layer I use a Dark tone and a mask of Ambien Occlusion.
3. The third layer used a Light color and an inverted Ambient Occlusion mask.
4. Finally, I add a layer with a black tone using several maps to give the effect of Dirt.
3.4.1
3.4.2
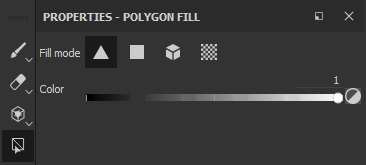
3.5 Selection Methods
There are several ways to select areas for texturing.
With this, we can select different methods. With Triangle Fill, fill individual triangles, with Polygon Fill, fill polygons, with Mesh Fill, fill all connected meshes and finally with UV Chunk Fill, fill by UV islands.
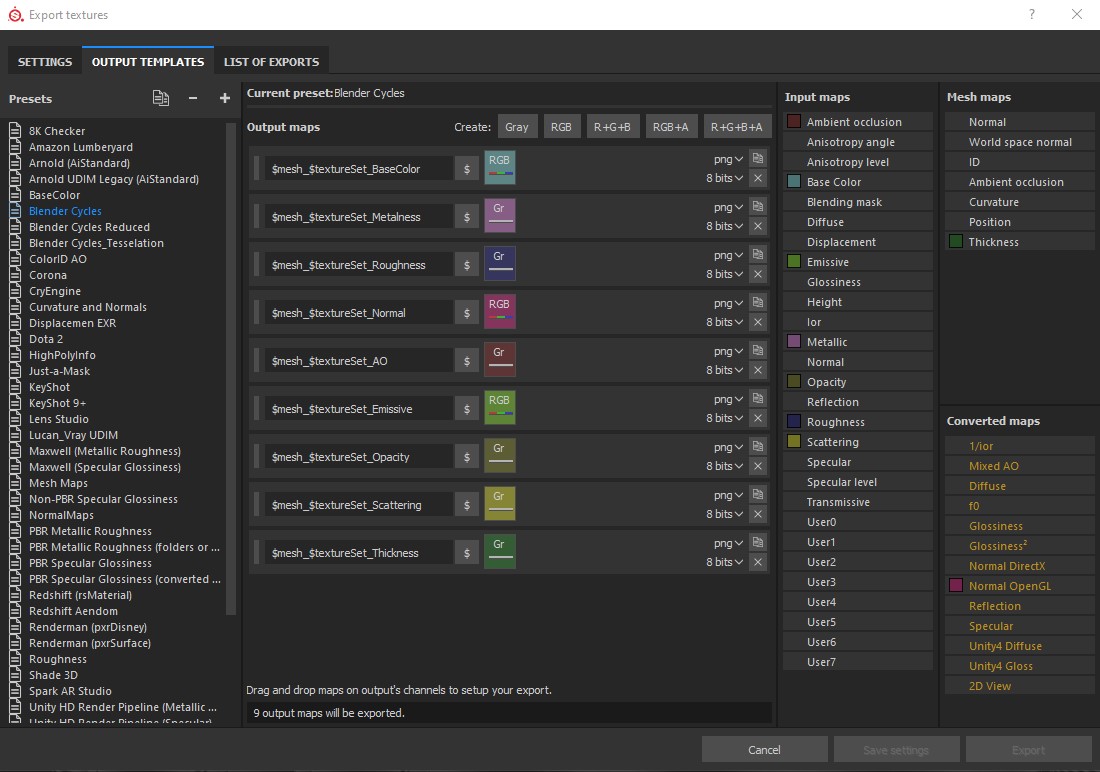
3.6 Exporting maps to Blender
To use the textures inside Blender, we need to export them in the right way.
To export the textures go to File > Export Textures or press Ctrl + Shift + E. Make a preset to export the textures to Blender. I use the following maps; Base Color, Metalness, Roughness, Normal, Ambien Oculussion, Emissive, Opacity, Scattering and Thickness. If the project I want to export does not use a map, Substance Painter will omit that map.
Rendering
Blender 2.90 & Photoshop CC
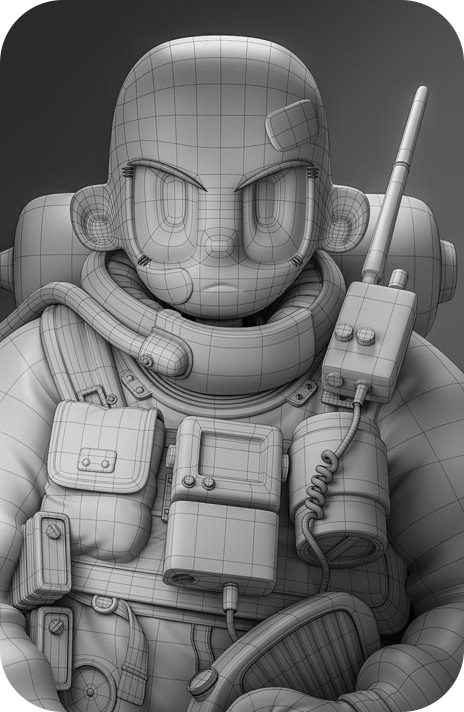
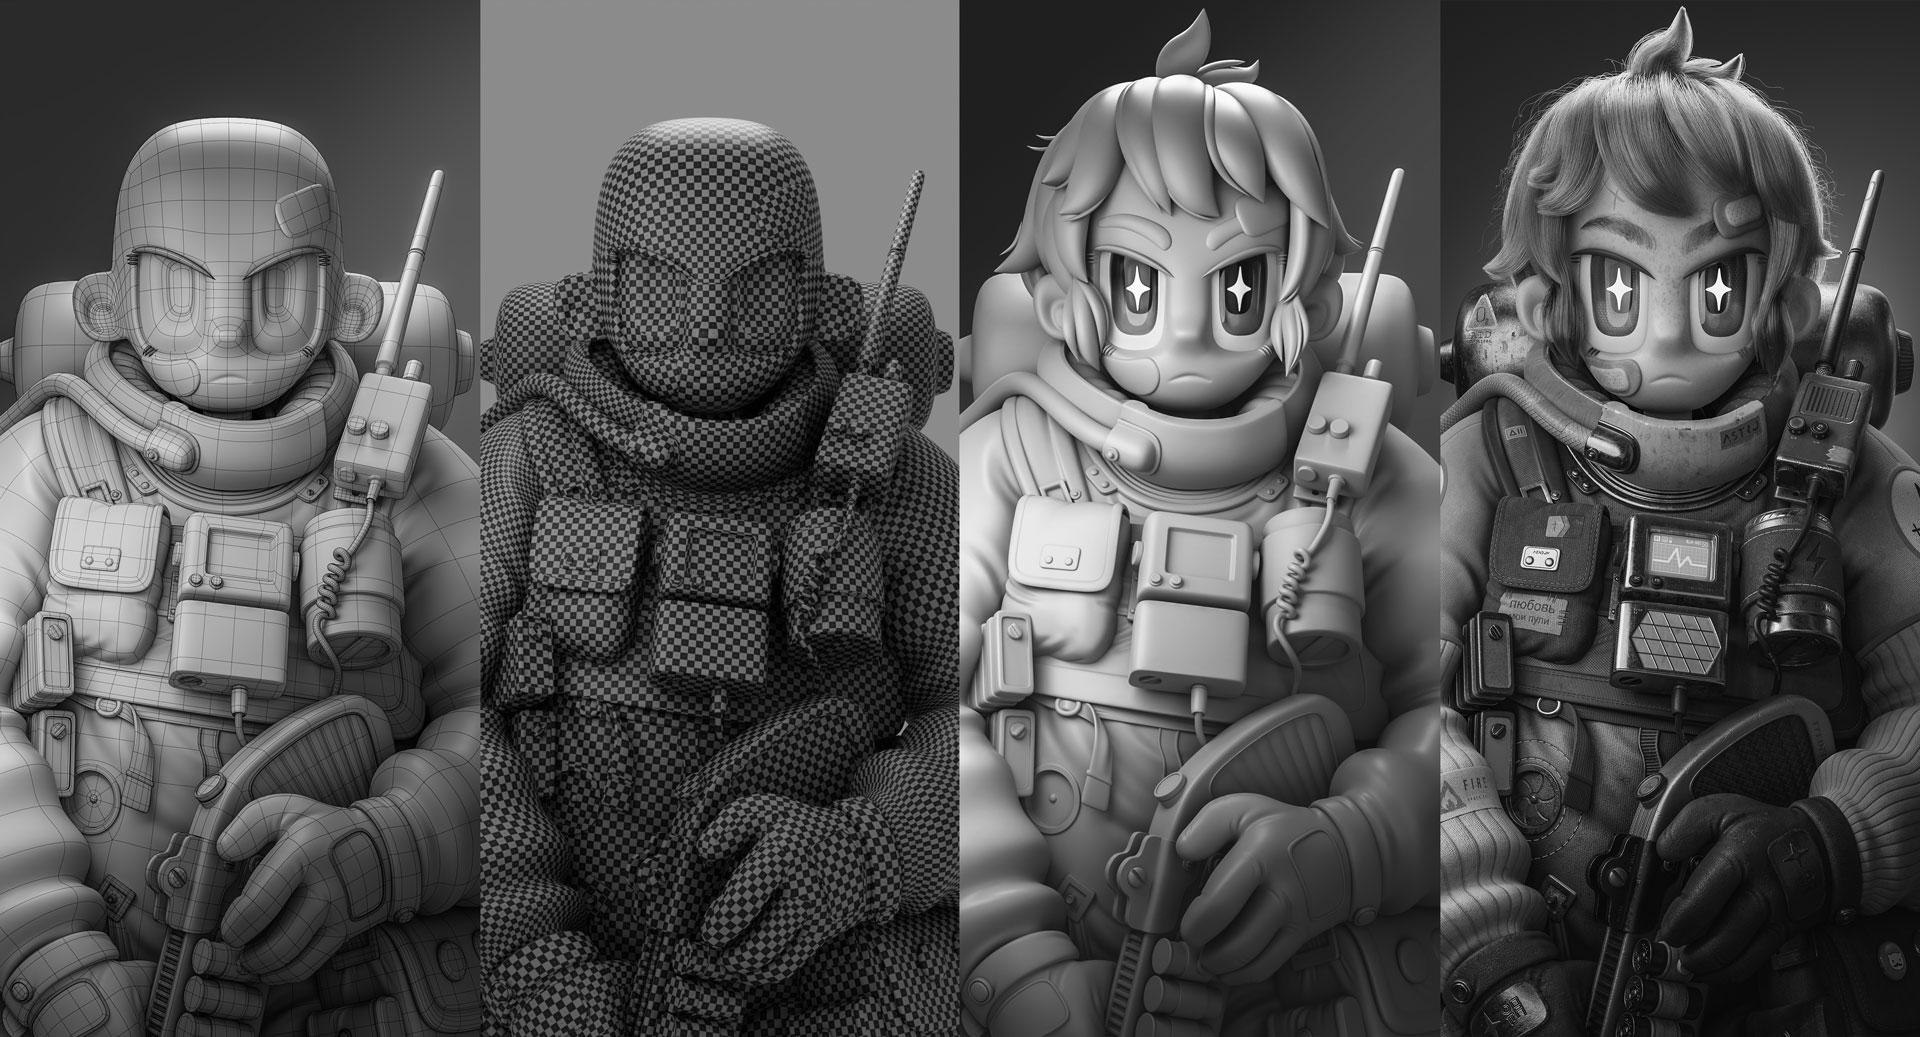
4.1 Topology Render
It is quite useful to make a render of the topology of our project for our presentation.
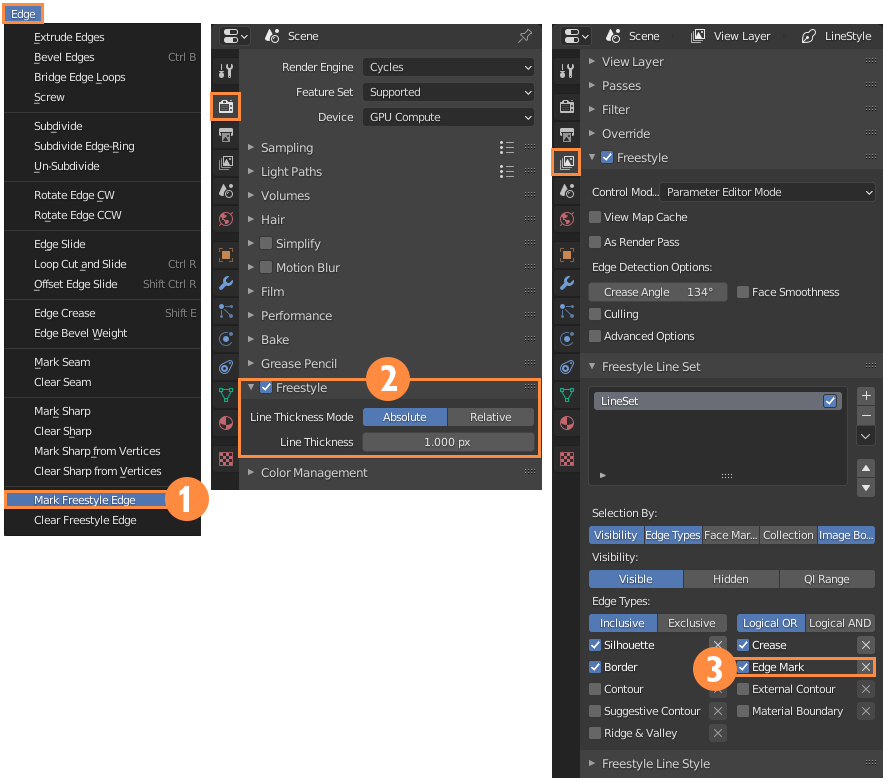
1. In Edit Mode select all the faces of our model and click on Edge > Mark Freestyle Edge.
2. In Render Properties, check Freestyle and decide the thickness in pixels with Line Thickness.
3. In View Layer Properties check Edge Mark
Keep in mind that after finishing the render, it will begin to process the topology lines.(4.1.2)
4.1.2
4.1.1
The Topology Specialist
This technique was taught to me by the great artist, Orlando Esquivel Arias. He is a master of topology. Be sure to check out his Artstation.
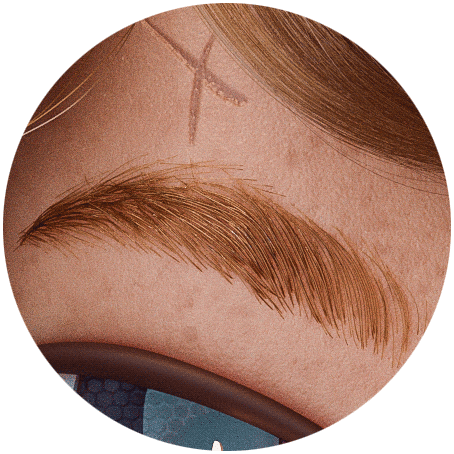
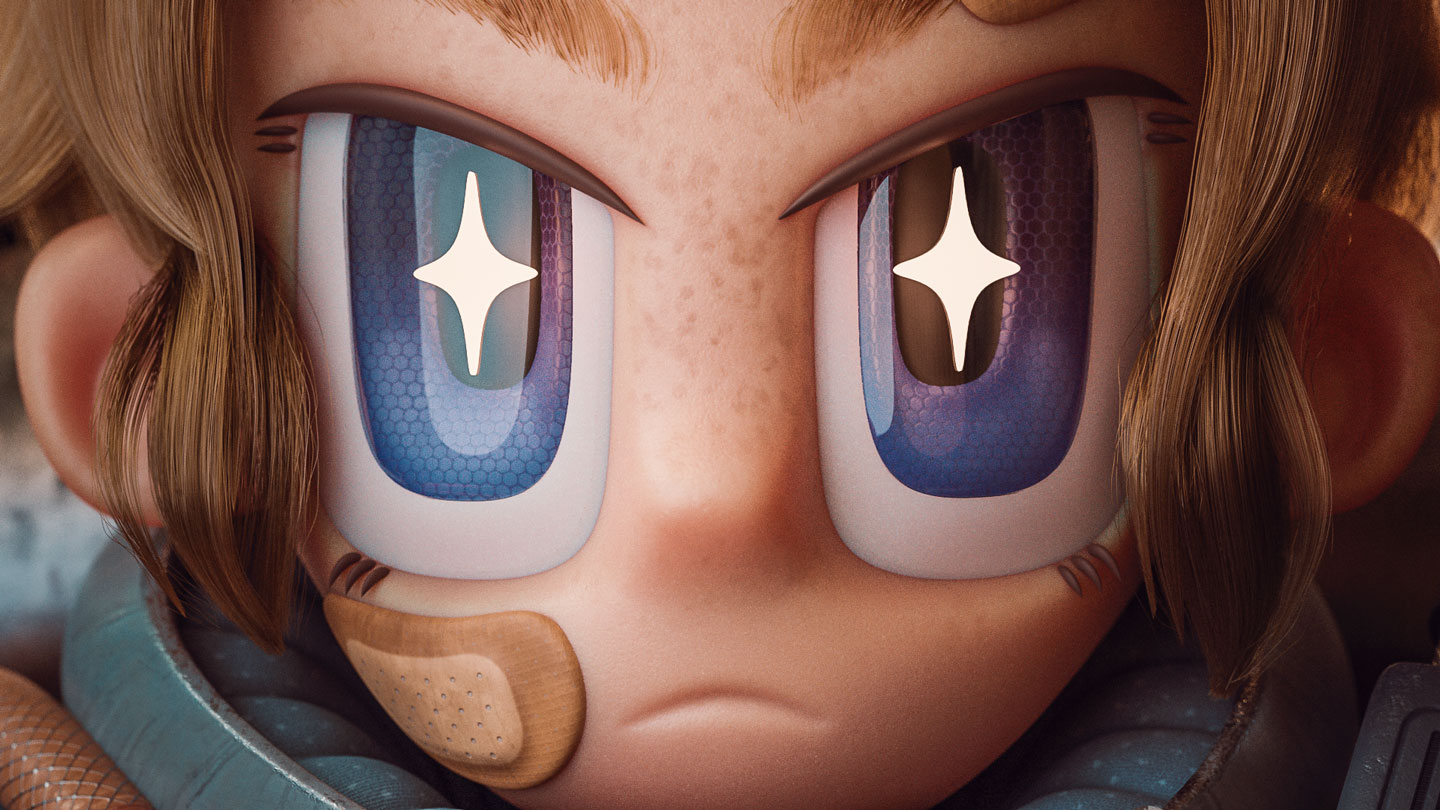
4.2 The Perfect Eyebrow
It is complex to make an excellent and credible eyebrow.
First, I have to talk about the incredible artist Nazar Noschenko. He has a great career creating beautiful characters with a realistic cartoon style, and he is a great reference point for artists that use Blender. I have learned a lot with his tutorials on how to create hair.
Last year (2019) he released a 3D eyebrow pack for Blender that has ten different styles. I used this pack for the eyebrows of this project. Feel free to take a look at his Artstation profile and check out this eyebrow pack.
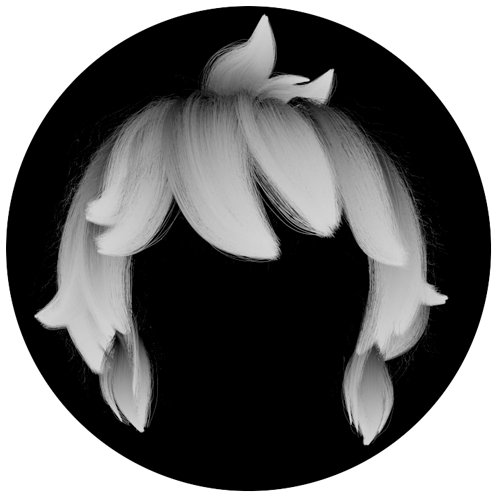
4.3 Principled Hair BSDF
This node allows us to create a more natural hair material.
First, create a mask (4.3.1) to mix two colors with the Hair Info > Intercept Node and a Color Ramp. With this mask, join two Principled Hair BSDF Nodes with different concentrations of melanin and create a more appealing color variation.(4.3.2)
4.3.1

4.3.2
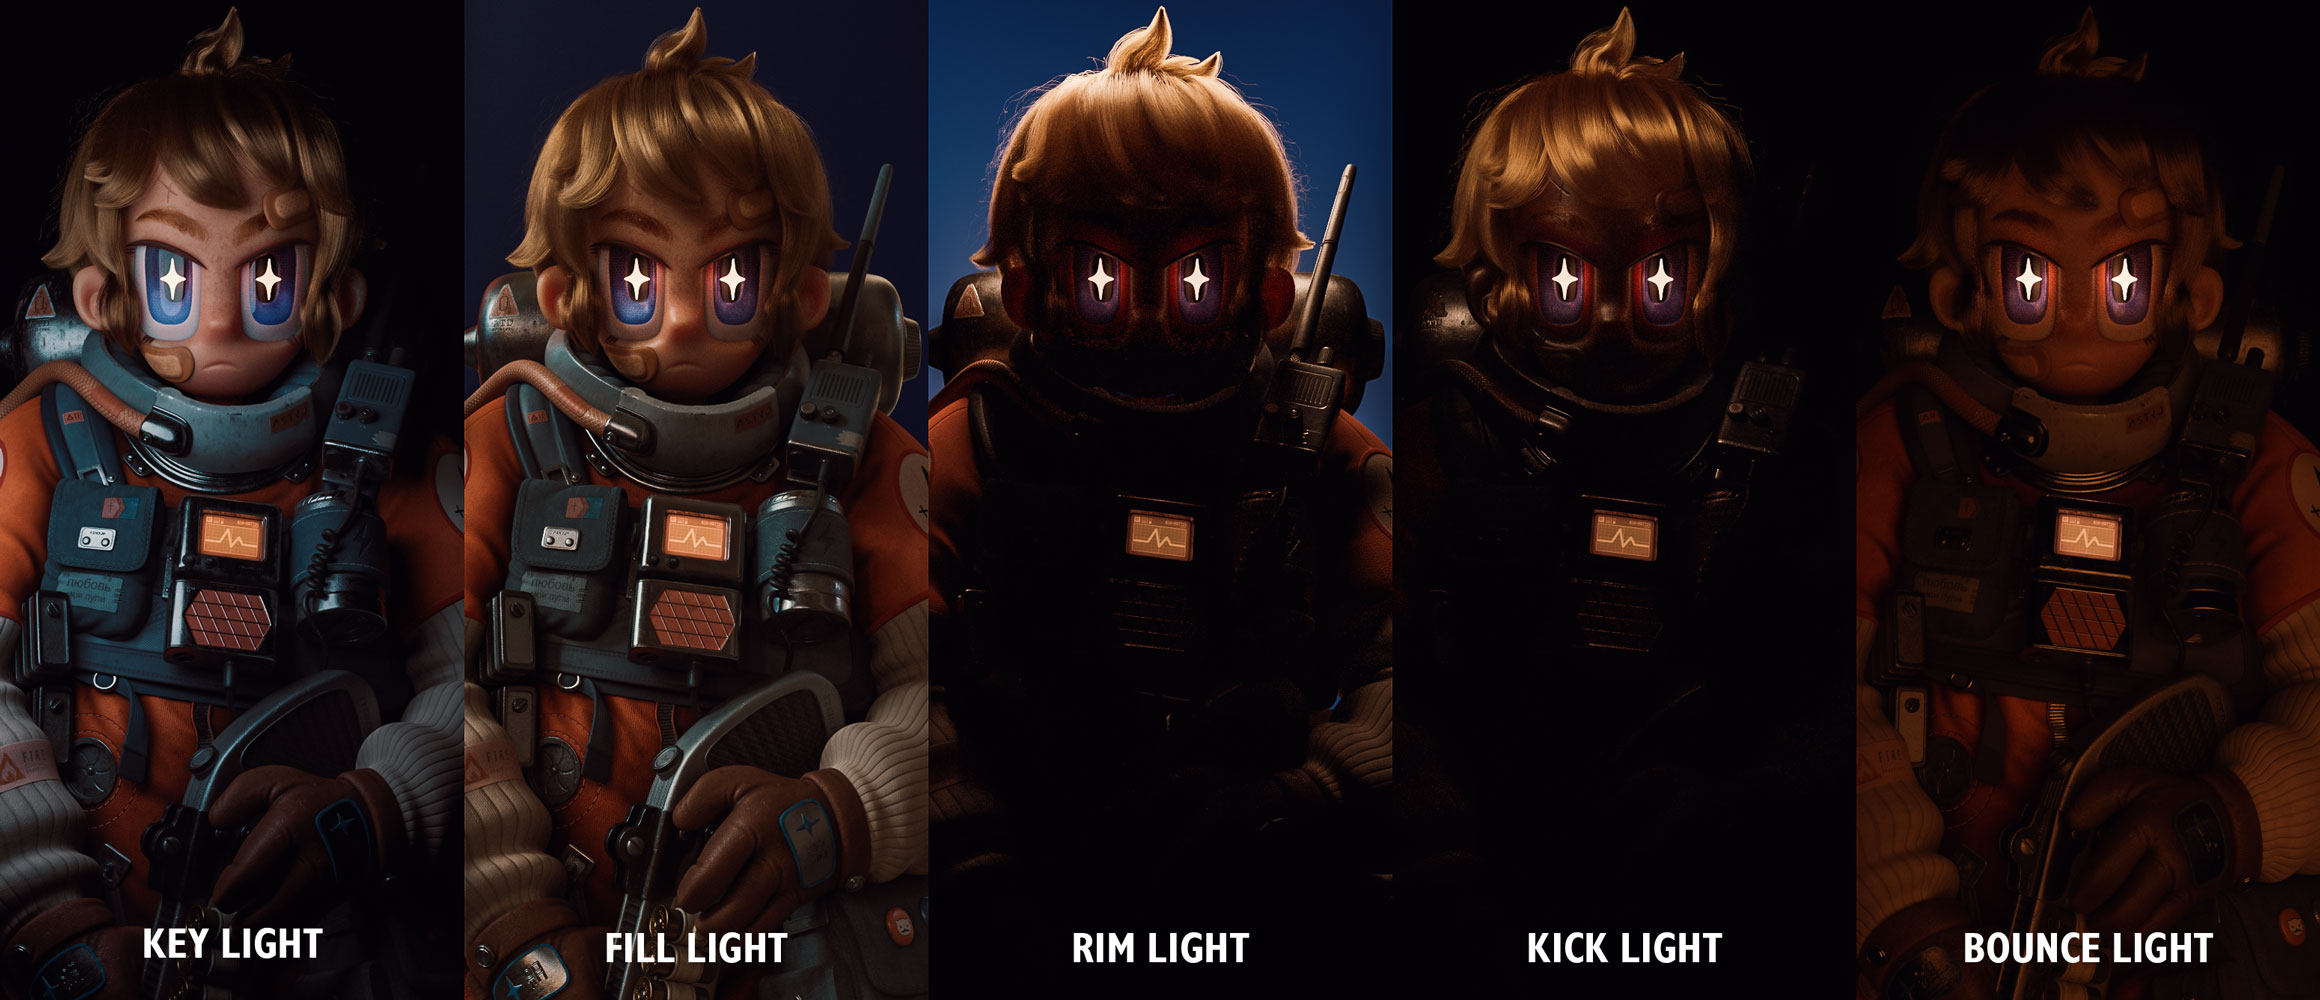
4.4 Illumination
It is necessary to have charming lighting for the project to stand out.
With the lighting, determine the atmosphere, mood and tone of the scene. For this project, I used all five types of lights. A Key Light that illuminates from the left side with a cold temperature. An HDRI as Fill Light. A combination of several lights to give the effect of a Rim Light. A Kick Light to give more emphasis to the hair, and finally, a warm Bounce Light to provide more light to darker areas.
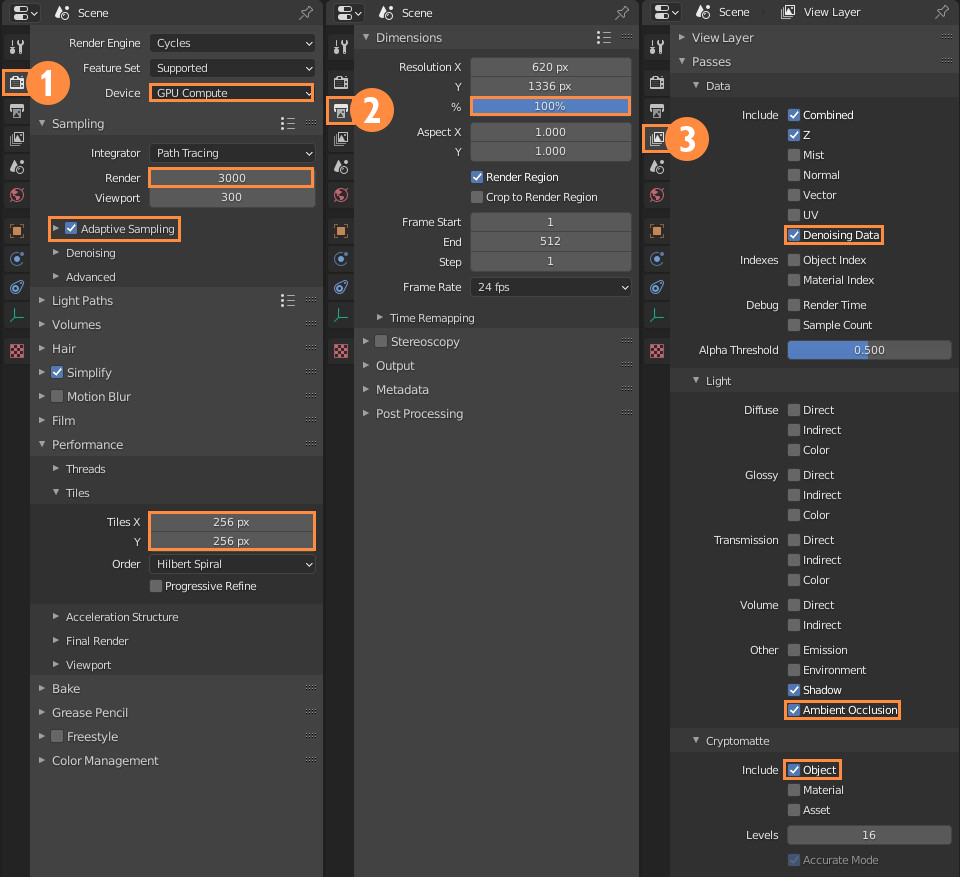
4.5 Global Settings
We must be clear about the limits of our computer, to not to overload it.
1. Render Properties
This scene did not exceed 5Gb in memory so it was possible to use only my old GTX 1080 GPU. Also, the skin is a bit noisy with low samples, so I used 3000 Samples, in combination with Adaptive Sampling. And in Tiles I used 256px x 256px.
2. Output Properties
I never increase the resolution size, I only increase the percentage, for the previews I used 100% but for the final render I used 300%.
3. View Layer Properties
Activate Denoising Data, to be able to remove noise in the compositor, as well as Ambient Occlusion and Cryptomatte.
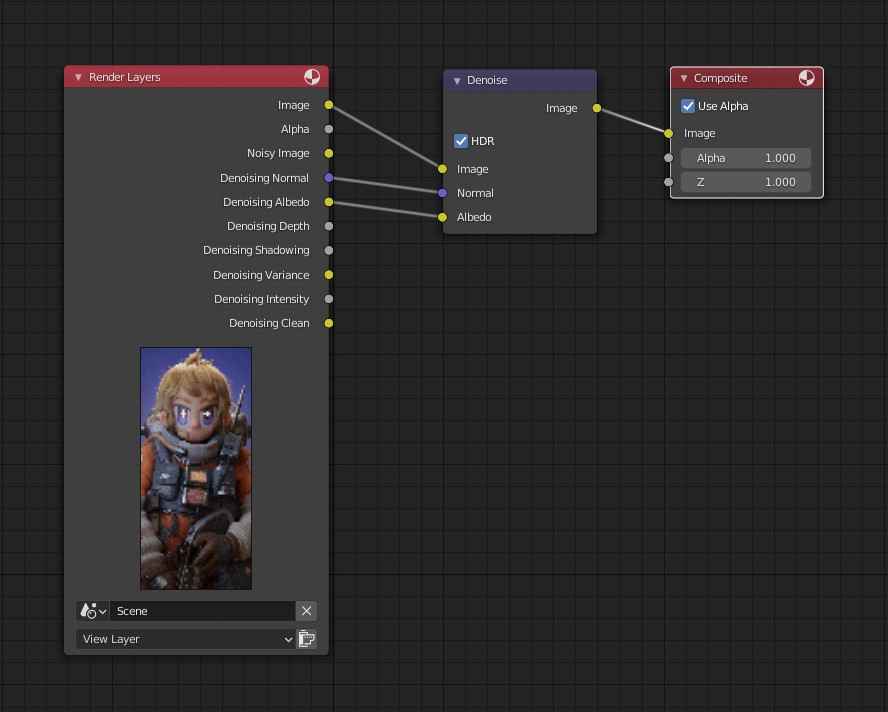
4.6 Denoise Node
Eliminate the rendering noise
To be able to remove the noise, we must first have Denoising Data enabled in the Passes menu of the View Layer Properties before rendering. Once the render is finished, go to the Compositor, add the Denoise node, which removes the noise from the image.
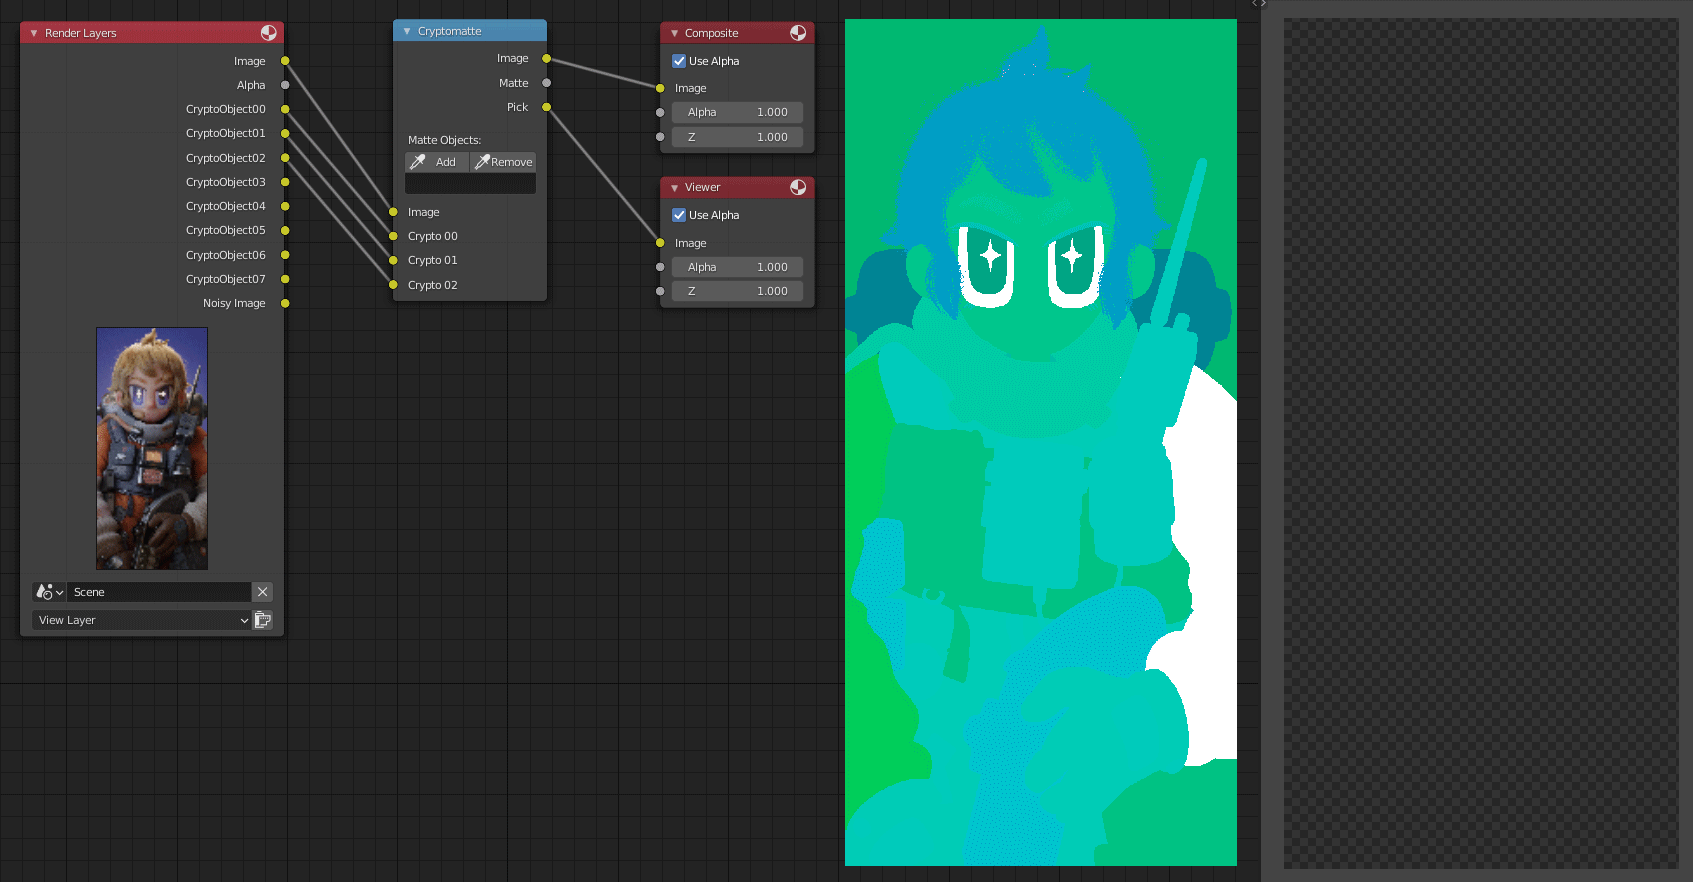
4.7 Cryptomatte
Create masks of specific objects
Before making the render, we need to activate Cryptomatte > Object in the Passes of the View Layer Properties. Once the render is done, go to the Compositor, add the Cryptomatte Node and make the connections. Join the Pick output to the Viewer Node and Image to the Composite Node. Now select the areas you want to mask with Add in the Cryptomatte Node.
4.8 Post Production
This is where we emphasize details and make the image stand out.
The first step is to go to Camera Raw and use tools like Clarity, Exposure, Sharpening and Noise Reduction to achieve a more balanced image. Then I add some Dark areas on the outside to give it a lateral emphasis. I also add a Brighter spot in the middle to provide the face with an accent. I add a LUT to create an atmosphere. And finally, play with Levels to lighten the image slightly.


Project
5.1 Timelapse Videos
Here I show the general process of the project.
I decided to divide the process of this project into three stages, to make it easier and more tolerable to see a lot of information about the same project.
MODELING This process was quite long and had to change direction on several occasions to fix errors, such as the first version of the face.
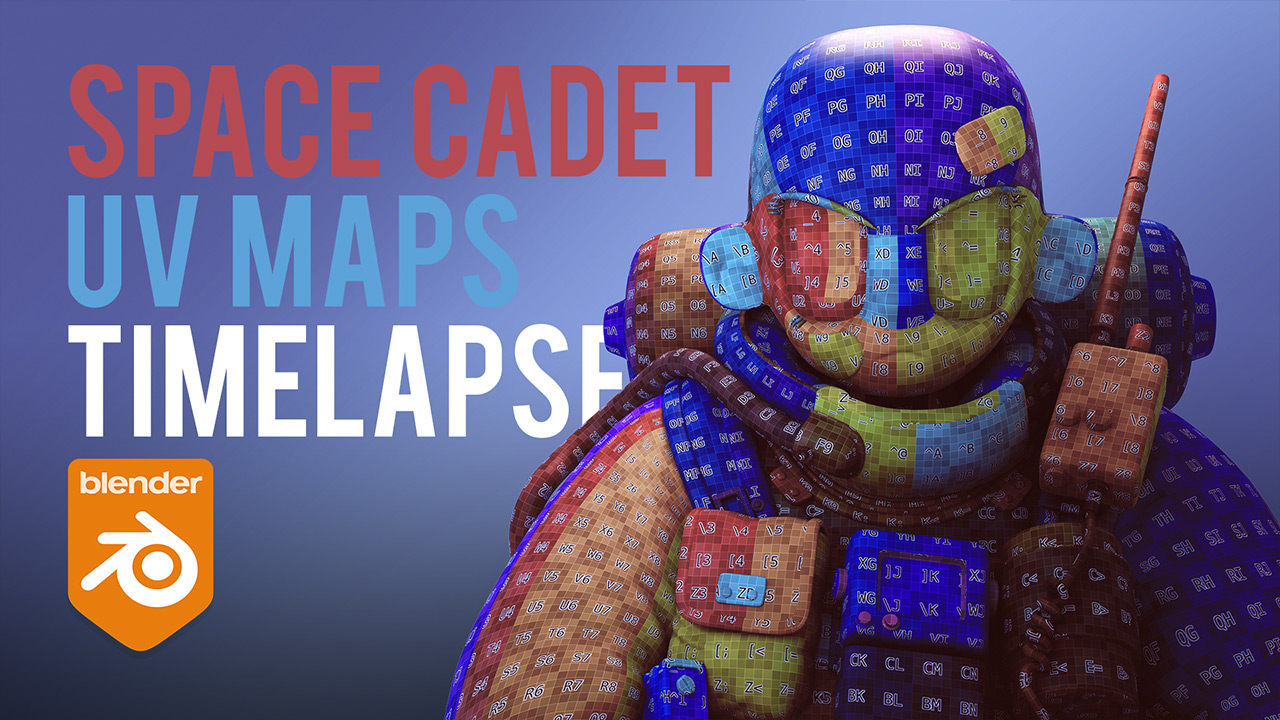
UV MAPS This phase is necessary to obtain quality in our textures looking for to avoid stretching and to get uniform UVs in the project.
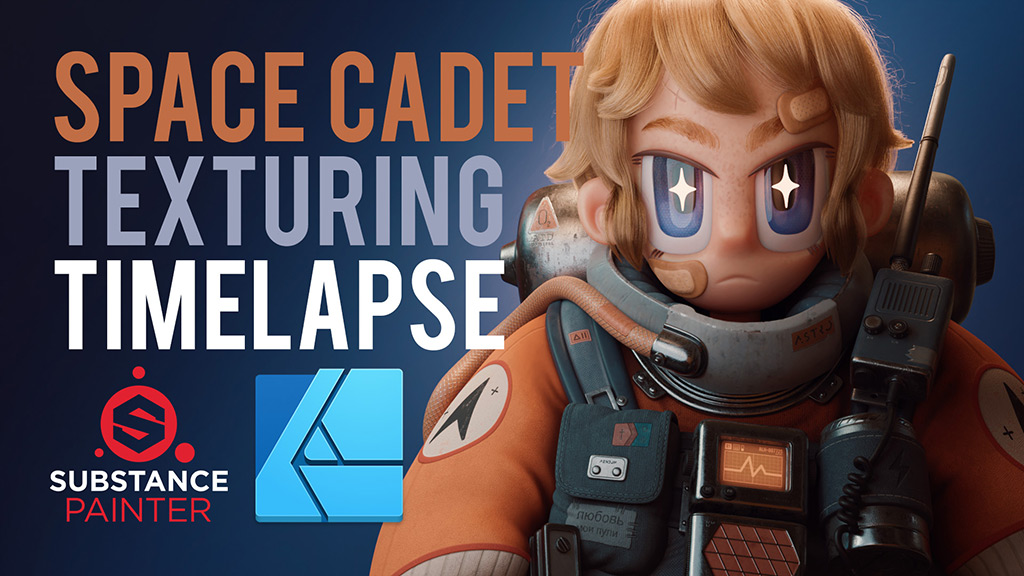
TEXTURING This time I made a generator inside Substance Designer that saves me time with some parts. This is my favorite part.
5.2 Conclusion
This project was planned to be a quick and short one, but between the pandemic that reduced my energy to do personal projects and the massive amount of work I had, it was almost impossible to achieve this. I also suffered a lot with the hair in the project, I did it about six times, and although it is not perfect, it is the best hair I have achieved so far. Anyway, I’m looking forward to improving this part of the projects as I go along. Although my goal is still to make a video game, I still need to learn Rigging and Animation to be a complete artist and not stay halfway in the development.
Thank you very much for taking the time to look at the guide, I hope it helps you, and I’m thrilled to share the things I’ve learned openly. For now this year, I’m going to focus on seeing what my next personal project is and see if I can add some Rigging and Animation to the following guide.
Alex Treviño


I want to thank Guillaume Singelin for allowing me to use his work, Nina Lagler for all the support, Orlando Esquivel for teaching me how to make a topology render, Juan “Onem” Gutierrez for giving me feedback on the tutorial, and all the people who came to give me encouragement.
Free Pack
Download the free Clay Render. It includes a base mesh of a head and hands that I used in this scene.
Download Clay Render and Model
Limited Pack
Buy the scene with UVs ready to be painted. Includes the free assets.
Complete Pack
Purchase the painted scene, the topology render scence, and a generator made in Substance Designer. This pack includes the Free Pack and the Limited Pack.