Software
Blender 2.79
Substance Painter 2017.3
Photoshop CC
Substance Painter 2017.3
Photoshop CC
- Import from Blender
- Baking
- Material Selection
- Roughness
- Import Alpha
- Bump
- Dirt
- Emissive
- Export Maps to Blender
- Principled BSDF
- HDRI
- Ilumination
- Depth of Field
- Global Settings
- Passes
- Post-production
- LUTs
- Conclusion
Download the free clay render or support me to continue doing more projects like this, and download the scene ready to paint or the scene I painted!
Modeling
Blender 2.79
1.1 Concept
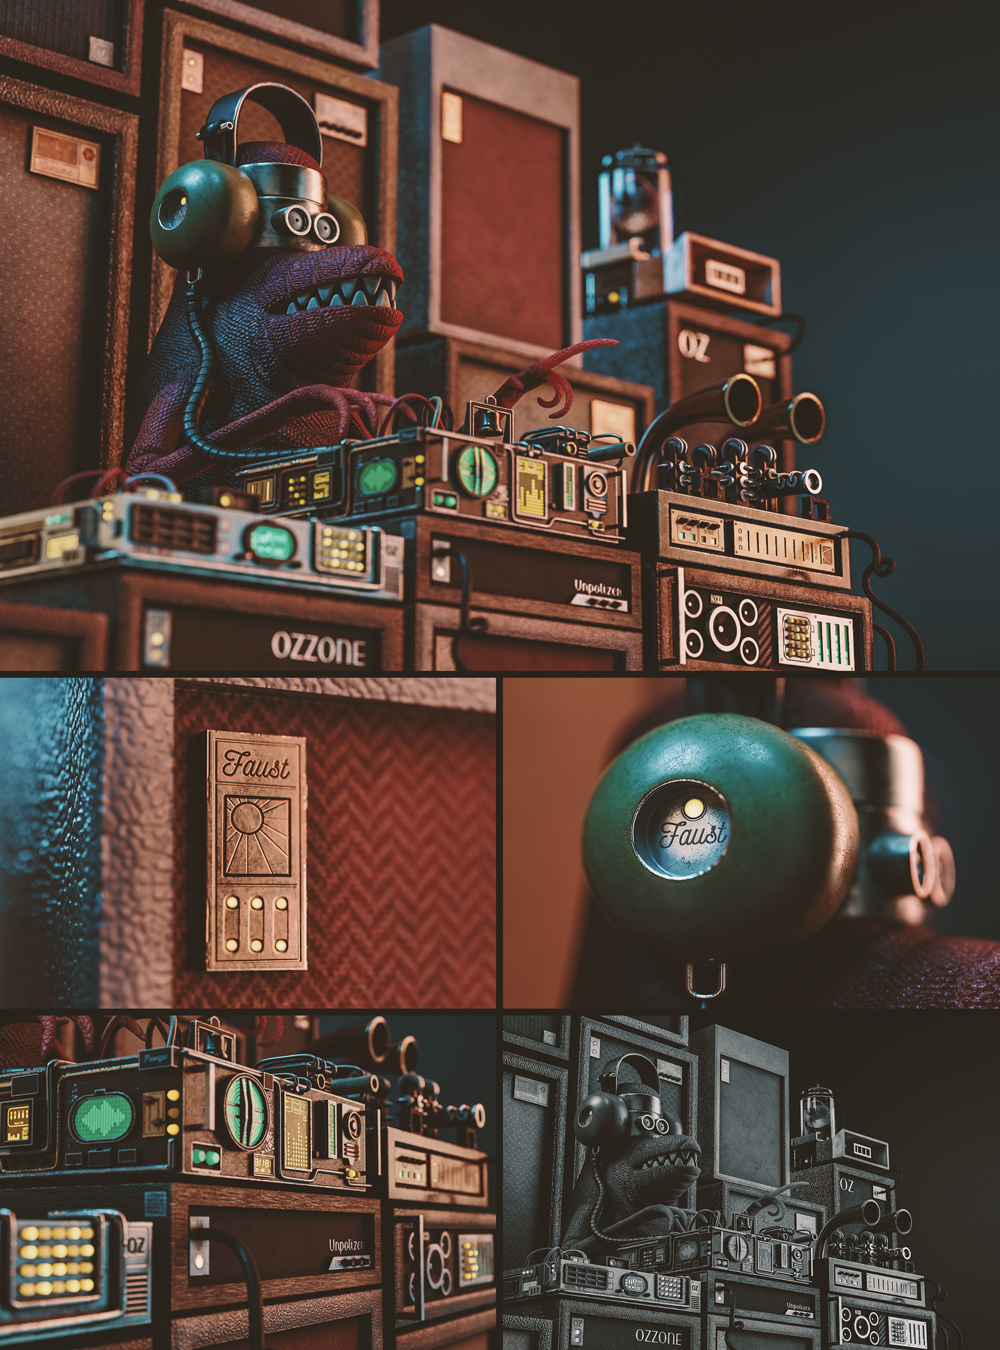
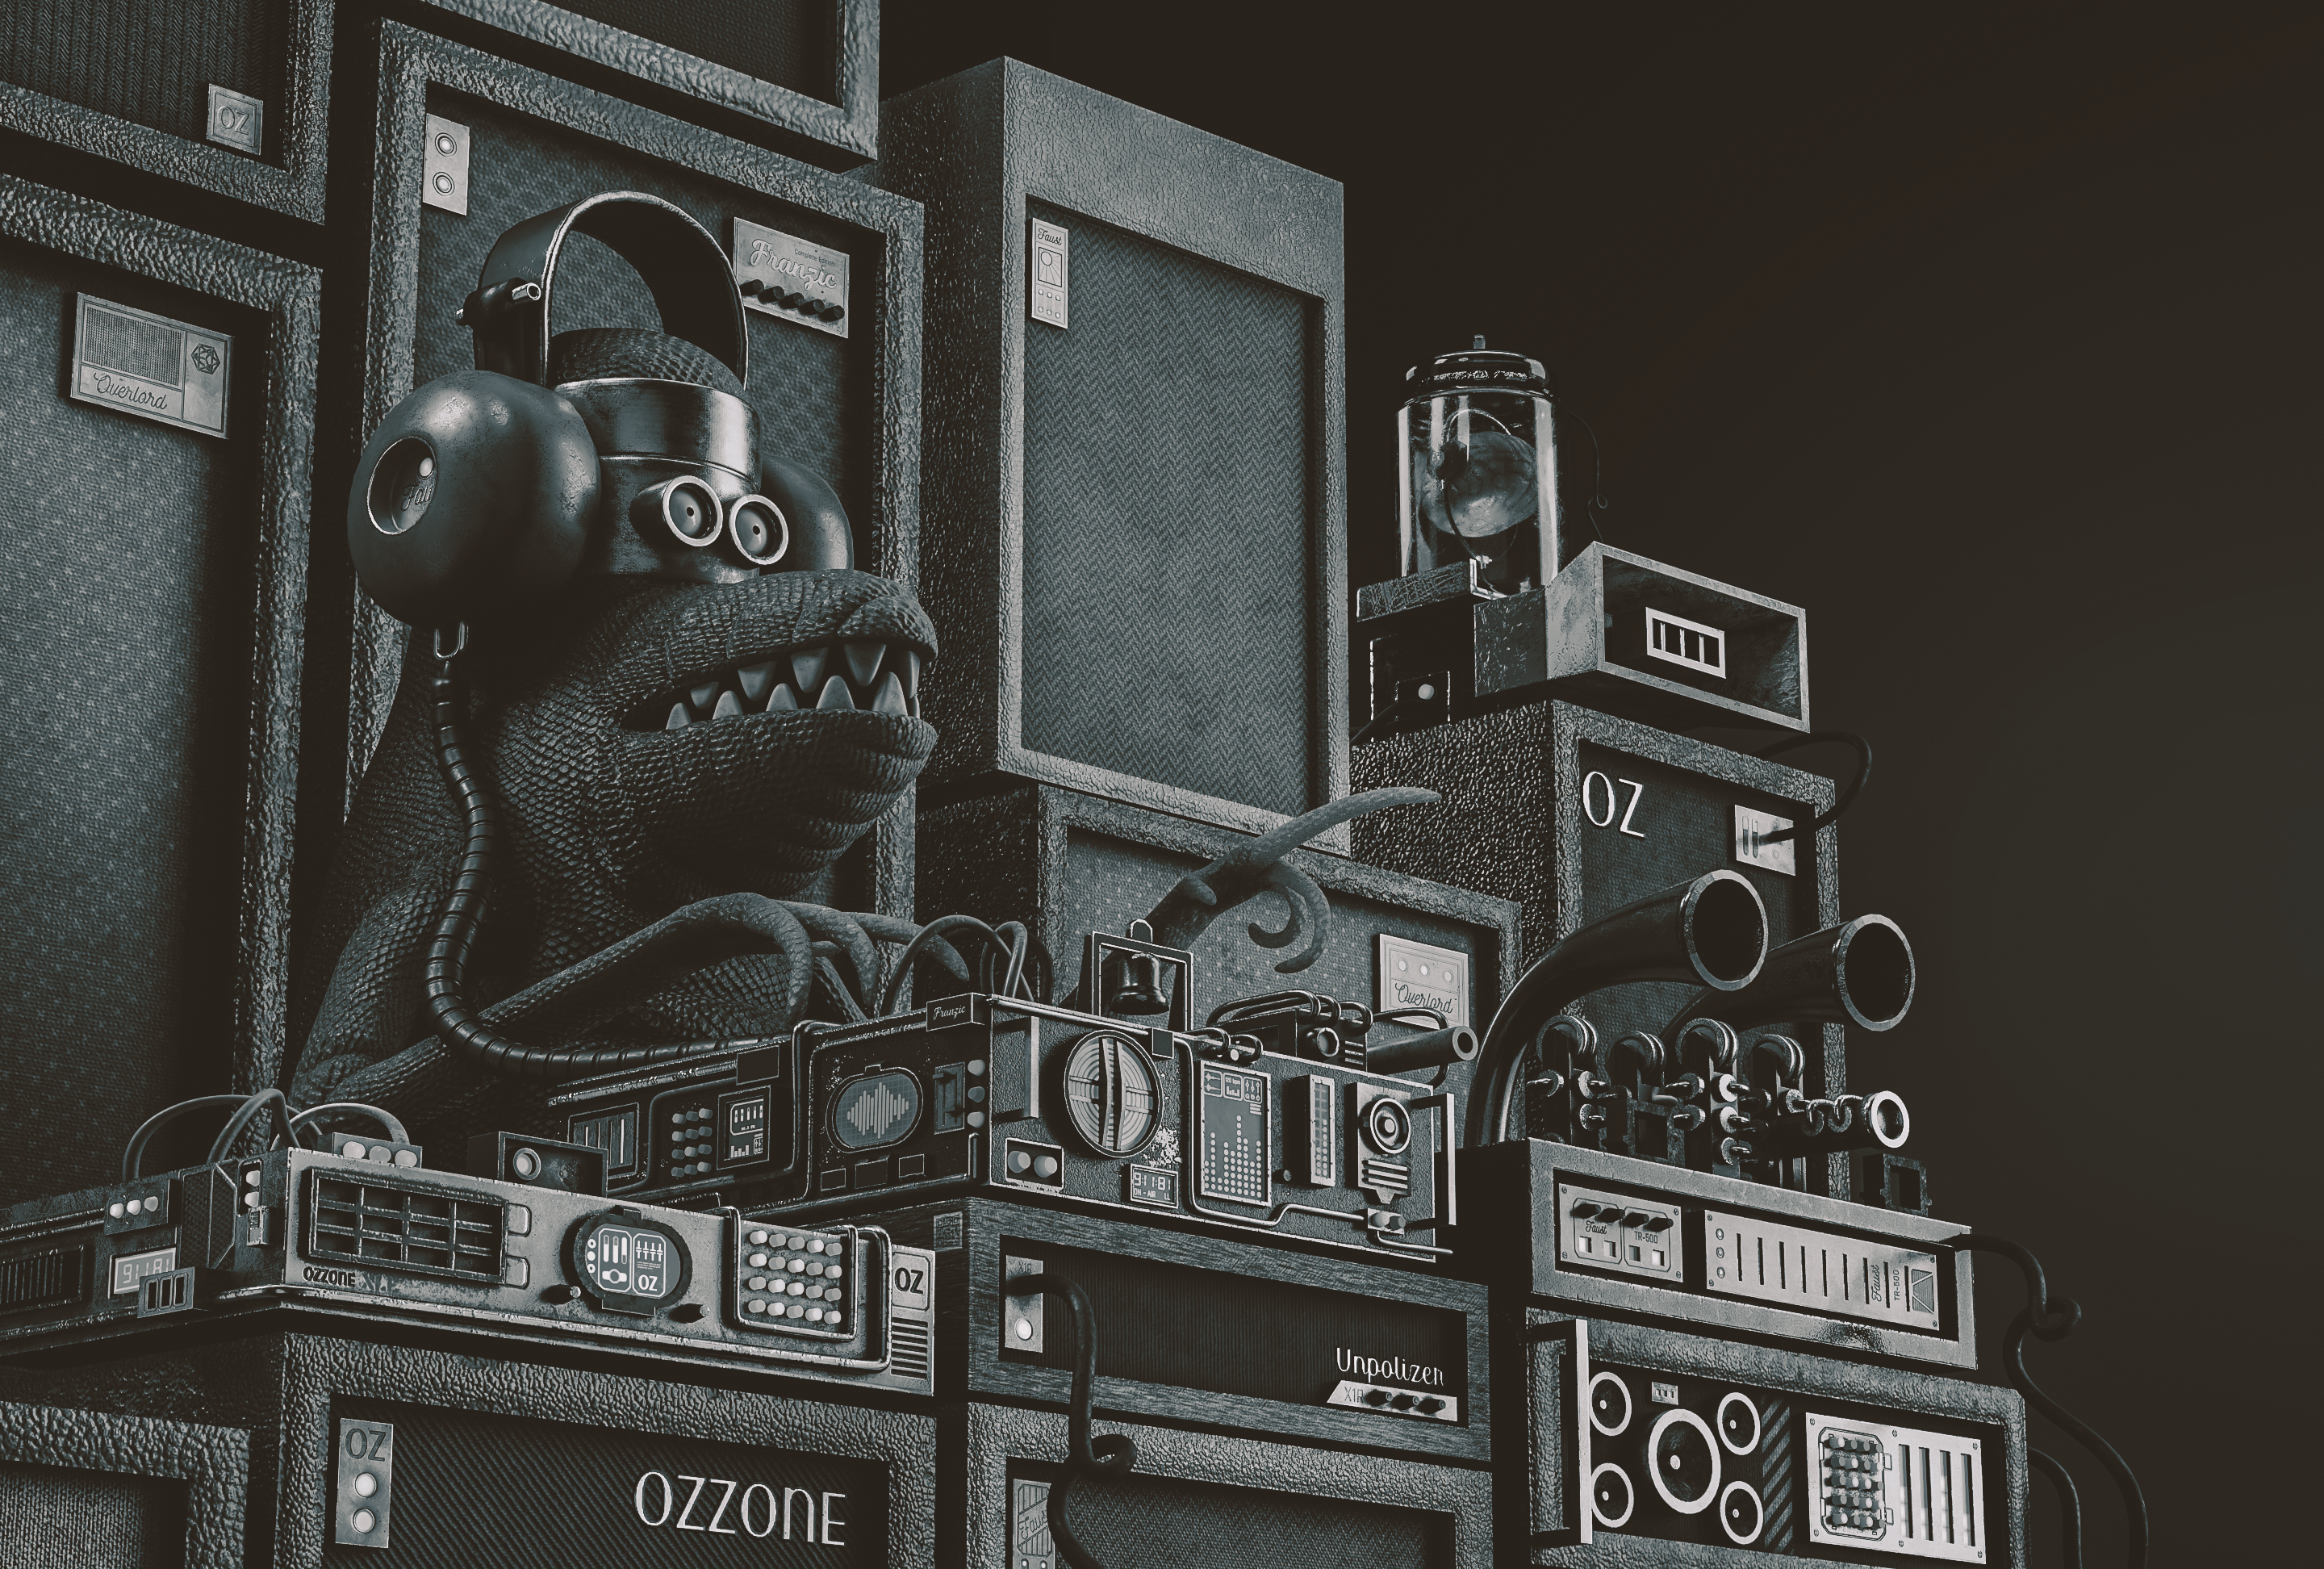
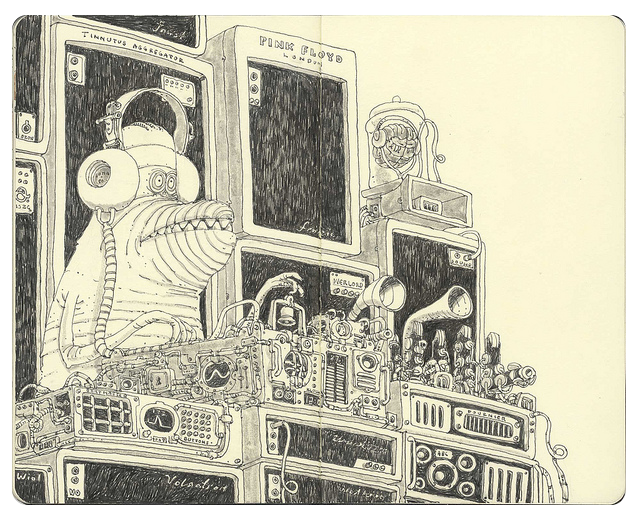
This project is based on a sketch of the great artist Mattias Adolfsson. How Mattias combine humor, detail, and world building is very inspiring, and this is my way to learn from his incredible work. For the textures and light, I got the general idea to imitate stop-motion look and feel. Having inspiration from Tim Burton, Wes Anderson and Laika Studios.
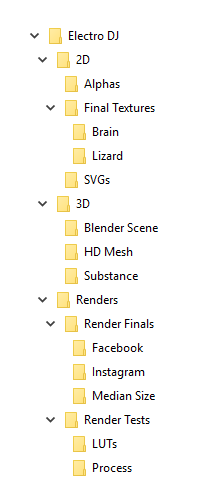
1.2 Folder Structure
Having a strict order in the folder structure can save us some time and headaches. I normally divide my assets into 3 main folders. The 2D folder that has the alphas, final textures, and vector images. The 3D folder has the Blender scene, some high meshes, and the substance project. And last, the render folder contains the process, LUTs selected and the final images.
1.3 Blockout
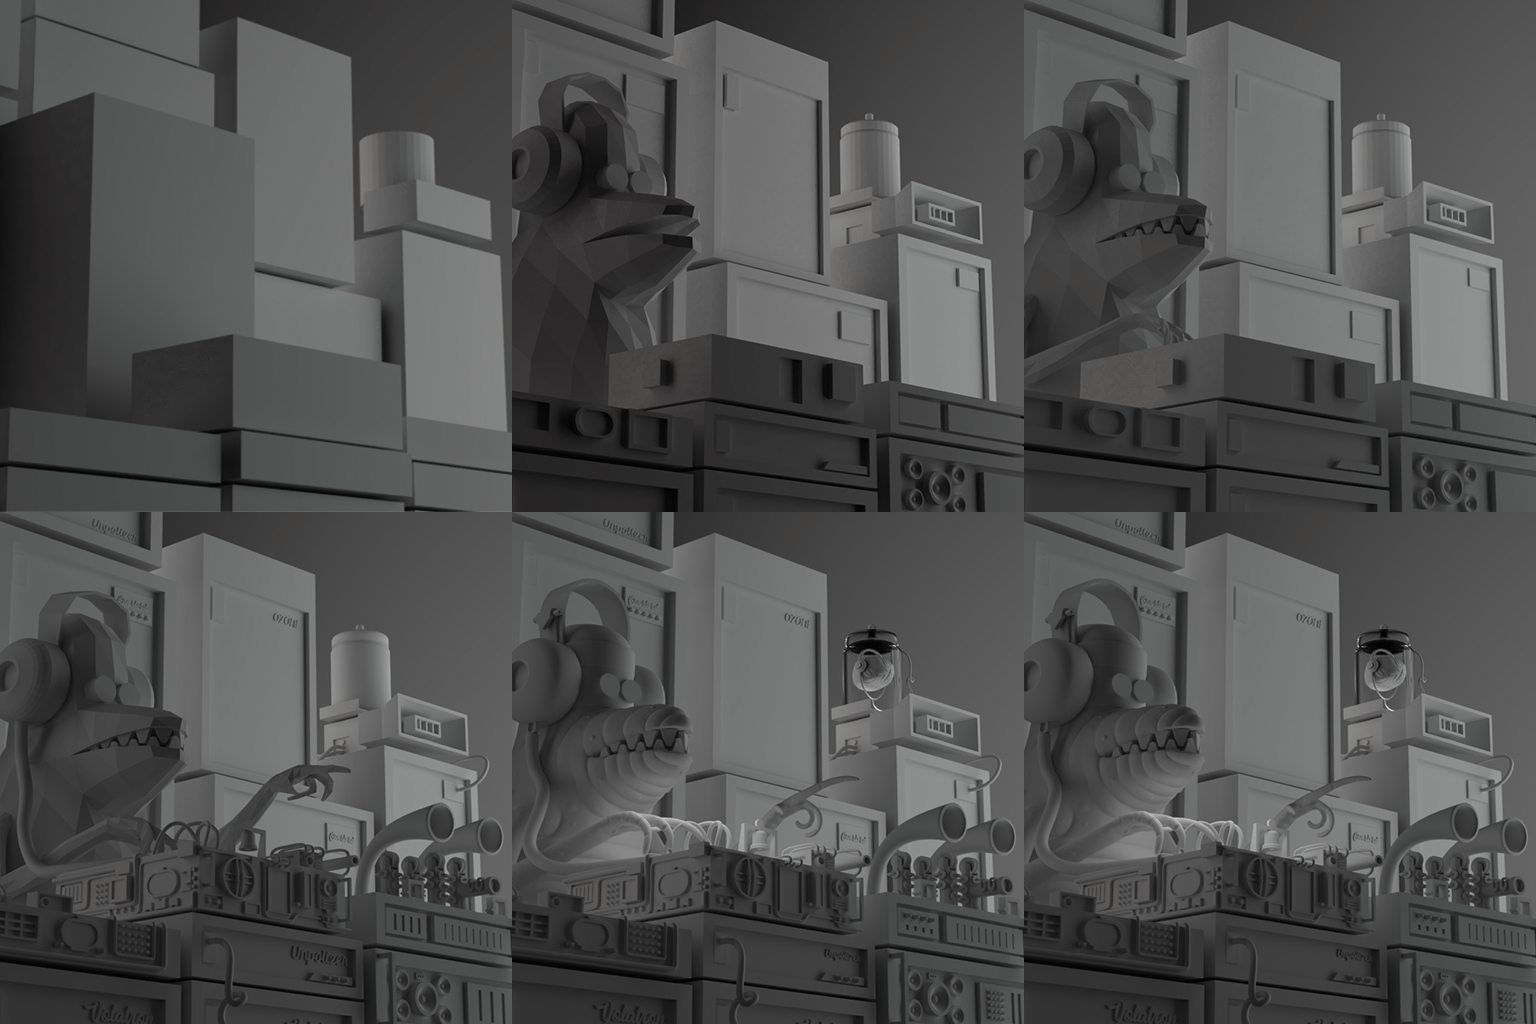
Divide into 3 phases. The first one where you put the most basic forms into the scene. The second is the medium detail, and the last one is the fine detail. Increase detail gradually. Its a lot easier to make big changes with fewer objects.
BASIC SHORTCUTS
Add Mesh Shift+A
Inset I
Extrude E
Bevel B
Add Loop Control+R
Scale S
Fill F
1.4 Sculpting
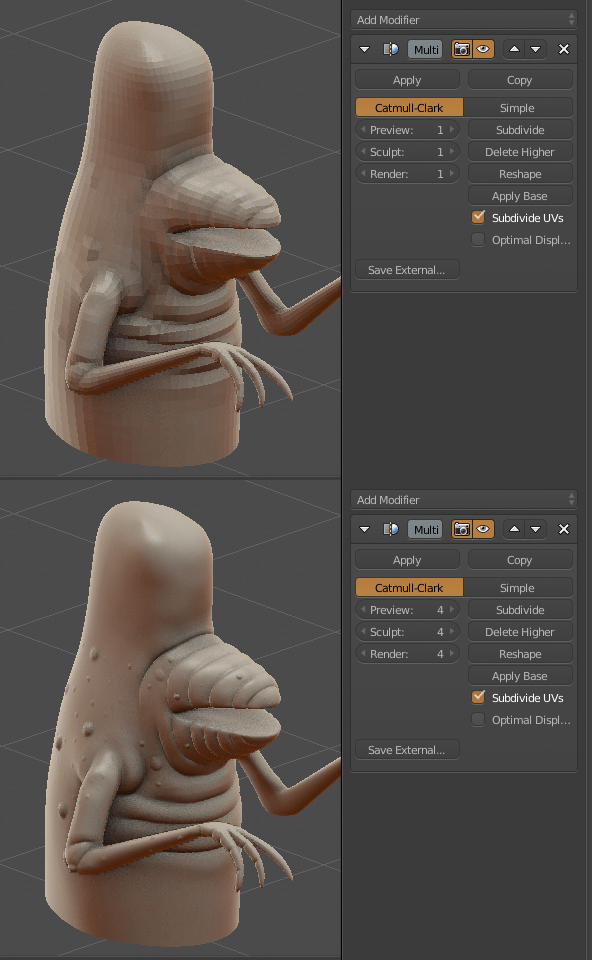
I use the Multiresolution modifier to manage the level of detail subdividing every time I need more definition (1.4.1). The brushes used were Clay Strips and Crease for the general form and Inflate for the moles (1.4.2). The benefit of using multiresolution is that you can move between different resolutions without losing detail (1.4.3). The body of the lizard and the brain are the only two things sculpted in this project. Apply Smooth Faces of the sculpted meshes.
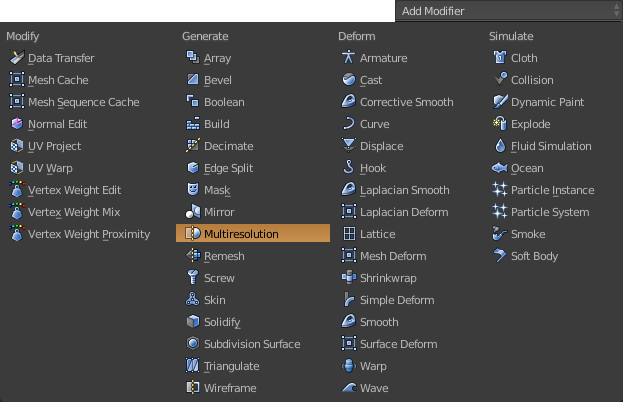
1.4.1
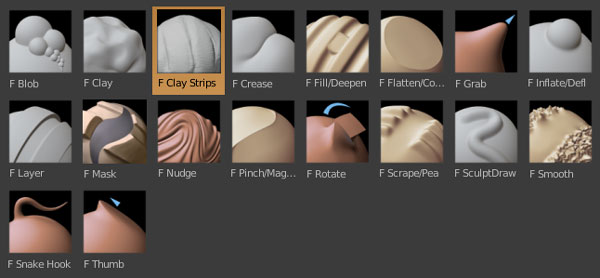
1.4.2
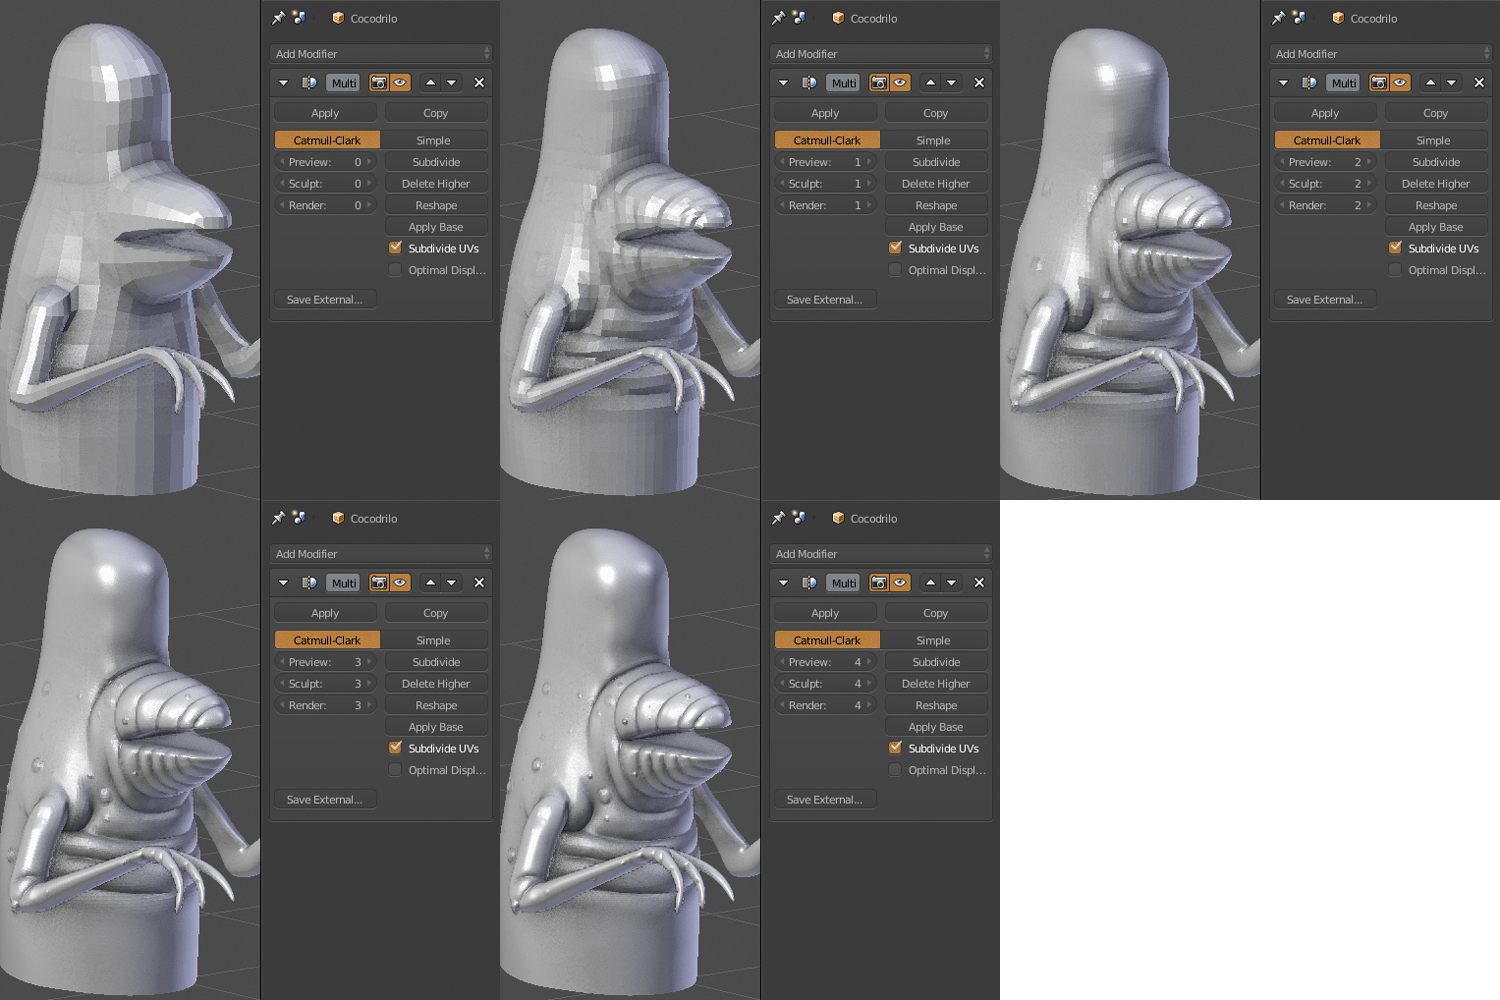
1.4.3
1.5 UV Maps
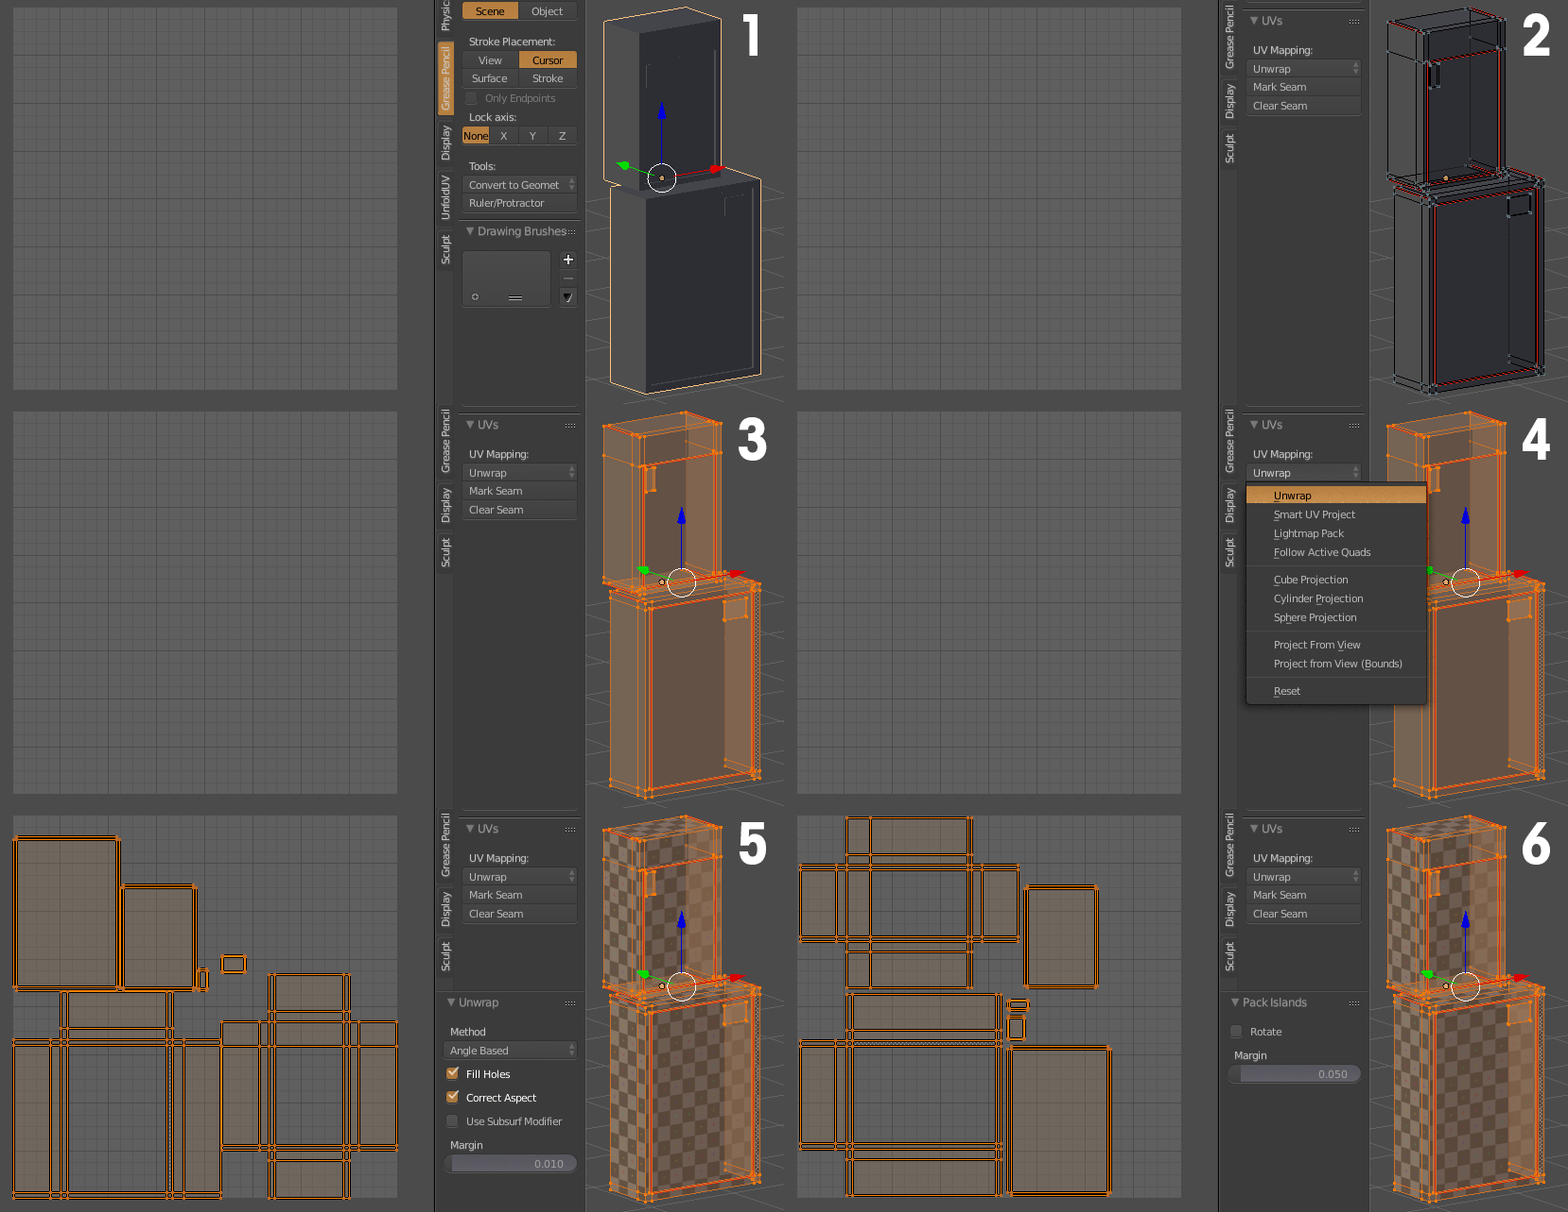
UV Maps of every object are necessary to texture the scene in Substance Painter. First, enter Edit Mode (1), then mark all the seams (2), select all faces tapping A twice (3), unwrap (4), and finally press Control+A for average scale (5) and Control+P to pack island (6). I approach UV Maps very similar to Papercraft. Try to hide your seams within the possibilities. And use V to stitch edges.
TIP
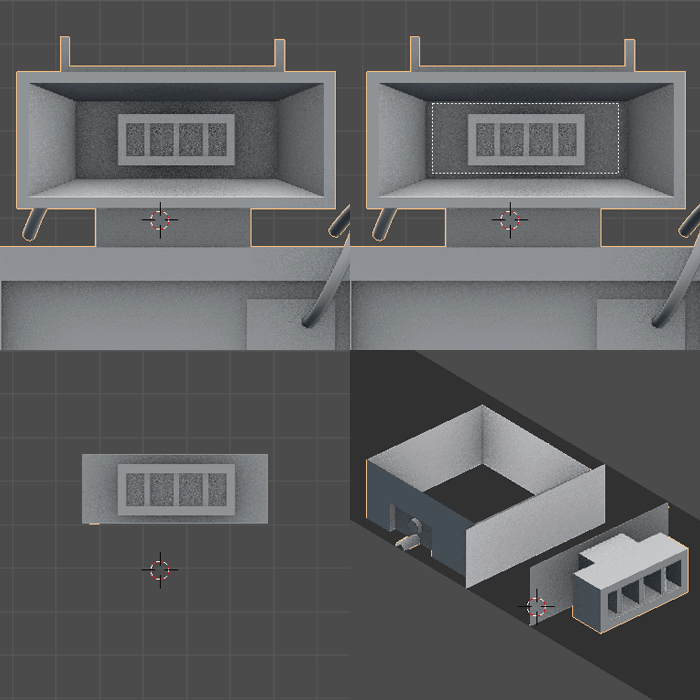
Before Unwraping any object always check your scale is right, if is not 1.00 in X, Y and Z. You need to use Control+A and Apply Scale (1.5.1). When it’s difficult to reach some areas use Alt+B to isolate selection, and to remove use the same shortcut (1.5.2).

1.5.1
1.5.2
1.6 ID Maps
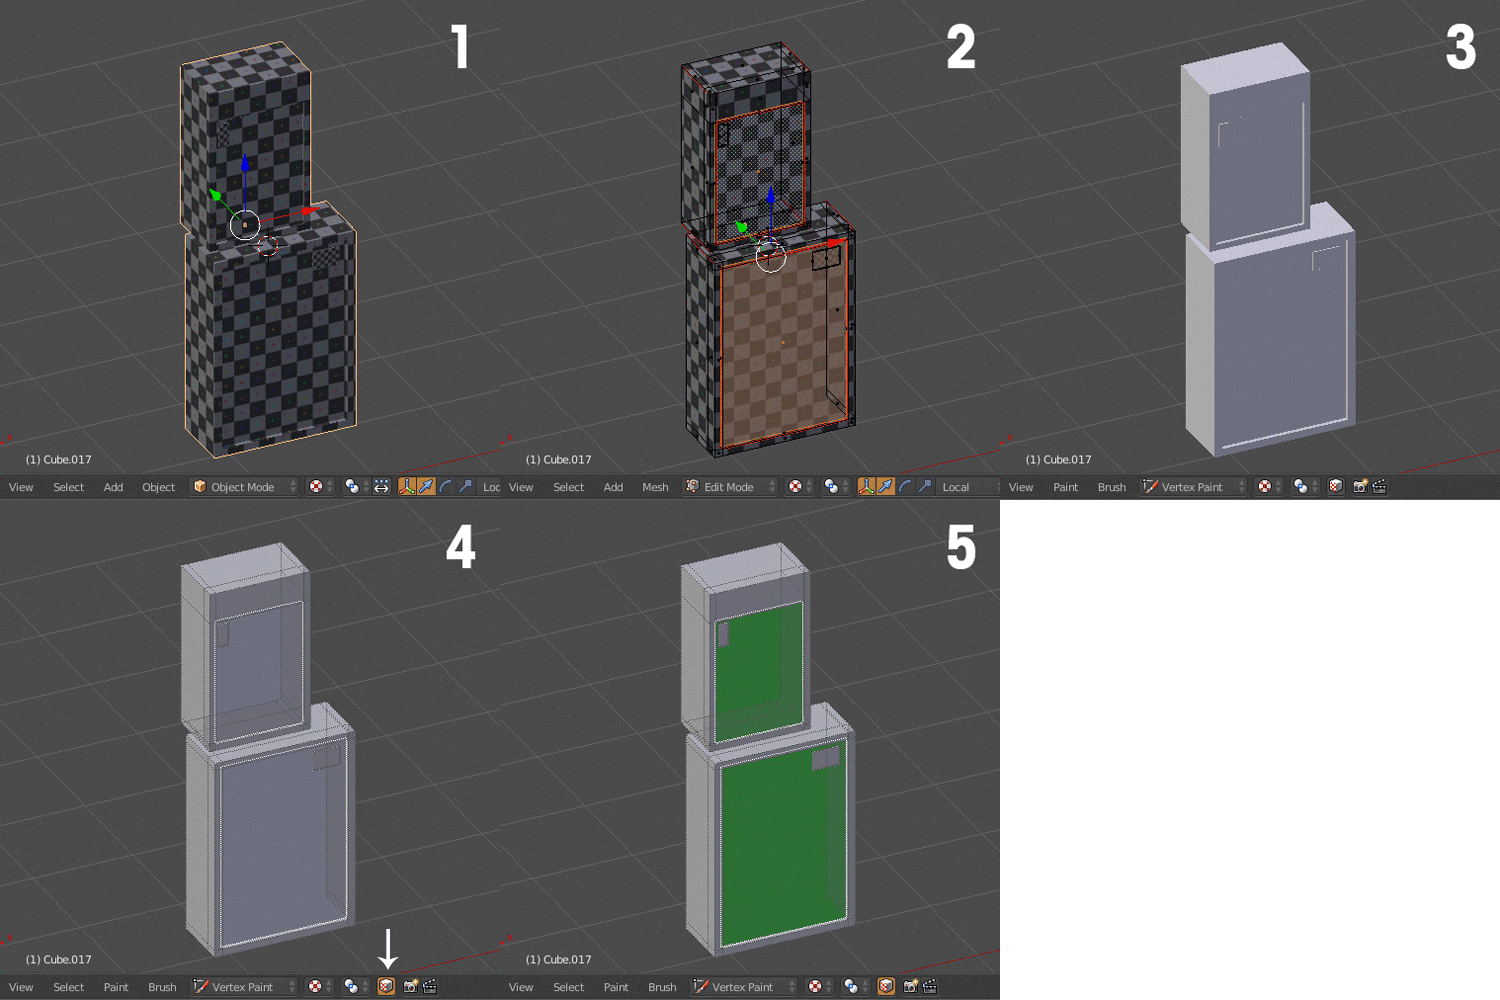
Having ID Maps simplify the task of selecting areas in Substance Painter. First, enter Edit mode (1), then select the faces that you want to be the same material (2), now enter Vertex Paint mode (3), click Face Selection (4), select color, and press Shift+K to apply color (5).
1.7 Export to Substance
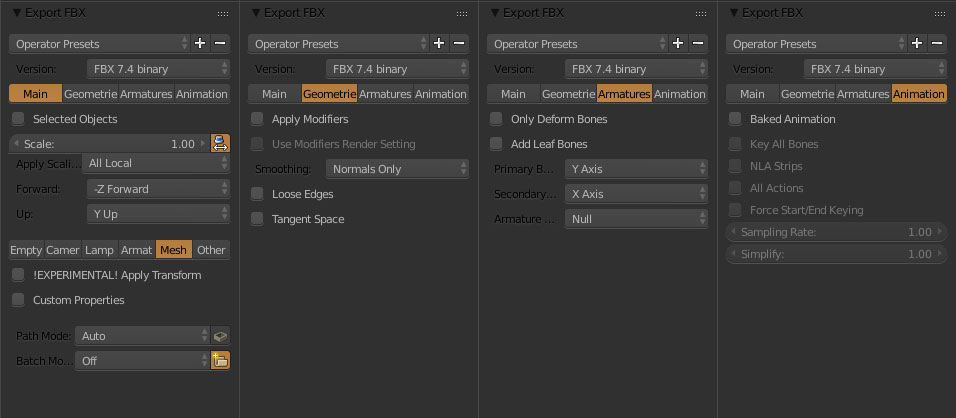
Make a low poly and high poly of the meshes that have Multiresolution, in this case, is the lizard and the brain. Applying a high subdivision level for the High poly, and low subdivision level for the Low poly (1.7.1). Export the complete scene with the Low poly mesh of the Lizard and the Brain, and export the Lizard in high poly and also export the Brain in high poly. Export as FBX (1.7.2)
1.7.1
1.7.2
TIP
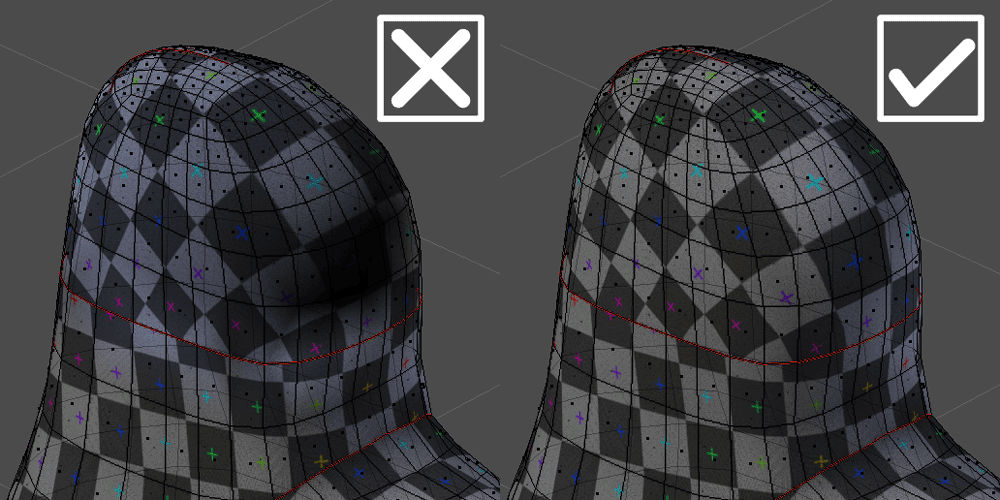
If the mesh shows some dark areas. You need to select the mesh and Recalculate the Normals.
Texturing
Substance Painter 2017.3
2.1 Import from Blender
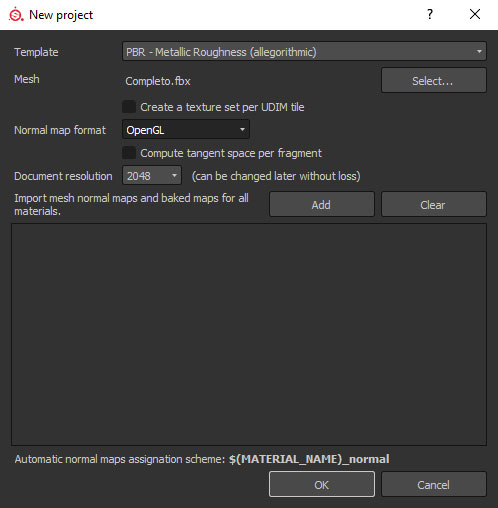
Select PBR – Metallic Roughness (Allegorithmic), and for the mesh select the complete scene with the low polys of the Lizard and the Brain. It’s very important to select OpenGL in the normal map format. For the document resolution, I use 2048, but you can choose lower or higher depending on your PC specs.
2.2 Baking
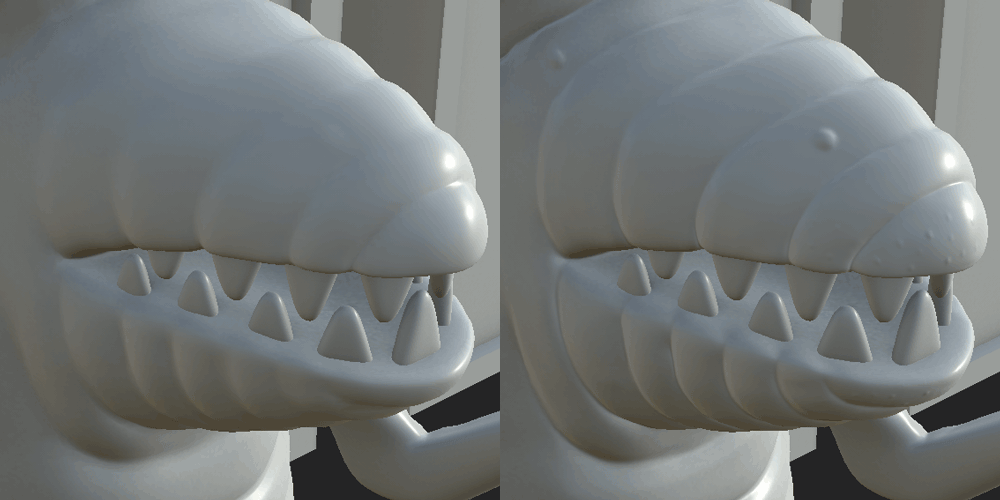
I keep all the boxes checked except Normal, and press Bake all Textures Sets (2.2.1). This will take some time. For the Lizard its necessary to have selected only this mesh and bake, but this time select only Normal and add the high poly of the lizard. Finally press Bake “Mesh Name” Textures (2.2.3). You can see the difference between the low poly with and without the Normal Map. (2.2.2)
2.2.2
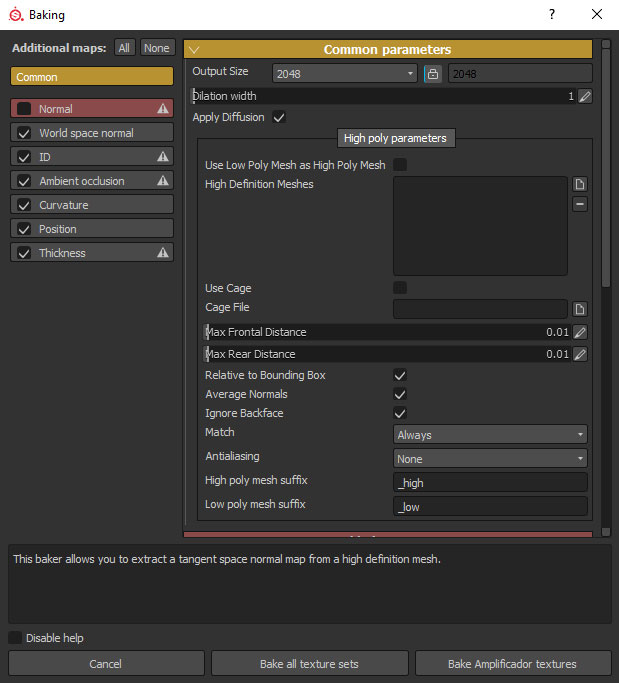
2.2.1
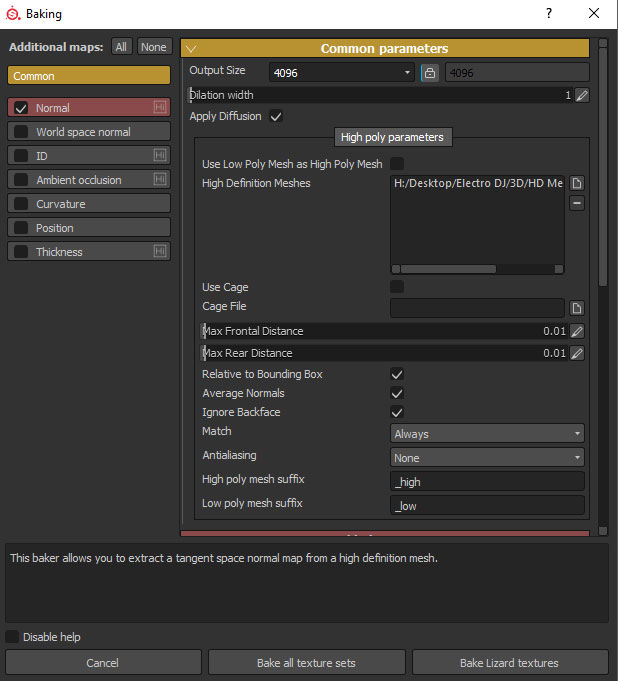
2.2.3
2.3 Material Selection
To select by ID Map you need to use Add Mask with Color Selection (2.3.1) and select the area that you want (2.3.2).
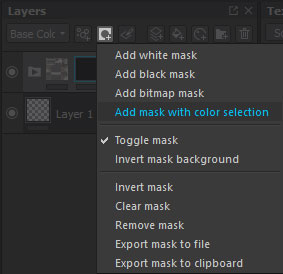
2.3.1
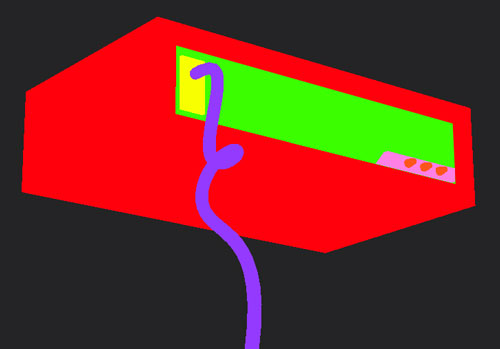
2.3.3
2.4 Roughness
To give the dimmer looking highlights the roughness makes the trick. Press Roughness on the properties (1), type grunge (2), and select it (3), the map is loaded, use the UV Scale to have the right aspect (4). You can see the mesh with and without the Roughness texture (2.4.2).
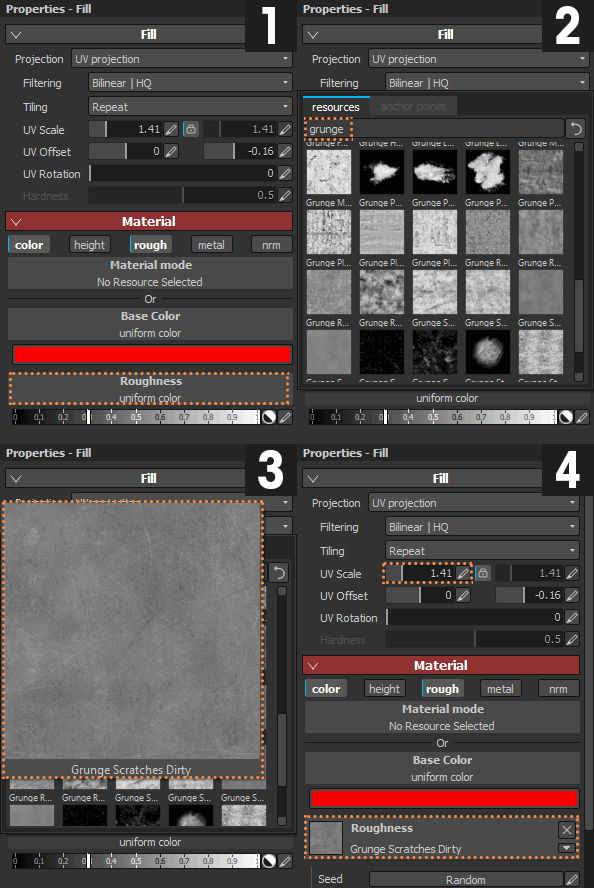
2.4.1
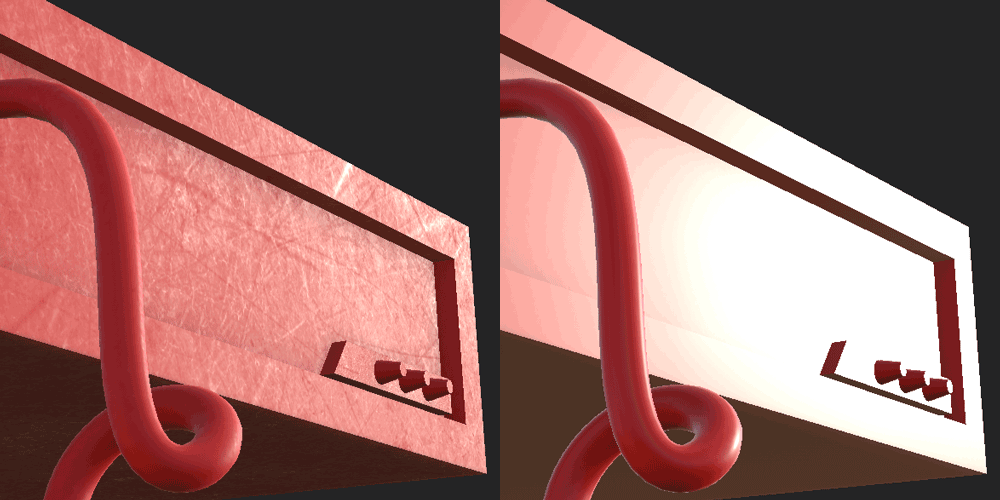
2.4.2
2.5 Import Alpha
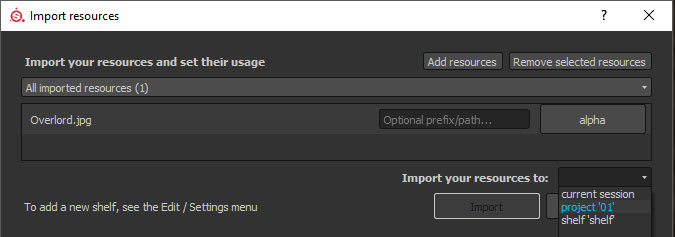
Use alphas to make height maps, emissive and other effects (2.5.1). Jpg of 2048 x 2048. To add alphas go to File > Import Resource, click on Add resources and select your alphas. Select all your alphas and change Undefined to Alpha (2.5.2). Then choose to use this alphas every time you open this project (2.5.3).
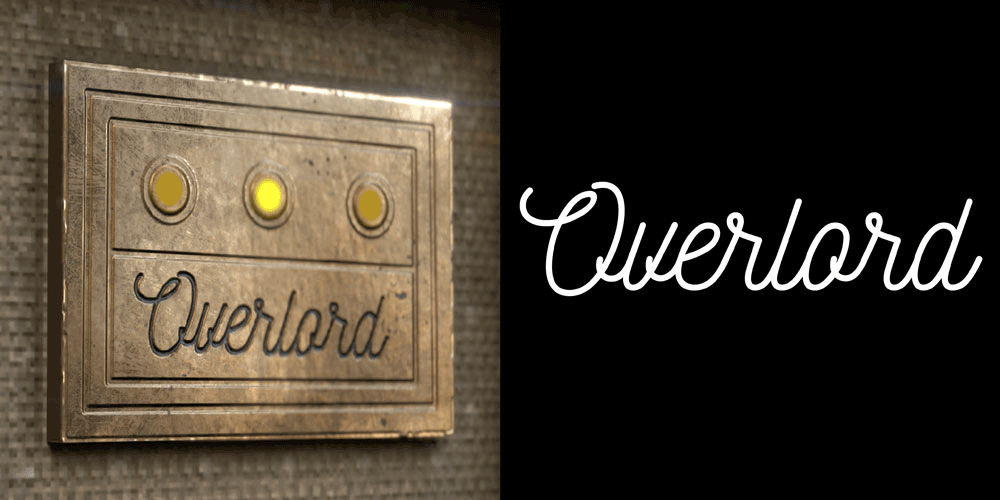
2.5.1
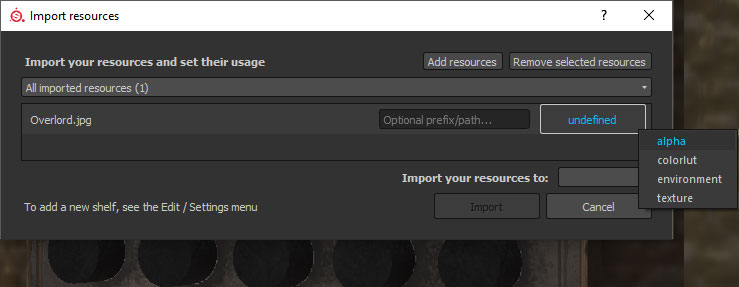
2.5.2
2.5.3
2.6 Bump
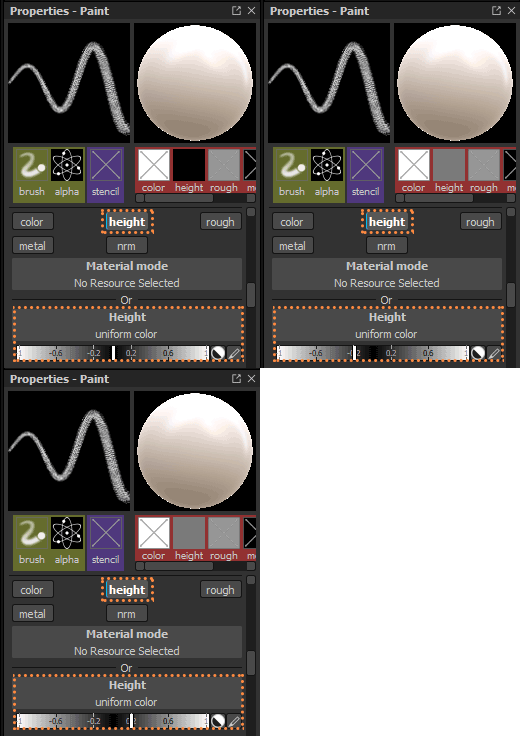
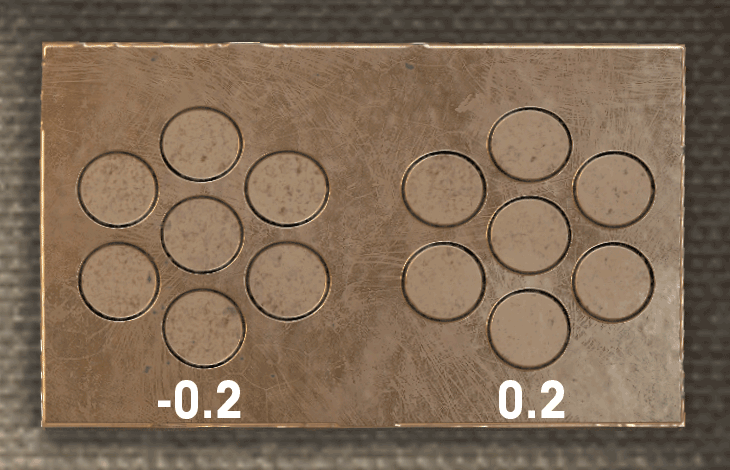
Go to Layers and select Add a Layer(2.6.1), then go to Properties and unselect everything except Height, you also can select the hight number (2.6.2). If a negative number is selected it’s going to be pushed, and if its positive it will be pulled (2.6.3).
2.6.1
2.6.2
2.6.3
2.7 Dirt
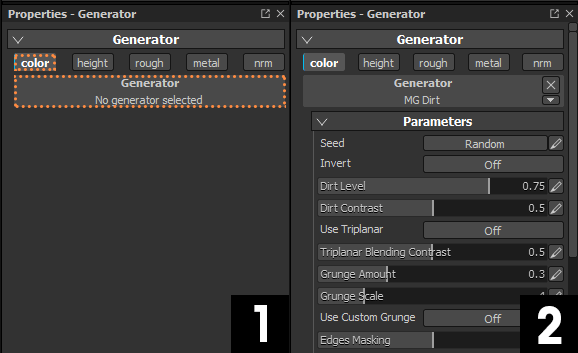
Add a Layer (2.7.1), then Add Generator (2.7.2), Change Normal to Multiply (2.7.3), because I’m using a dark color. In properties deselect everything except Color and click on Generator, select MG Dirt and play with Dirt Level and Contrast (2.7.4).
2.7.1
2.7.2

2.7.3
2.7.4
2.8 Emissive
Tha basic channels are Base Color, Height, Roughness, Metallic and Normal. For getting additional channels like Emissive, Add Emissive in the TextureSet Settings (2.8.1). In the Properties tab, you now have the Emissive channel enabled (2.8.2). This image shows the Emissive channel applied (2.8.3).
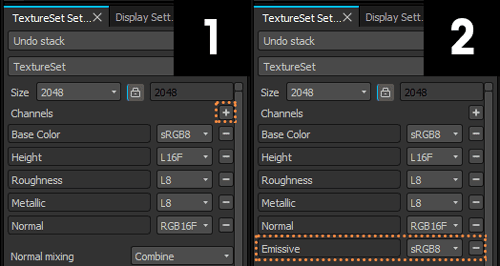
2.8.1
2.8.2
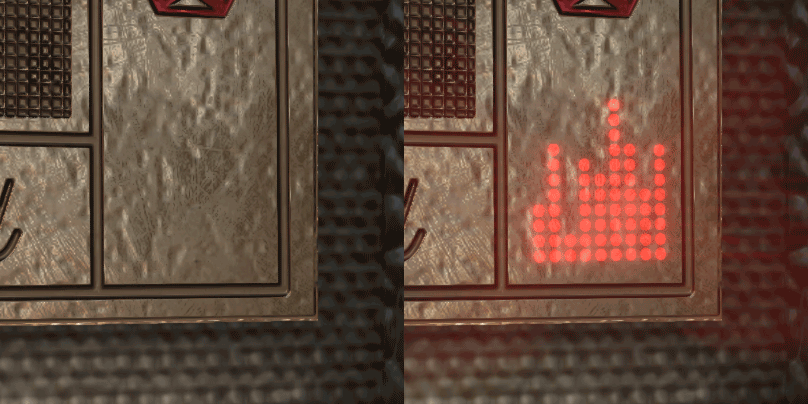
2.8.3
2.9 Export Maps to Blender
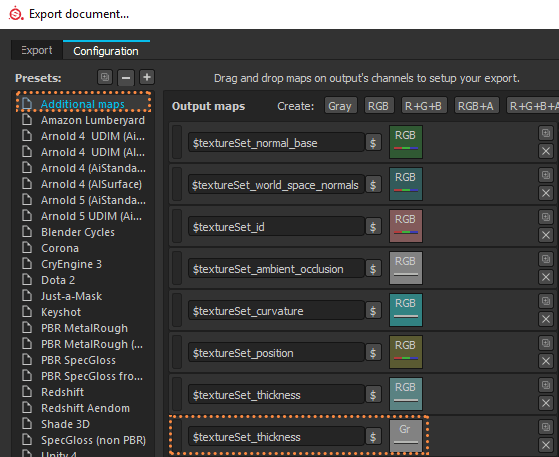
To export our textures go to File > Export Textures or press Control+Shift+E (2.9.1), Make a new Preset for Blender that adds Ambien Oclussion and Emissive maps (2.9.2), and Export. And then using the Additional Maps Presets to Export the Thickness (2.9.3), that will be used for the SSS of the lizard.
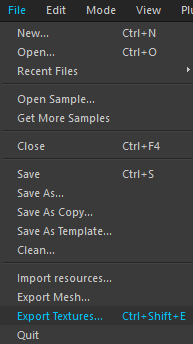
2.9.1
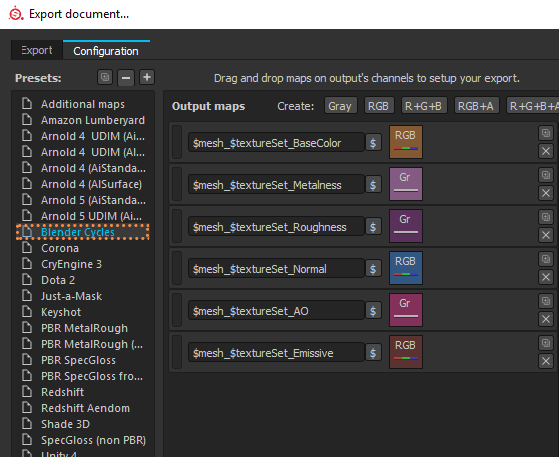
2.9.2
2.9.3
Rendering
Blender 2.79 & Photoshop CC
3.1 Principled BSDF
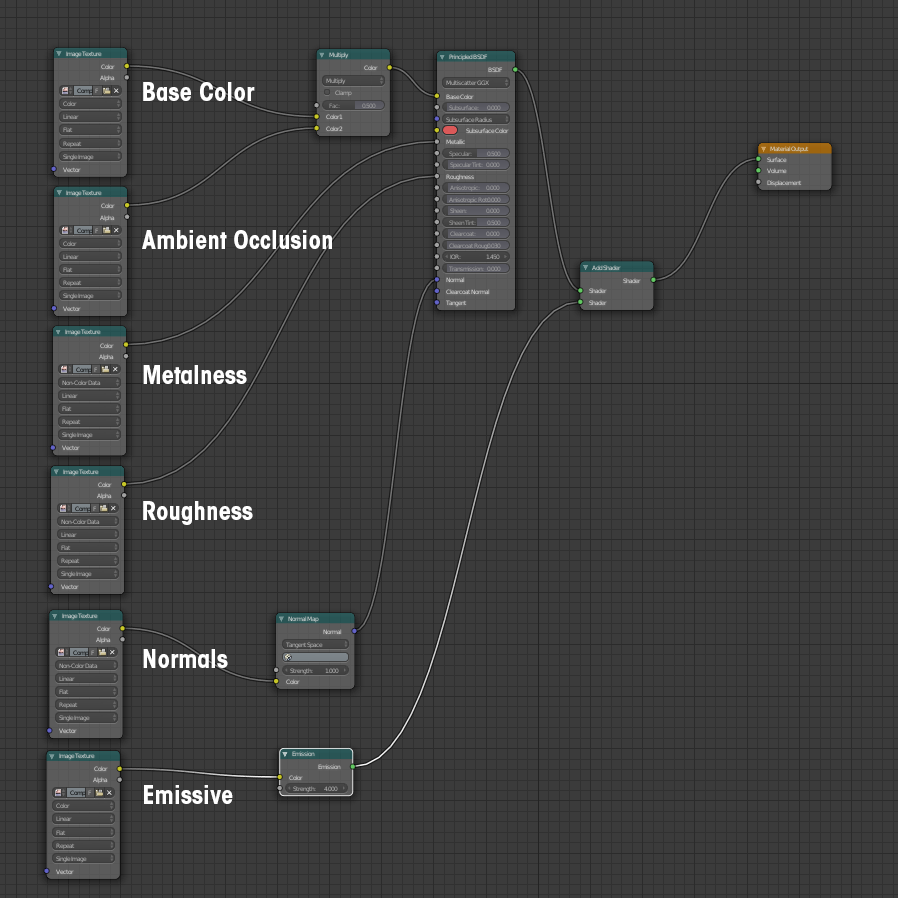
This shader is based on the Disney PBR, and looks amazing! For this to work out. Multiply the Base Color Map and Ambien Occlusion Map, Metalness, Roughness and Normal maps set to Non-Color Data. Normal has to use NormalMap Node to work correctly. The Emissive Map also needs the Emission Node And mix with AddShader PrincipledBSDF and Emission Nodes. Its kind of complex on text but easy on the image.
3.2 HDRI
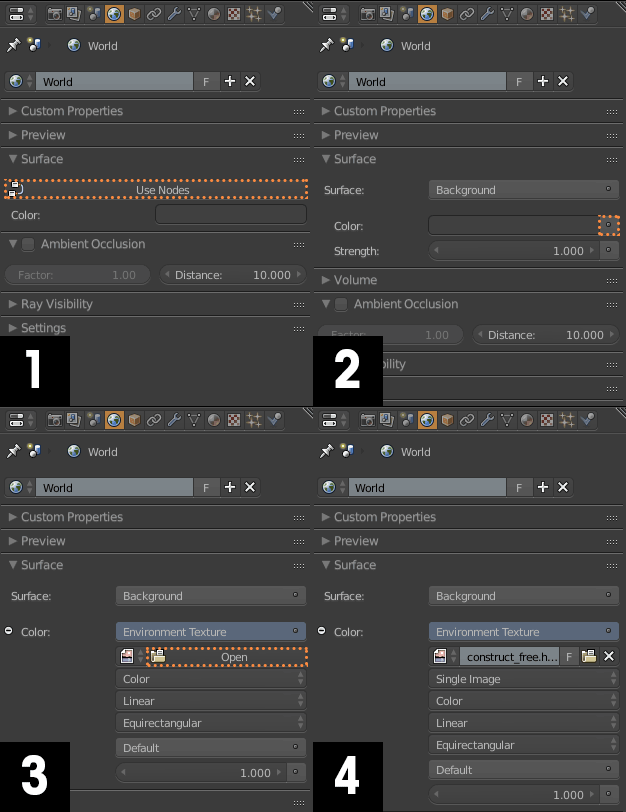
High Dynamic Range Imaging it is just necessary to get a realistic look. To use on Blender go to World and Press Use Nodes (1), click on the Color Dot (2), Select Environment Texture (3), Now we have an HDRI (4). On the Node Editor add the Texture Coordinate and Mapping to rotate the HDRI. On the Background Node use 0.2 of Strength (3.2.2).
3.2.1

3.2.2
3.3 Illumination
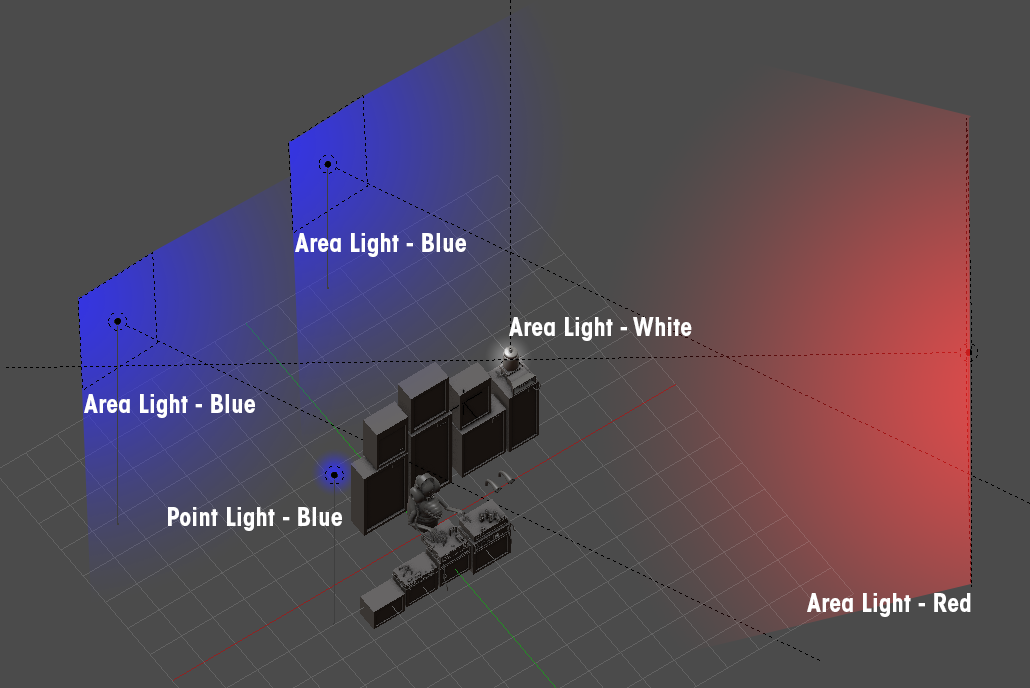
One big red area light on the front, two medium blue area lights on the back, one small white area light on the brain mesh and one blue point light over the lizard.
3.4 Depth of Field
To use DOF on blender insert a camera, add an empty object on Focus, and play with Size. 0.1 is a good starting point.

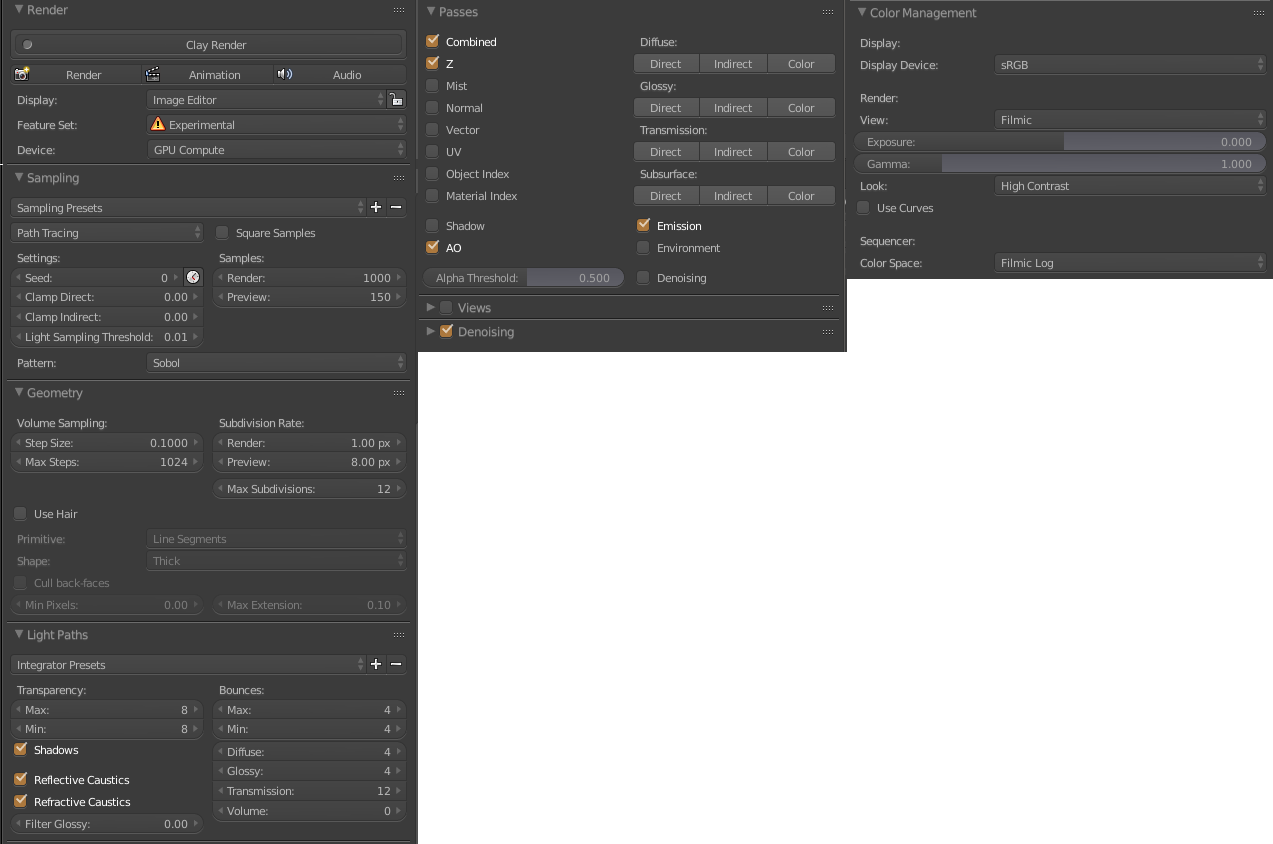
3.5 Global Settings
The basic settings are this. On Render go to Settings and use 1000 samples Max and Min bounce of 4, on Passes add the AO and Emission. Use Filmic on Color Management to give the crisp color.
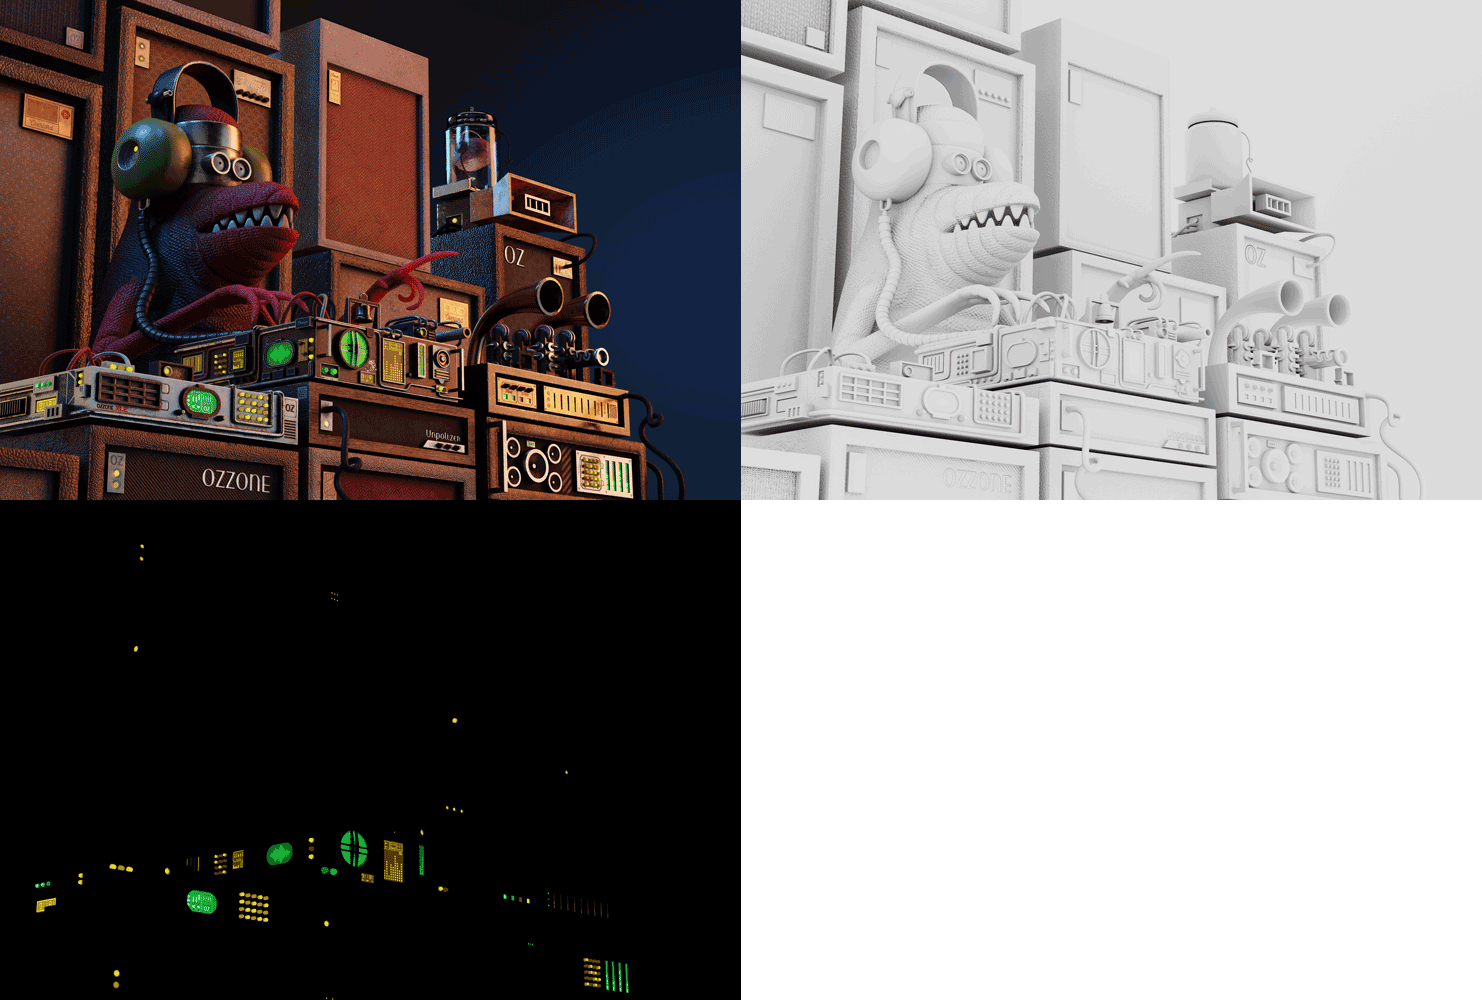
3.6 Pases
Save The Image with F3, the Ambien Occlusion, and Emission.
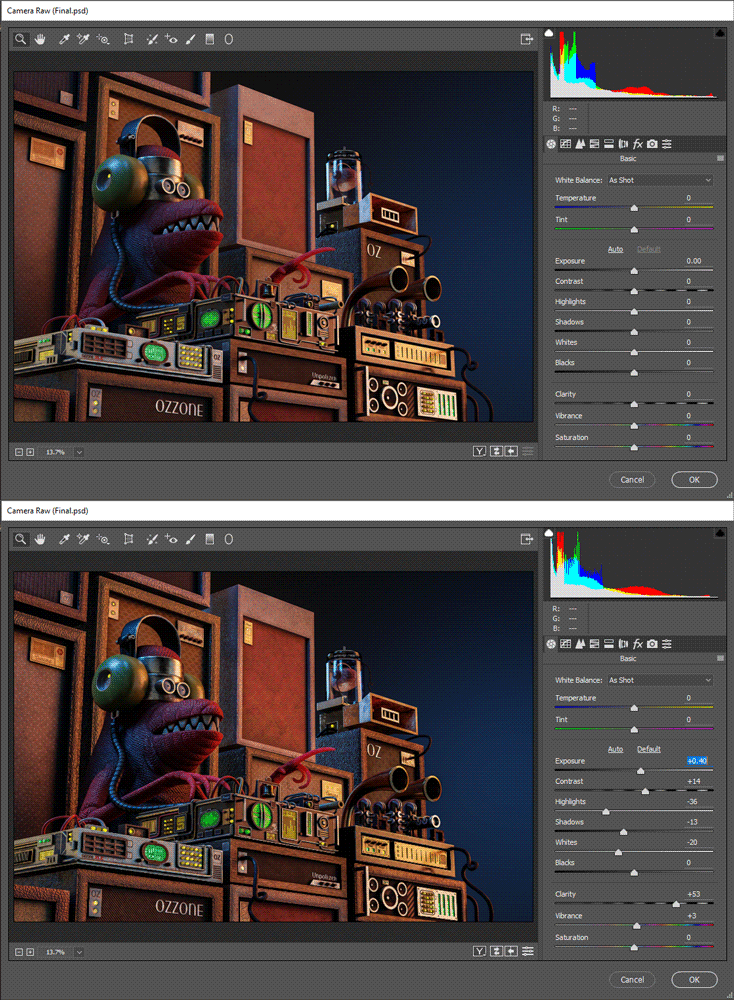
3.7 Post-production
Go to Photoshop, press Control+J to make a copy of the image and use Control+Shift+A to use the Camera Raw Editor to improve the Exposure, Highlights, Clarity and much more.
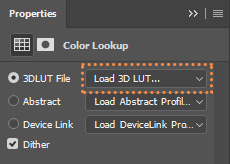
3.8 LUTs
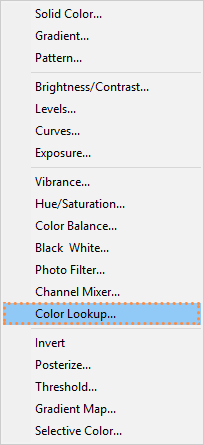
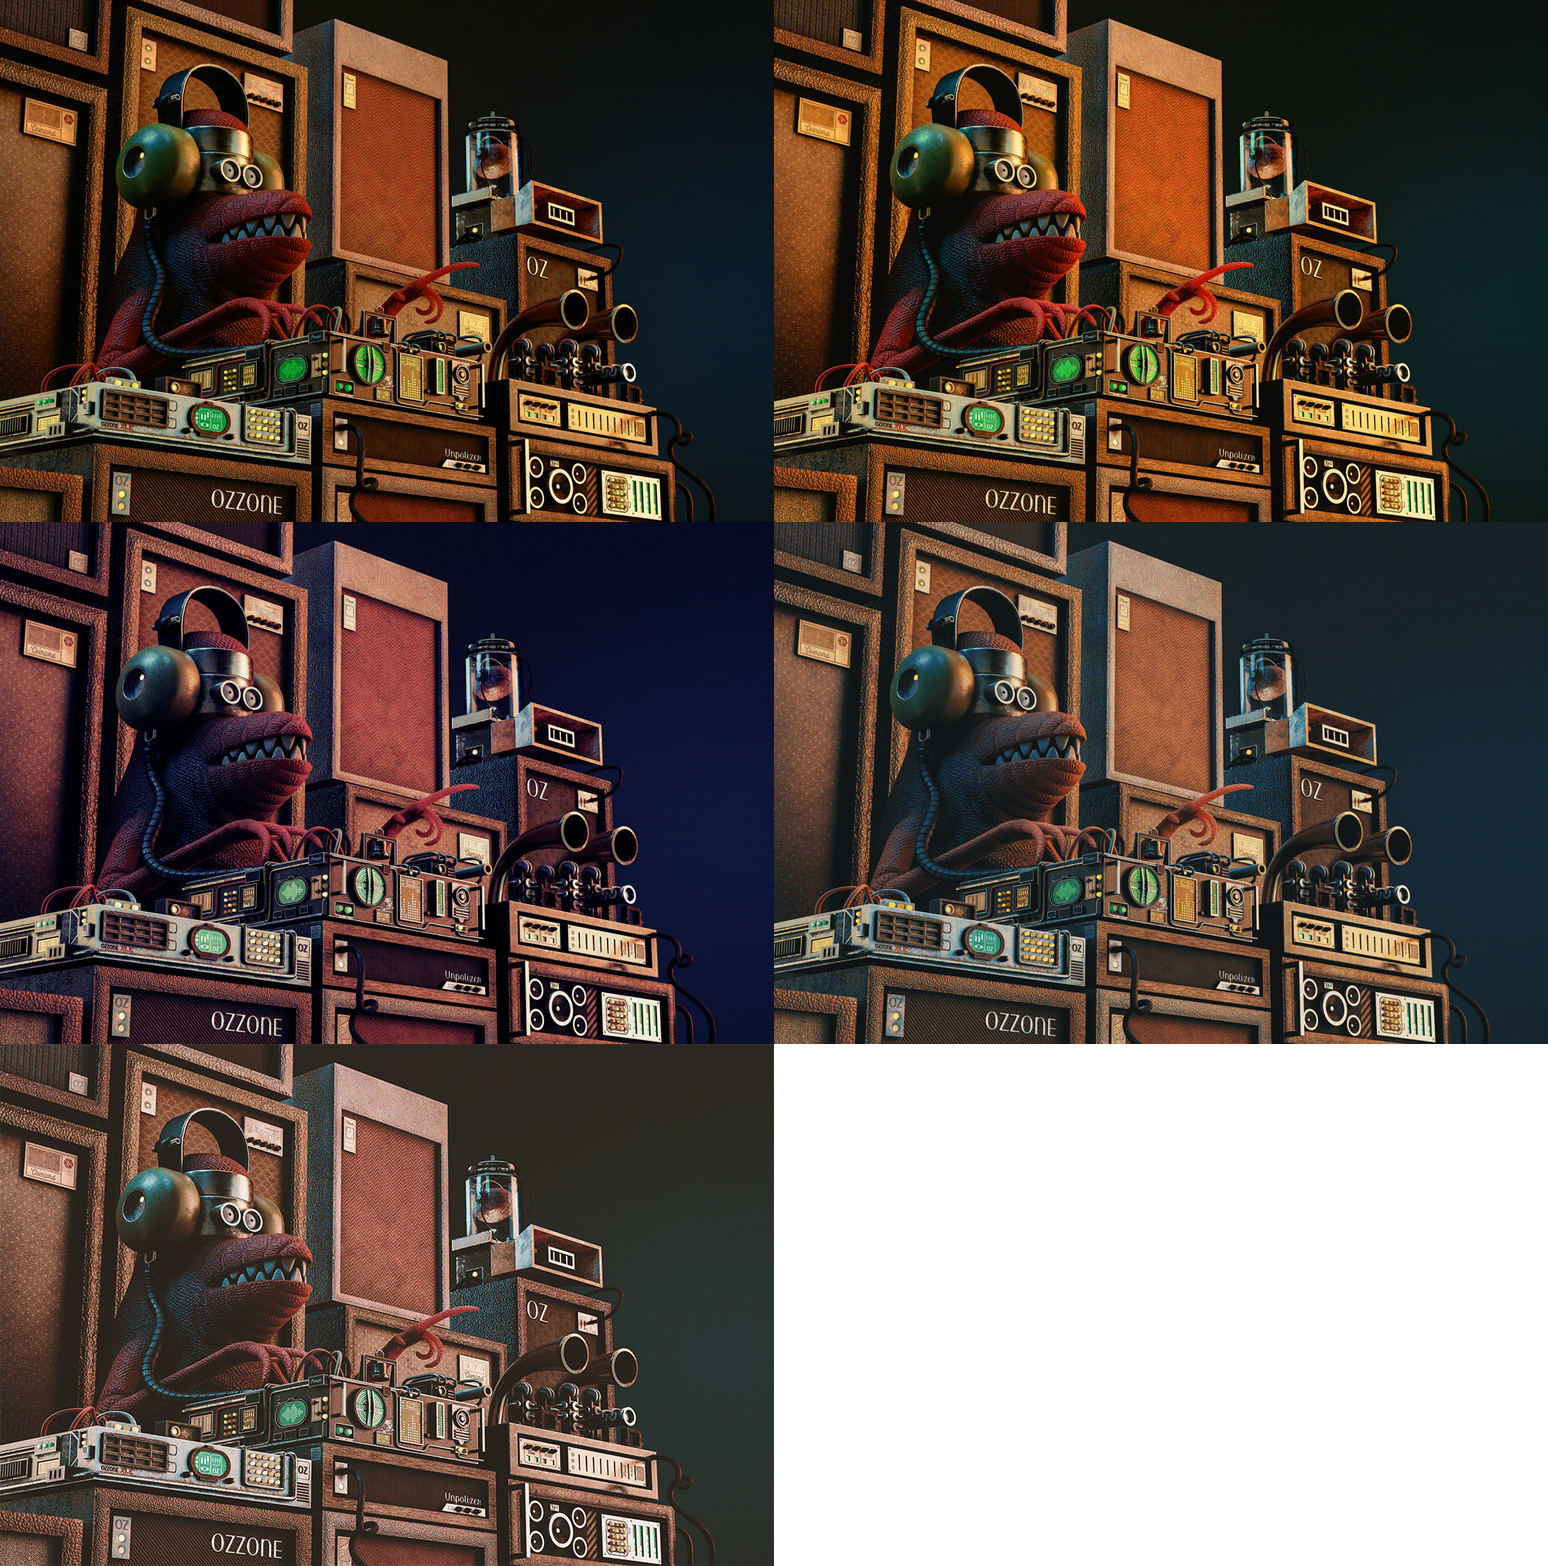
To give a cinematic look, the Look Up Tables (LUTs) are color grading presets. To use them go to Create new or Adjustment Layer (3.8.1), select Color Lookup (3.8.2), Now select one of the presets (3.8.3). I use different LUTs to decide the final one (3.8.4).
3.8.3
3.8.1
3.8.2
3.8.4
Conclusion
This project was my first serious attempt to use Blender and Substance Painter together. I’m really pleased with the result, I want to make something a little more complex. I hope this workflow guide give some light on how to jump between Blender 2.79 and Substance Painter 2017.3 with no hassle. Now that the Substance Painter 2018 is out, you know what is the next guide about. Feel free to give me advice on how to improve the guide or skills, ask me questions or just say hi.
Alex Treviño
